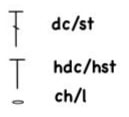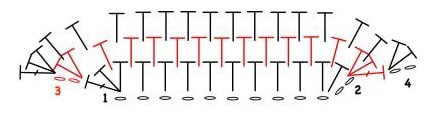
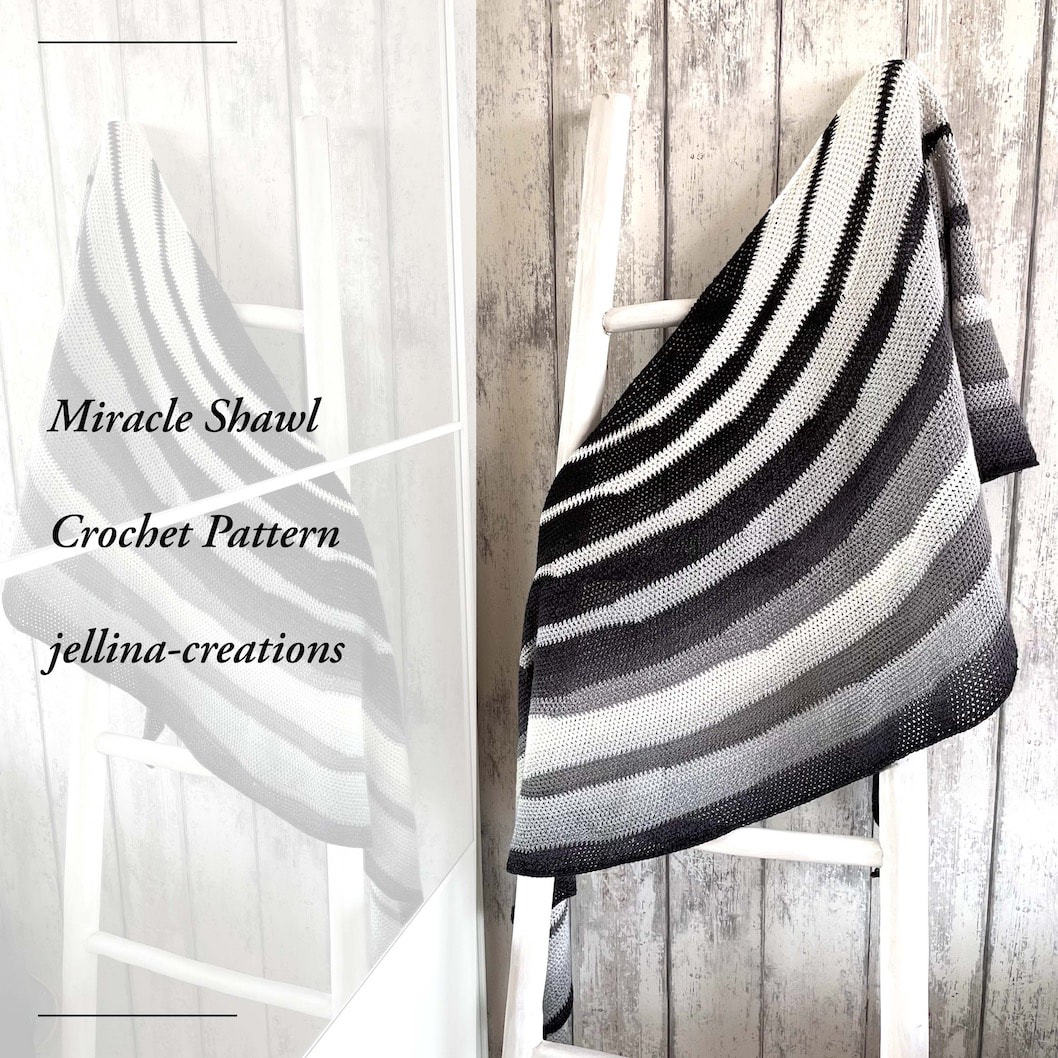
 Here she is, the pattern of the Miracle scarf! A completely free pattern on my blog If you want to download it in your own language without advertising, you can consider purchasing the PDF for a small fee. I hope you enjoy making this scarf as much as I did. Be sure to share your WIPs and final results with us. We are especially curious about your color combinations! ------------------------------------------- Daar is ze dan, het patroon van de Miracle sjaal! Hier op mijn blog is ze gratis te gebruiken. Wil je hem in je eigen taal downloaden zonder reclame's dan kun je overwegen om voor een kleine vergoede de pdf aan te schaffen. Ik hoop dat je er net zoveel plezier beleeft aan het maken van deze sjaal als ik heb gedaan. Deel ook zeker je WIP' s en eindresultaten met ons. We zijn vooral benieuwd naar jullie kleuren combinaties! Materials 1x Wooly Whirl color 472 Sugar Sizzle (30% wool, 70% coton, 215gr, 1000m) or 2x Whirl color 751 Liquorice yum yum (60% coton, 40% acrylic, 215gr, 1000m) Crochet-hook 3.5mm 6 of 9 Stitchmarkers Gauge 22 stitches and 21 rows in hoc with crochet-hook 3.5 will be 10 x 10cm. But a little bigger or smaller will not effect the pattern. Size after blocking Big version with 2 Whirls wil be 248 x 54cm Small version with 1 Whirl wil be 186 x 46cm Stitches and abbreviations (us terms) ch chain stitch hdc half double crochet dc double crochet sc single crochet slst slip stitch st(s) stitch(es) ------------------------------------------- Benodigdheden 1x Wooly Whirl kleur 472 Sugar Sizzle (30% wol, 70% katoen, 215 gram, 1000 meter) of 2x Whirl kleur 751 Liquorice yum yum (60% katoen, 40% acryl, 215 gram, 1000 meter) Haaknaald 3.5mm 6 of 9 Steken markeerders Stekenverhouding 22 steken en 21 rijen volgens patroon met haaknaald 3.5 meten 10 x 10 centimeter. Maar meer of minder is ook niet erg voor het patroon, de stof moet lekker soepel aanvoelen dat is het belangrijkste. Afmeting na blocken Grote versie met 2 Whirl: 248 x 54 centimeter Kleine versie met 1 Whirl 186 x 46 centimeter Gebruikte steken l losse hst half stokje st stokje v vaste hv halve vaste Pattern Notes Working short rows is a technique of working only part of a row to a set of stitches, turning and working back a set of stitches. This way you get beautiful stripes in your shawl. A plus for this design is that you don’t have to count. We use stitch markers at the beginning of every new color change to determine the point where we turn. In this way, it is very relaxed to work on. Below you can see how the scarf is constructed. The base is like many shawls, in this section, you also do the increases as normal. From section A you see that you do not complete the entire round but always return when you are at your stitch marker, on every odd round you go 1 stitch marker further until you reach the end. And then the odd rows you go back to your starting point. You will see that after section A your scarf will have a kind of bulge on the side and section B will make the scarf moon-shaped again. This keeps repeating itself. ----------------------------------------------- Opmerkingen Voor deze sjaal wordt gebruik gemaakt van verkorte toeren, wat wil zeggen dat de toeren niet helemaal worden afgehaakt maar je keert voortijdig je werk. Op deze manier krijg je mooie kleurbanen in je shawl. Een pluspunt voor het haken van deze shawl is dat je niet hoeft te tellen. We gebruiken aan het begin van een nieuwe kleur markeerders om op zicht de punten te bepalen waar we keren. Op deze manier is het een heerlijk ontspannen haakwerkje. Hieronder zie je visueel hoe de sjaal is opgebouwd. De basis is zoals bij vele sjaals, in deze sectie moet je ook ‘normaal’ meerderen. Vanaf sectie A zie je dat je niet de gehele toer af haakt maar steeds bij je stekenmarkeerder terug keert, bij elke oneven toer ga je 1 stekenmarkeerder verder tot je aan het eind komt. En dan de oneven toer ga je weer terug naar je start punt. Je zult zien dat je sjaal na sectie A een soort bobbel aan de zijkant krijgt en sectie B maakt de sjaal weer maanvormig. Dit herhaalt zich steeds. 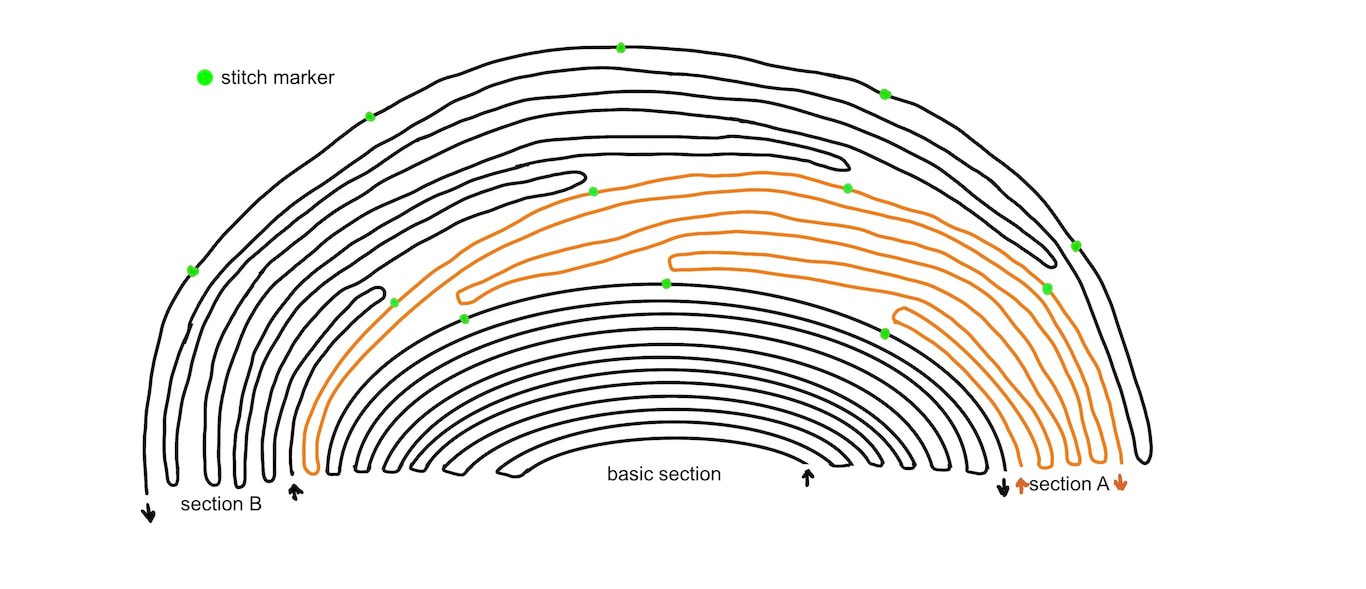 For a large version of this shawl you use 2x a Whirl and for a smaller version only 1 Whirl. The small version is almost completely written out. The large version up to and including the 10th lane, but after that it's easy to continue the pattern because it's just repeating. This shawl is worked in half double crochets which are worked between the stitches, making it a wonderfully relaxed way of crocheting. The first (side) increase (ch 2, 2hdc) always goes in the first st, the first 'regular' hdc always goes between the 3rd last and 2nd last st of the previous round. The last (side) increase (2hdc,1dc) always goes between the last hdc and the ch2 from the previous round. This increases in your crochet work are done during turning your work. The first ch 2 counts as a stitch. --------------------------------------------------------- Voor een grote versie van deze shawl gebruik je 2x een Whirl en voor een kleinere versie slechts 1 Whirl. De kleine versie is (bijna) helemaal uitgeschreven. De grote versie tot en met de 10e baan maar hierna is het eenvoudig het patroon te vervolgen, omdat het alleen maar herhalingen zijn. Deze shawl wordt gehaakt in halve stokjes welke tussen de steken wordt gehaakt, dit maakt het een heerlijk relaxte manier van haken. De eerste (zijkant)meerdering (2l, 2hst) gaat altijd in de eerste steek, het eerste ‘gewone’ hst gaat altijd tussen de 3e laatst en 2e laatste steek van de vorige toer. De laatste (zijkant)meerdering (2hst,dc) gaat altijd tussen het laatste hst en de 2l van de vorige toer. De meerderingen in je haakwerk worden tijdens je keer punten gedaan. De eerste 2l tellen mee als steek. Skip betekend sla over
Pattern For the version with 2 Whirls: Color A is from dark to light Color B is from light to dark For the version with 1 Whirl Color A is from the center Color B is from the outside The base with color A Row 1 ch 22 Row 2 (2hdc) in 3rd ch from hook, 18hdc, (2hdc, 1dc). [24] Row 3 (ch2, 2hdc), 21hdc, (2hdc, 1dc). [27] Row 4 (ch2, 2hdc), 7hdc, (2hdc), 8hdc, (2hdc), 7hdc, (2hdc, 1dc). [32] Row 5 (ch2, 2hdc), 12hdc, (2hdc), 3hdc, (2hdc), 12hdc, (2hdc, 1dc). [37] Row 6 (ch2, 2hdc), 7hdc, (2hdc), 18hdc, (2hdc), 7hdc, (2hdc, 1dc). [42] Row 7 (ch2, 2hdc), 12hdc, (2hdc), 13hdc, (2hdc), 12hdc, (2hdc, 1dc). [47] Row 8 (ch2, 2hdc), 7hdc, (2hdc), 28hdc, (2hdc), 7hdc, (2hdc, 1dc). [52] Row 9 (ch2, 2hdc), 22hdc, (2hdc), 3hdc, (2hdc), 22hdc, (2hdc, 1dc). [57] Row 10 (ch2, 2hdc), 7hdc, (2hdc), 38hdc, (2hdc), 7hdc, (2hdc, 1dc). [62] Row 11 (ch2, 2hdc), 22hdc, (2hdc), 13hdc, (2hdc), 22hdc, (2hdc, 1dc). [66] Cut A Fold your work in half and place a stitch marker in the middle, fold the points towards the middle and place a stitch marker in the middle as well. You now have a stitch marker in 3 places, apparently equal distances from each other -------------------------------------------- Werkbeschrijving Voor de versie met 2 Whirls: Kleur A is van donker naar licht Kleur B is van licht naar donker Voor de versie met 1 Whirl Kleur A is vanuit het midden Kleur B is vanaf de buitenkant De basis met kleur A Rij 1 22 lossen Rij 2 (2hst) in 3e losse van haaknaald, 18hst, (2hst, 1st). [24] Rij 3 (2l, 2hst), 21hst, (2hst, 1st), kl. [27] Rij 4 (2l, 2hst), 7hst, (2hst), 8hst, (2hst), 7hst, (2hst, 1st). [32] Rij 5 (2l, 2hst), 12hst, (2hst), 3hst, (2hst), 12hst, (2hst, 1st). [37] Rij 6 (2l, 2hst), 7hst, (2hst), 18hst, (2hst), 7hst, (2hst, 1st). [42] Rij 7 (2l, 2hst), 12hst, (2hst), 13hst, (2hst), 12hst, (2hst, 1st). [47] Rij 8 (2l, 2hst), 7hst, (2hst), 28hst, (2hst), 7hst, (2hst, 1st). [52] Rij 9 (2l, 2hst), 22hst, (2hst), 3hst, (2hst), 22hst, (2hst, 1st). [57] Rij 10 (2l, 2hst), 7hst, (2hst), 38hst, (2hst), 7hst, (2hst, 1st). [62] Rij 11 (2l, 2hst), 22hst, (2hst), 13hst, (2hst), 22hst, (2hst, 1st). [66] Knip A af Vouw je werk dubbel en plaats in het midden een steken markeerder, vouw de punten naar het midden en plaats hier ook in het midden een steken markeerder. Je hebt nu op 3 plaatsen, op het oog gelijke afstanden van elkaar een steken markeerder The first section, attach color B Row 1 (ch2, hdc), hdc until you get to 1st stitch marker, 1sc, slst, ch1, turn (Photo 1a) Row 2 skip slst, in next st, the sc from previous round work 1sc, then hdc’s to end, (2hdc, 1dc) in last st. (photo 1b and 1c) ------------------------------------------- De eerste baan, hecht hiervoor kleur B aan. Rij 1 (2l, 2hst), hst tot je bij de 1e steken markeerder komt, 1v, 1hv, 1l, keer je werk (foto 1a) Rij 2 skip hv, in de volgende steek, in de v van de vorige toer haak je een v, en dan hst tot eind, (2hst, 1st) in laatste steek. (foto 1b en 1c) 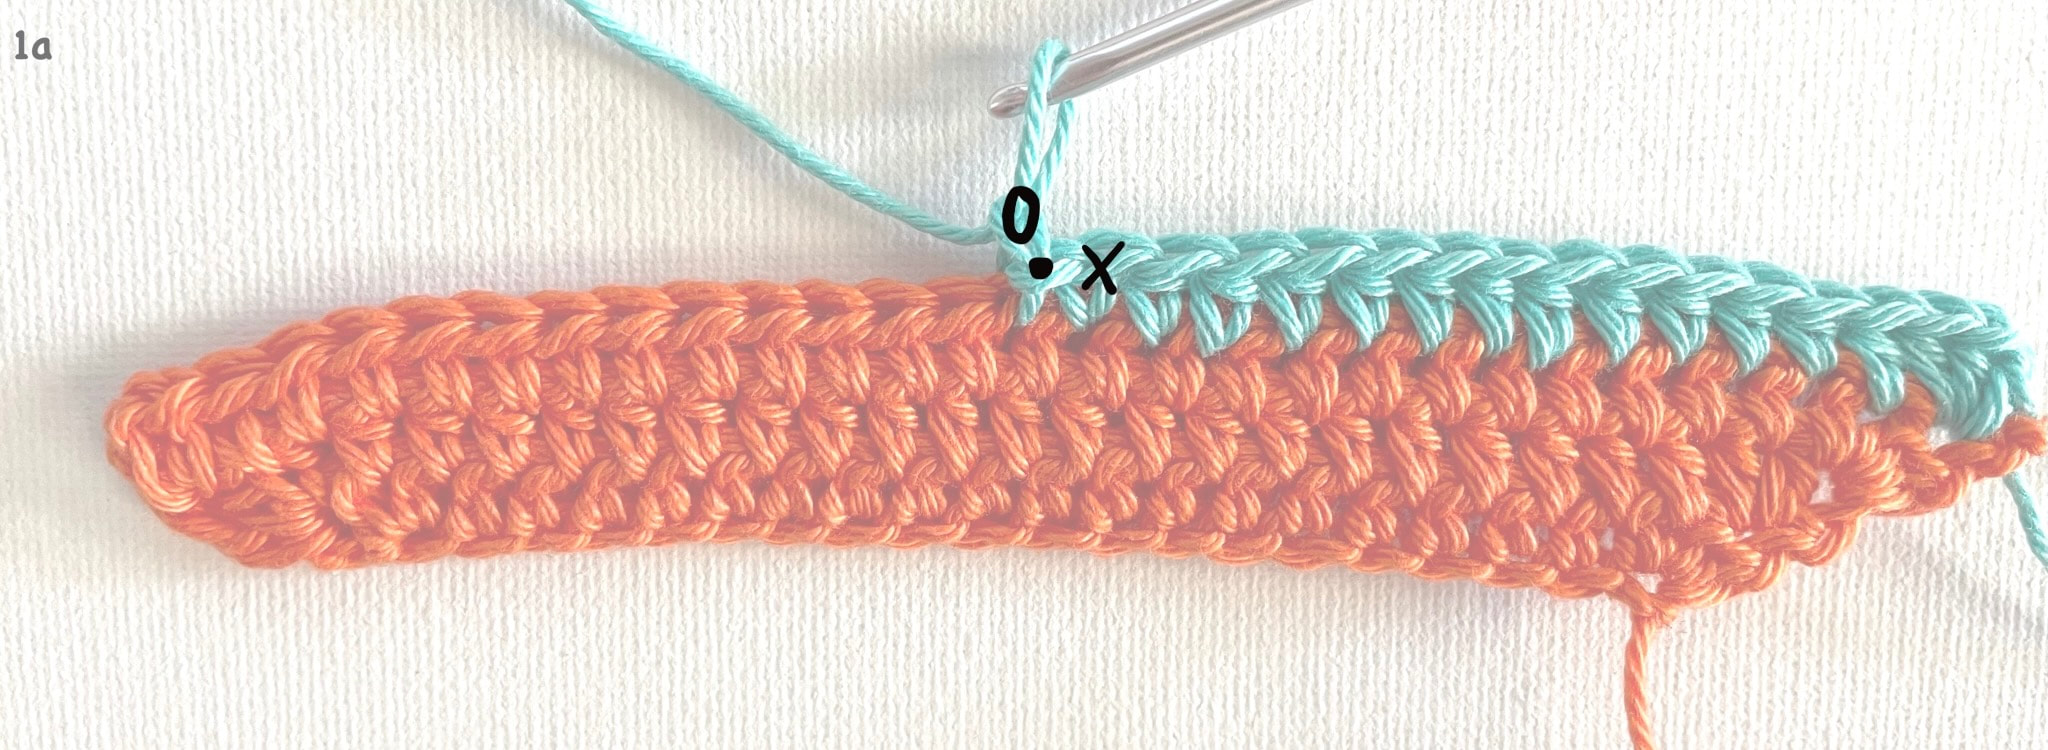 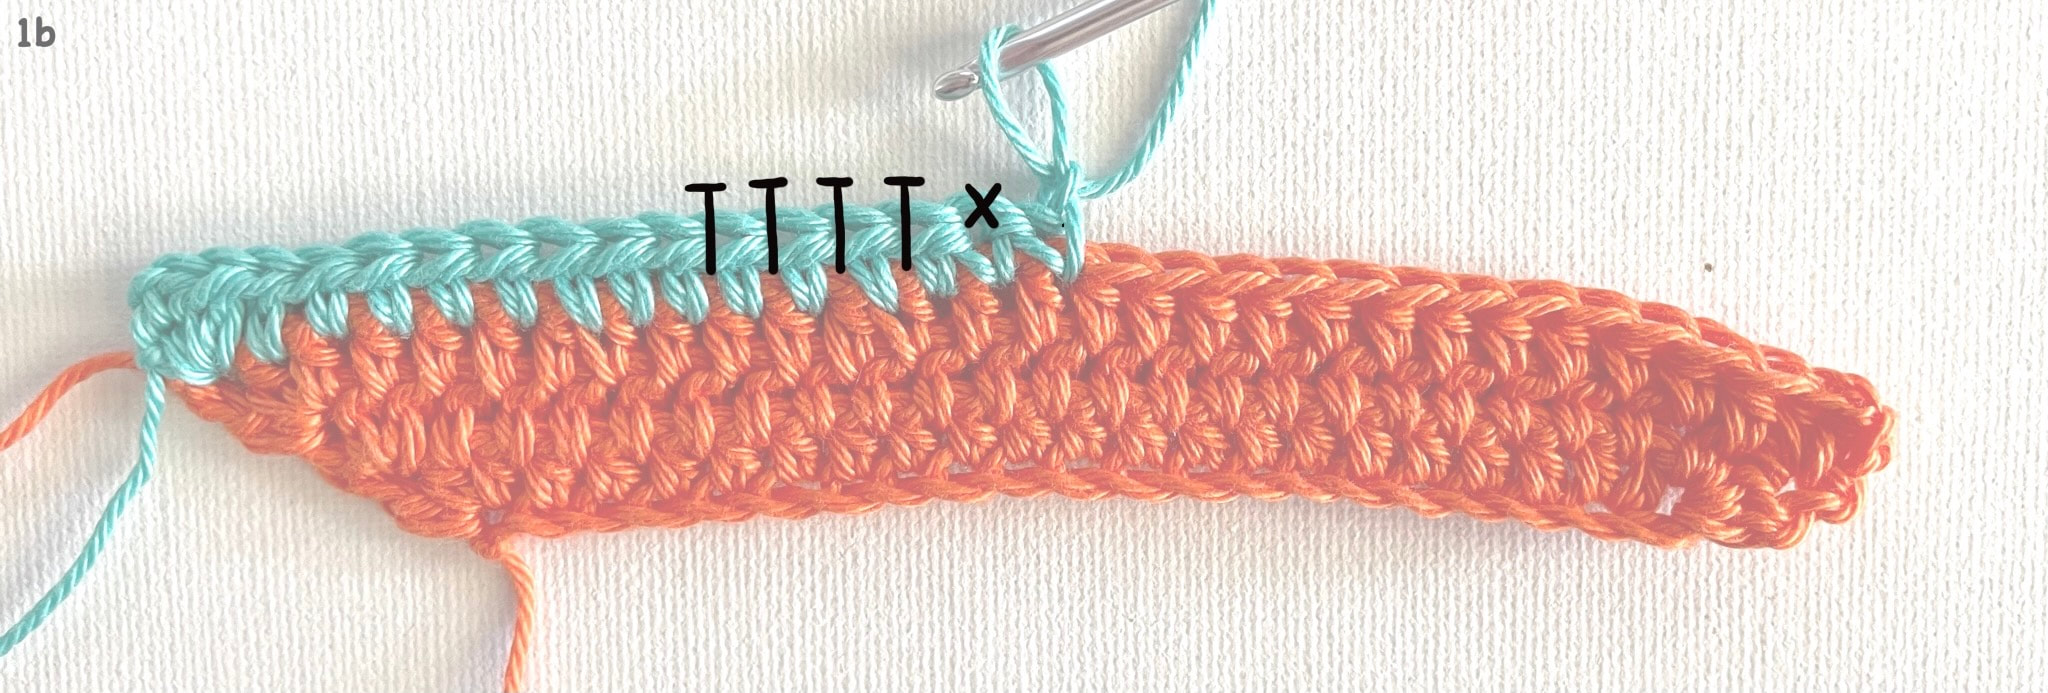 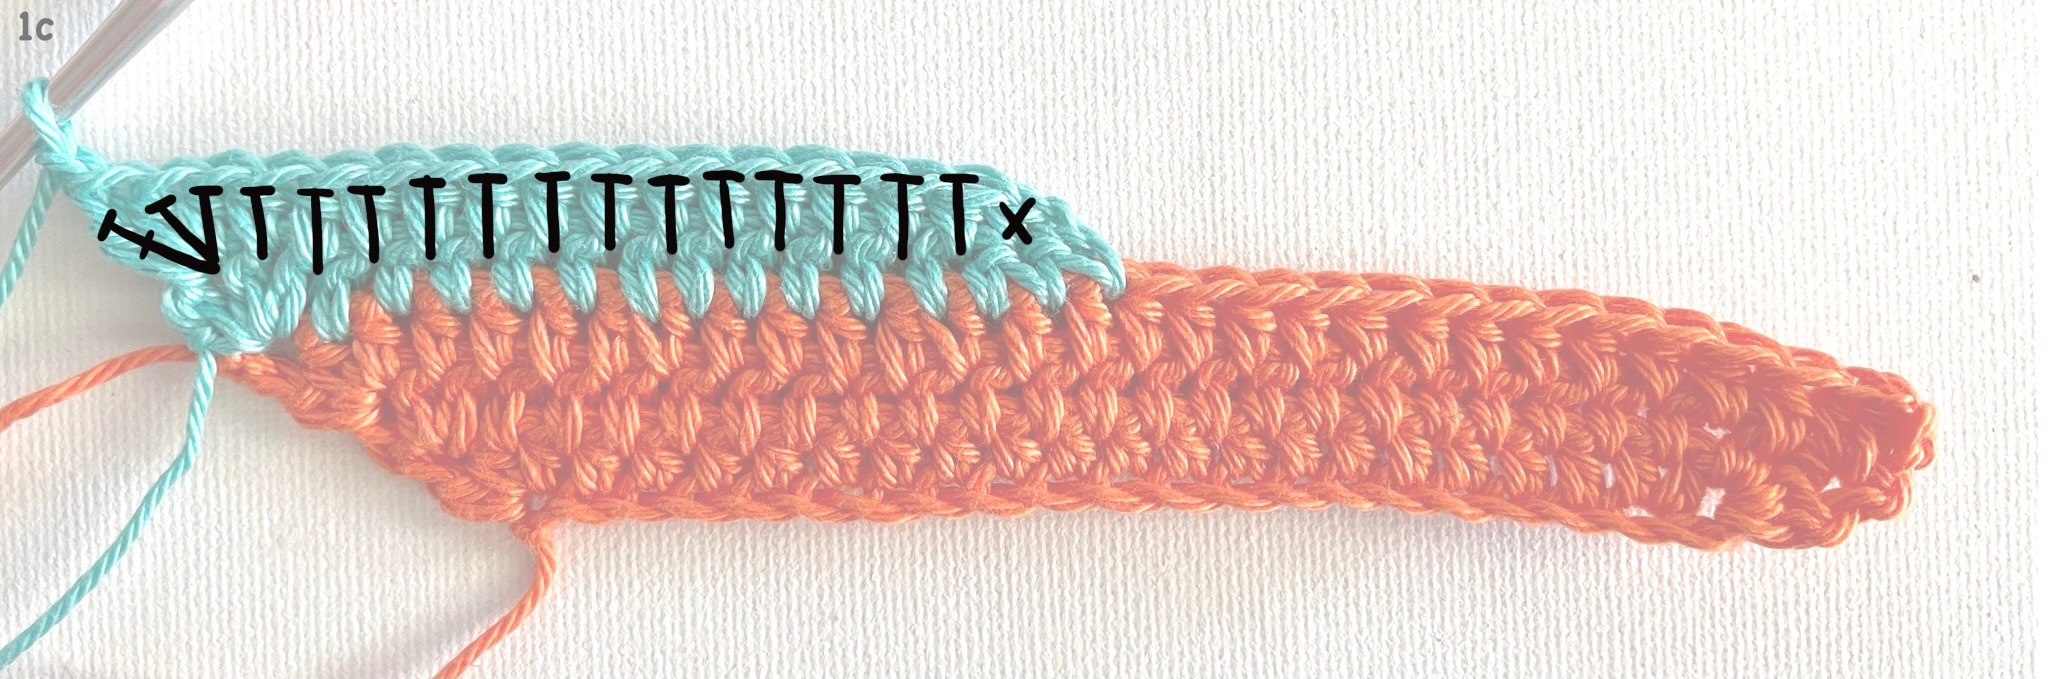 Row 3 (ch 2, 2hdc), hdc until you get to the 2nd stitch marker, attention also work a hdc in dc and slst and around ch from previous round and in hdc from previous section (photo 2a and 2b), Now work a sc, slst and ch 1 and turn your work. -------------------------------------- Rij 3 (2l, 2hst), hst tot je bij de 2e steken markeerder komt, let op haak hierbij ook een hst in de v en hv en l van de vorige toer en in het hst van de vorige baan (foto 2a en 2b), haak nu een v, hv en 1l en keer je werk. 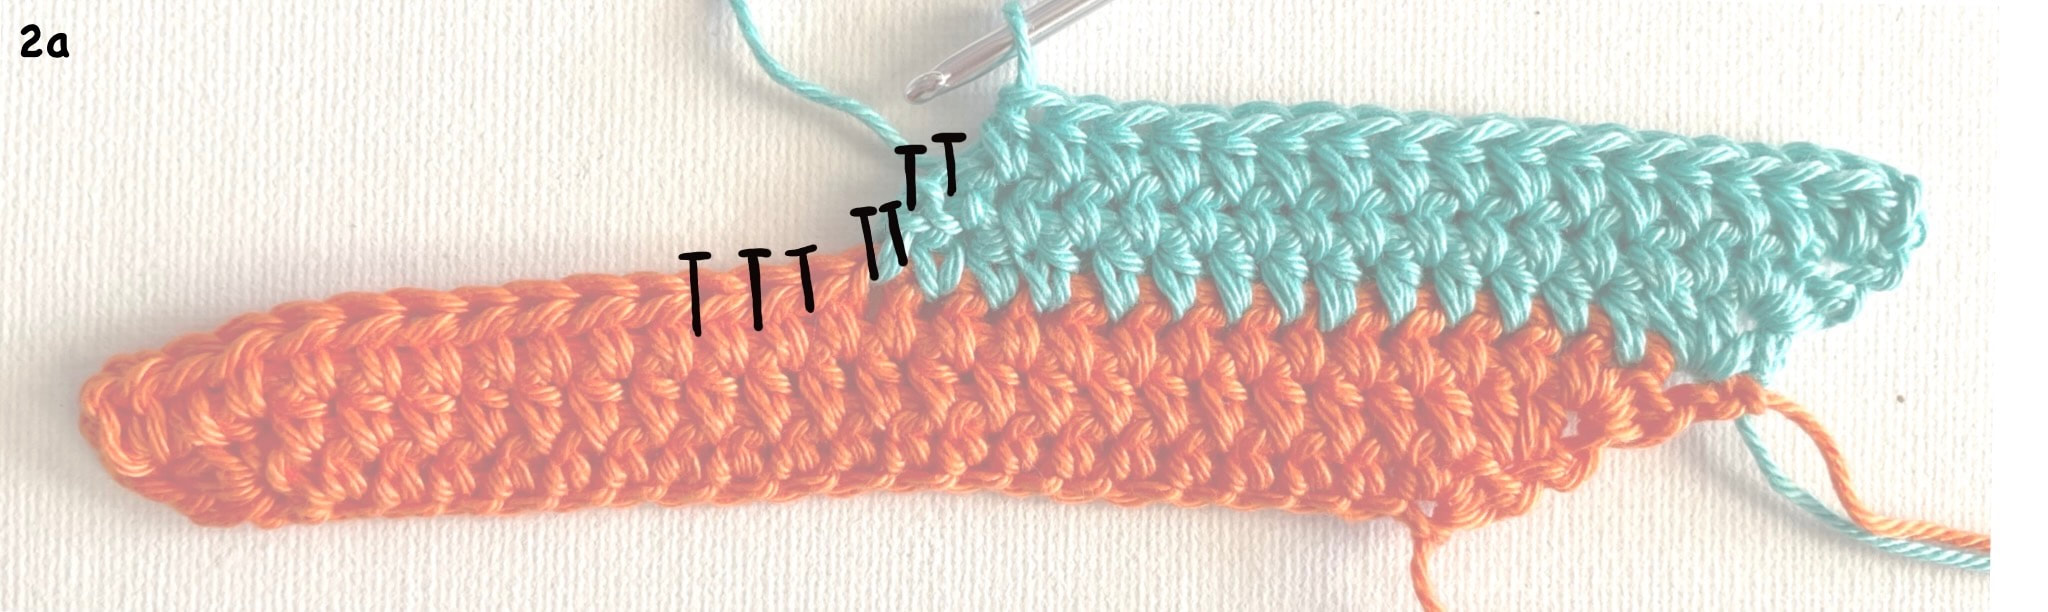 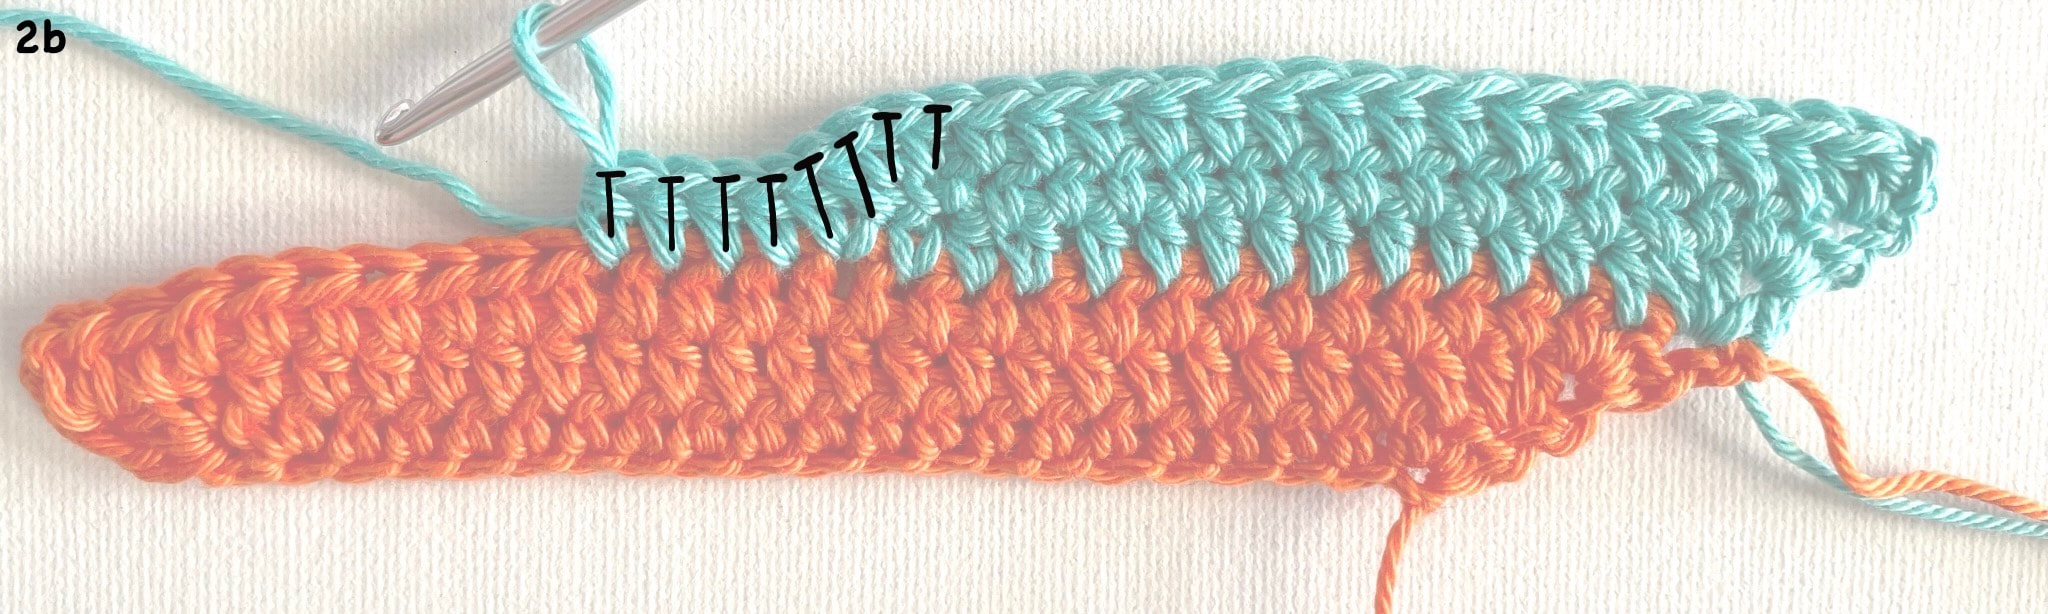 Row 4 Skip slst, in next st, the sc of previous row work 1sc, hdc til end, (2hdc, 1dc) in last st. Row 5 (ch2, 2hdc), hdc until you get to the 3rth stitch marker, attention also work a hdc in dc and slst and in ch from previous row and in hdc from previous section , now work a sc, slst and ch 1 and turn your work. Row 6 Skip slst, in next st, the sc of previous row work 1sc, hdc til end, (2hdc, 1dc) in last st. Row 7 (ch2, 2hdc), hdc till end, attention also work a hdc in dc and slst and in ch from previous round, (2hdc, 1dc) in last st. Row 8 (ch2, 2hdc), hdc til end, (2hdc, 1dc) in last st. Cut yarn B Now, at sight, divide 4 st marker over the sts, this does not have to be very precise. But if you are unsure about this you can measure it. ----------------------------------- Rij 4 skip hv, in de volgende steek, in de v van de vorige toer haak je een v, en dan hst tot eind, (2hst, 1st) in laatste steek. Rij 5 (2l, 2hst), hst tot je bij de 3e steken markeerder komt, let op haak hierbij ook een hst in de v en hv en l van de vorige toer en in het hst van de vorige baan, bij de stekenmarkeerder haak je een v, hv en 1l en keer je werk. Rij 6 skip hv, in de volgende steek, in de v van de vorige toer haak je een v, en dan hst tot eind, (2hst, 1st) in laatste steek. Rij 7 (2l, 2hst), hst tot eind, let op haak ook een hst in de v en hv en l van de vorige toer, (2hst, 1st) in laatste steek. Rij 8 (2l, 2hst), hst tot eind, (2hst, 1st) in laatste steek. Knip B af Verdeel nu, op zicht, 4 steken markeerder over de steken, dit komt niet heel precies. Maar als je hier onzeker over bent kunt je een centimeter gebruiken. The second section, attach color A Row 1 (ch2, hdc), hdc until you get to 1st stitch marker, 1sc, slst, ch1, turn your work. Row 2 skip slst, in next st, the sc from previous round work 1sc, then hdc’s to end, (2hdc, 1dc) in last st. Row 3 (ch 2, 2hdc), hdc until you get to the 2nd stitch marker, attention also work a hdc in dc and slst and around ch from previous round and in hdc from previous section (photo 2a and 2b), Now work a sc, slst and ch 1 and turn your work. Row 4 Skip slst, in next st, the sc of previous row work 1sc, hoc til end, (2hdc, 1dc) in last st. Row 5 (ch2, 2hdc), hdc until you get to the 3th stitch marker, attention also work a hdc in dc and slst and around ch from previous round and in hdc from previous section (photo 2a and 2b), Now work a sc, slst and ch 1 and turn your work. Row 6 Skip slst, in next st, the sc of previous row work 1sc, hdc til end, (2hdc, 1dc) in last st. Row 7 (ch2, 2hdc), hdc until you get to the 4th stitch marker, attention also work a hdc in dc and slst and around ch from previous round and in hdc from previous section (photo 2a and 2b), Now work a sc, slst and ch 1 and turn your work. Row 8 Skip slst, in next st, the sc of previous row work 1sc, hdc til end, (2hdc, 1dc) in last st. Row 9 (ch2, 2hdc), hdc till end, attention also work a hdc in dc and slst and in ch from previous round, (2hdc, 1dc) in last st. Row 10 (ch2, 2hdc), hdc til end, (2hdc, 1dc) in last st. Cut yarn A Now, at sight, divide 4 st marker over the sts, this does not have to be very precise. ----------------------------------------- De tweede baan, hecht kleur A aan aan de andere zijde. Rij 1 (2l, 2hst), hst tot je bij de 1e steken markeerder komt, 1v, 1hv, 1l, keer je werk (foto 1a) Rij 2 skip hv, in de volgende steek, in de v van de vorige toer haak je een v, en dan hst tot eind, (2hst, 1st) in laatste steek. Rij 3 (2l, 2hst), hst tot je bij de 2e steken markeerder komt, let op haak hierbij ook een hst in de v en hv en l van de vorige toer en in het hst van de vorige baan, bij de stekenmarkeerder haak je een v, hv en 1l en keer je werk. Rij 4 skip hv, in de volgende steek, in de v van de vorige toer haak je een v, en dan hst tot eind, (2hst, 1st) in laatste steek. Rij 5 (2l, 2hst), hst tot je bij de 3e steken markeerder komt, let op haak hierbij ook een hst in de v en hv en l van de vorige toer en in het hst van de vorige baan, bij de stekenmarkeerder haak je een v, hv en 1l en keer je werk. Rij 6 skip hv, in de volgende steek, in de v van de vorige toer haak je een v, en dan hst tot eind, (2hst, 1st) in laatste steek. Rij 7 (2l, 2hst), hst tot je bij de 4e steken markeerder komt, let op haak hierbij ook een hst in de v en hv en l van de vorige toer en in het hst van de vorige baan, bij de stekenmarkeerder haak je een v, hv en 1l en keer je werk. Rij 8 skip hv, in de volgende steek, in de v van de vorige toer haak je een v, en dan hst tot eind, (2hst, 1st) in laatste steek. Rij 9 (2l, 2hst), hst tot eind, let op haak ook een hst in de v en hv en l van de vorige toer, (2hst, 1st) in laatste steek. Rij 10 (2l, 2hst), hst tot eind, (2hst, 1st) in laatste steek. Knip A af. Verdeel nu, op zicht, 5 steken markeerder over de steken, dit komt niet heel precies. Maar als je hier onzeker over bent kunt je een centimeter gebruiken. The third section, attach color B on the other side Row 1 (ch2, hdc), hdc until you get to 1st stitch marker, 1sc, slst, ch1, turn your work. Row 2 skip slst, in next st, the sc from previous round work 1sc, then hdc’s to end, (2hdc, 1dc) in last st. Row 3 (ch 2, 2hdc), hdc until you get to the 2nd stitch marker, attention also work a hdc in dc and slst and around ch from previous round and in hdc from previous section (photo 2a and 2b), Now work a sc, slst and ch 1 and turn your work. Row 4 Skip slst, in next st, the sc of previous row work 1sc, hoc til end, (2hdc, 1dc) in last st. Row 5 (ch2, 2hdc), hdc until you get to the 3th stitch marker, attention also work a hdc in dc and slst and around ch from previous round and in hdc from previous section (photo 2a and 2b), Now work a sc, slst and ch 1 and turn your work. Row 6 Skip slst, in next st, the sc of previous row work 1sc, hdc til end, (2hdc, 1dc) in last st. Row 7 (ch2, 2hdc), hdc until you get to the 4th stitch marker, attention also work a hdc in dc and slst and around ch from previous round and in hdc from previous section (photo 2a and 2b), Now work a sc, slst and ch 1 and turn your work. Row 8 Skip slst, in next st, the sc of previous row work 1sc, hdc til end, (2hdc, 1dc) in last st. Row 9 (ch2, 2hdc), hdc until you get to the 5th stitch marker, attention also work a hdc in dc and slst and around ch from previous round and in hdc from previous section (photo 2a and 2b), Now work a sc, slst and ch 1 and turn your work. Row 10 Skip slst, in next st, the sc of previous row work 1sc, hdc til end, (2hdc, 1dc) in last st. Row 11 (ch2, 2hdc), hdc till end, attention also work a hdc in dc and slst and in ch from previous round, (2hdc, 1dc) in last st. Row 12 (ch2, 2hdc), hdc til end, (2hdc, 1dc) in last st. Cut yarn B Now, at sight, divide 6 st marker over the sts, this does not have to be very precise. -------------------------------------------- De derde baan, hecht kleur B aan aan de andere zijde. Rij 1 (2l, 2hst), hst tot je bij de 1e steken markeerder komt, 1v, 1hv, 1l, keer je werk (foto 1a) Rij 2 skip hv, in de volgende steek, in de v van de vorige toer haak je een v, en dan hst tot eind, (2hst, 1st) in laatste steek. Rij 3 (2l, 2hst), hst tot je bij de 2e steken markeerder komt, let op haak hierbij ook een hst in de v en hv en l van de vorige toer en in het hst van de vorige baan, bij de stekenmarkeerder haak je een v, hv en 1l en keer je werk. Rij 4 skip hv, in de volgende steek, in de v van de vorige toer haak je een v, en dan hst tot eind, (2hst, 1st) in laatste steek. Rij 5 (2l, 2hst), hst tot je bij de 3e steken markeerder komt, let op haak hierbij ook een hst in de v en hv en l van de vorige toer en in het hst van de vorige baan, bij de stekenmarkeerder haak je een v, hv en 1l en keer je werk. Rij 6 skip hv, in de volgende steek, in de v van de vorige toer haak je een v, en dan hst tot eind, (2hst, 1st) in laatste steek. Rij 7 (2l, 2hst), hst tot je bij de 4e steken markeerder komt, let op haak hierbij ook een hst in de v en hv en l van de vorige toer en in het hst van de vorige baan, bij de stekenmarkeerder haak je een v, hv en 1l en keer je werk. Rij 8 skip hv, in de volgende steek, in de v van de vorige toer haak je een v, en dan hst tot eind, (2hst, 1st) in laatste steek. Rij 9 (2l, 2hst), hst tot je bij de 5e steken markeerder komt, let op haak hierbij ook een hst in de v en hv en l van de vorige toer en in het hst van de vorige baan, bij de stekenmarkeerder haak je een v, hv en 1l en keer je werk. Rij 10 skip hv, in de volgende steek, in de v van de vorige toer haak je een v, en dan hst tot eind, (2hst, 1st) in laatste steek. Rij 11 (2l, 2hst), hst tot het eind, let op haak ook een hst in de v en hv en l van de vorige toer (2hst, 1st) Rij 12 (2l, 2hst, hst tot eind, (2hst, 1st) in laatste steek. Knip B af. Verdeel nu, op zicht, 6 steken markeerder over de steken, dit komt niet heel precies. The fourth section, attach color A on the other side Row 1 (ch2, hdc), hdc until you get to 1st stitch marker, 1sc, slst, ch1, turn your work. Row 2 skip slst, in next st, the sc from previous round work 1sc, then hdc’s to end, (2hdc, 1dc) in last st. Row 3 (ch 2, 2hdc), hdc until you get to the 2nd stitch marker, attention also work a hdc in dc and slst and around ch from previous round and in hdc from previous section (photo 2a and 2b), Now work a sc, slst and ch 1 and turn your work. Row 4 Skip slst, in next st, the sc of previous row work 1sc, hoc til end, (2hdc, 1dc) in last st. Row 5 (ch2, 2hdc), hdc until you get to the 3th stitch marker, attention also work a hdc in dc and slst and around ch from previous round and in hdc from previous section (photo 2a and 2b), Now work a sc, slst and ch 1 and turn your work. Row 6 Skip slst, in next st, the sc of previous row work 1sc, hdc til end, (2hdc, 1dc) in last st. Row 7 (ch2, 2hdc), hdc until you get to the 4th stitch marker, attention also work a hdc in dc and slst and around ch from previous round and in hdc from previous section (photo 2a and 2b), Now work a sc, slst and ch 1 and turn your work. Row 8 Skip slst, in next st, the sc of previous row work 1sc, hdc til end, (2hdc, 1dc) in last st. Row 9 (ch2, 2hdc), hdc until you get to the 5th stitch marker, attention also work a hdc in dc and slst and around ch from previous round and in hdc from previous section (photo 2a and 2b), Now work a sc, slst and ch 1 and turn your work. Row 10 Skip slst, in next st, the sc of previous row work 1sc, hdc til end, (2hdc, 1dc) in last st. Row 11 (ch2, 2hdc), hdc until you get to the 6th stitch marker, attention also work a hdc in dc and slst and around ch from previous round and in hdc from previous section (photo 2a and 2b), Now work a sc, slst and ch 1 and turn your work. Row 12 Skip slst, in next st, the sc of previous row work 1sc, hdc til end, (2hdc, 1dc) in last st. Row 13 (ch2, 2hdc), hdc till end, attention also work a hdc in dc and slst and in ch from previous round, (2hdc, 1dc) in last st. Row 14 (ch2, 2hdc), hdc til end, (2hdc, 1dc) in last st. Cut yarn A Now, at sight, divide 7 st marker over the sts, this does not have to be very precise. ------------------------------------- Vierde baan, hecht kleur A aan aan de andere zijde. Rij 1 (2l, 2hst), hst tot je bij de 1e steken markeerder komt, 1v, 1hv, 1l, keer je werk. Rij 2 skip hv, in de volgende steek, in de v van de vorige toer haak je een v, en dan hst tot eind, in laatste steek. Rij 3 (2l, 2hst), hst tot je bij de 2e steken markeerder komt, let op haak hierbij ook een hst in de v en hv en l van de vorige toer en in het hst van de vorige baan, bij de stekenmarkeerder haak je een v, hv en 1l en keer je werk. Rij 4 skip hv, in de volgende steek, in de v van de vorige toer haak je een v, en dan hst tot eind, (2hst, 1st) in laatste steek. Rij 5 (2l, 2hst), hst tot je bij de 3e steken markeerder komt, let op haak hierbij ook een hst in de v en hv en l van de vorige toer en in het hst van de vorige baan, bij de stekenmarkeerder haak je een v, hv en 1l en keer je werk. Rij 6 skip hv, in de volgende steek, in de v van de vorige toer haak je een v, en dan hst tot eind, (2hst, 1st) in laatste steek. Rij 7 (2l, 2hst), hst tot je bij de 4e steken markeerder komt, let op haak hierbij ook een hst in de v en hv en l van de vorige toer en in het hst van de vorige baan, bij de stekenmarkeerder haak je een v, hv en 1l en keer je werk. Rij 8 skip hv, in de volgende steek, in de v van de vorige toer haak je een v, en dan hst tot eind, (2hst, 1st) in laatste steek. Rij 9 (2l, 2hst), hst tot je bij de 5e steken markeerder komt, let op haak hierbij ook een hst in de v en hv en l van de vorige toer en in het hst van de vorige baan, bij de stekenmarkeerder haak je een v, hv en 1l en keer je werk. Rij 10 skip hv, in de volgende steek, in de v van de vorige toer haak je een v, en dan hst tot eind, (2hst, 1st) in laatste steek. Rij 11 (2l, 2hst), hst tot je bij de 6e steken markeerder komt, let op haak hierbij ook een hst in de v en hv en l van de vorige toer en in het hst van de vorige baan, bij de stekenmarkeerder haak je een v, hv en 1l en keer je werk. Rij 12 skip hv, in de volgende steek, in de v van de vorige toer haak je een v, en dan hst tot eind, (2hst, 1st) in laatste steek. Rij 13 (2l, 2hst), hst tot het eind, let op haak ook een hst in de v en hv en l van de vorige toer (2hst, 1st) Rij 14 (2l, 2hst, hst tot eind, (2hst, 1st) in laatste steek. Knip A af. Verdeel nu, op zicht, 7 steken markeerder over de steken, dit komt niet heel precies. The fifth section, attach color B on the other side Row 1 (ch2, hdc), hdc until you get to 1st stitch marker, 1sc, slst, ch1, turn your work. Row 2 skip slst, in next st, the sc from previous round work 1sc, then hdc’s to end, (2hdc, 1dc) in last st. Row 3 (ch 2, 2hdc), hdc until you get to the 2nd stitch marker, attention also work a hdc in dc and slst and around ch from previous round and in hdc from previous section (photo 2a and 2b), Now work a sc, slst and ch 1 and turn your work. Row 4 Skip slst, in next st, the sc of previous row work 1sc, hoc til end, (2hdc, 1dc) in last st. Row 5 (ch2, 2hdc), hdc until you get to the 3th stitch marker, attention also work a hdc in dc and slst and around ch from previous round and in hdc from previous section (photo 2a and 2b), Now work a sc, slst and ch 1 and turn your work. Row 6 Skip slst, in next st, the sc of previous row work 1sc, hdc til end, (2hdc, 1dc) in last st. Row 7 (ch2, 2hdc), hdc until you get to the 4th stitch marker, attention also work a hdc in dc and slst and around ch from previous round and in hdc from previous section (photo 2a and 2b), Now work a sc, slst and ch 1 and turn your work. Row 8 Skip slst, in next st, the sc of previous row work 1sc, hdc til end, (2hdc, 1dc) in last st. Row 9 (ch2, 2hdc), hdc until you get to the 5th stitch marker, attention also work a hdc in dc and slst and around ch from previous round and in hdc from previous section (photo 2a and 2b), Now work a sc, slst and ch 1 and turn your work. Row 10 Skip slst, in next st, the sc of previous row work 1sc, hdc til end, (2hdc, 1dc) in last st. Row 11 (ch2, 2hdc), hdc until you get to the 6th stitch marker, attention also work a hdc in dc and slst and around ch from previous round and in hdc from previous section (photo 2a and 2b), Now work a sc, slst and ch 1 and turn your work. Row 12 Skip slst, in next st, the sc of previous row work 1sc, hdc til end, (2hdc, 1dc) in last st. Row 13 (ch2, 2hdc), hdc until you get to the 7th stitch marker, attention also work a hdc in dc and slst and around ch from previous round and in hdc from previous section (photo 2a and 2b), Now work a sc, slst and ch 1 and turn your work. Row 14 Skip slst, in next st, the sc of previous row work 1sc, hdc til end, (2hdc, 1dc) in last st. Row 15 (ch2, 2hdc), hdc till end, attention also work a hdc in dc and slst and in ch from previous round, (2hdc, 1dc) in last st. Row 16 (ch2, 2hdc), hdc til end, (2hdc, 1dc) in last st. Cut yarn B Now, at sight, divide 8 st marker over the sts, this does not have to be very precise. ----------------------------------- Vijfde baan, hecht kleur B aan aan de andere zijde. Rij 1 (2l, 2hst), hst tot je bij de 1e steken markeerder komt, 1v, 1hv, 1l, keer je werk (foto 1a) Rij 2 skip hv, in de volgende steek, in de v van de vorige toer haak je een v, en dan hst tot eind, (2hst, 1st) in laatste steek. Rij 3 (2l, 2hst), hst tot je bij de 2e steken markeerder komt, let op haak hierbij ook een hst in de v en hv en l van de vorige toer en in het hst van de vorige baan, bij de stekenmarkeerder haak je een v, hv en 1l en keer je werk. Rij 4 skip hv, in de volgende steek, in de v van de vorige toer haak je een v, en dan hst tot eind, (2hst, 1st) in laatste steek. Rij 5 (2l, 2hst), hst tot je bij de 3e steken markeerder komt, let op haak hierbij ook een hst in de v en hv en l van de vorige toer en in het hst van de vorige baan, bij de stekenmarkeerder haak je een v, hv en 1l en keer je werk. Rij 6 skip hv, in de volgende steek, in de v van de vorige toer haak je een v, en dan hst tot eind, (2hst, 1st) in laatste steek. Rij 7 (2l, 2hst), hst tot je bij de 4e steken markeerder komt, let op haak hierbij ook een hst in de v en hv en l van de vorige toer en in het hst van de vorige baan, bij de stekenmarkeerder haak je een v, hv en 1l en keer je werk. Rij 8 skip hv, in de volgende steek, in de v van de vorige toer haak je een v, en dan hst tot eind, (2hst, 1st) in laatste steek. Rij 9 (2l, 2hst), hst tot je bij de 5e steken markeerder komt, let op haak hierbij ook een hst in de v en hv en l van de vorige toer en in het hst van de vorige baan, bij de stekenmarkeerder haak je een v, hv en 1l en keer je werk. Rij 10 skip hv, in de volgende steek, in de v van de vorige toer haak je een v, en dan hst tot eind, (2hst, 1st) in laatste steek. Rij 11 (2l, 2hst), hst tot je bij de 6e steken markeerder komt, let op haak hierbij ook een hst in de v en hv en l van de vorige toer en in het hst van de vorige baan, bij de stekenmarkeerder haak je een v, hv en 1l en keer je werk. Rij 12 skip hv, in de volgende steek, in de v van de vorige toer haak je een v, en dan hst tot eind, (2hst, 1st) in laatste steek. Rij 13 (2l, 2hst), hst tot je bij de 7e steken markeerder komt, let op haak hierbij ook een hst in de v en hv en l van de vorige toer en in het hst van de vorige baan, bij de stekenmarkeerder haak je een v, hv en 1l en keer je werk. Rij 14 skip hv, in de volgende steek, in de v van de vorige toer haak je een v, en dan hst tot eind, (2hst, 1st) in laatste steek. Rij 15 (2l, 2hst), hst tot het eind, let op haak ook een hst in de v en hv en l van de vorige toer (2hst, 1st) Rij 16 (2l, 2hst, hst tot eind, (2hst, 1st) in laatste steek. Knip B af. Verdeel nu, op zicht, 8 steken markeerder over de steken, dit komt niet heel precies. 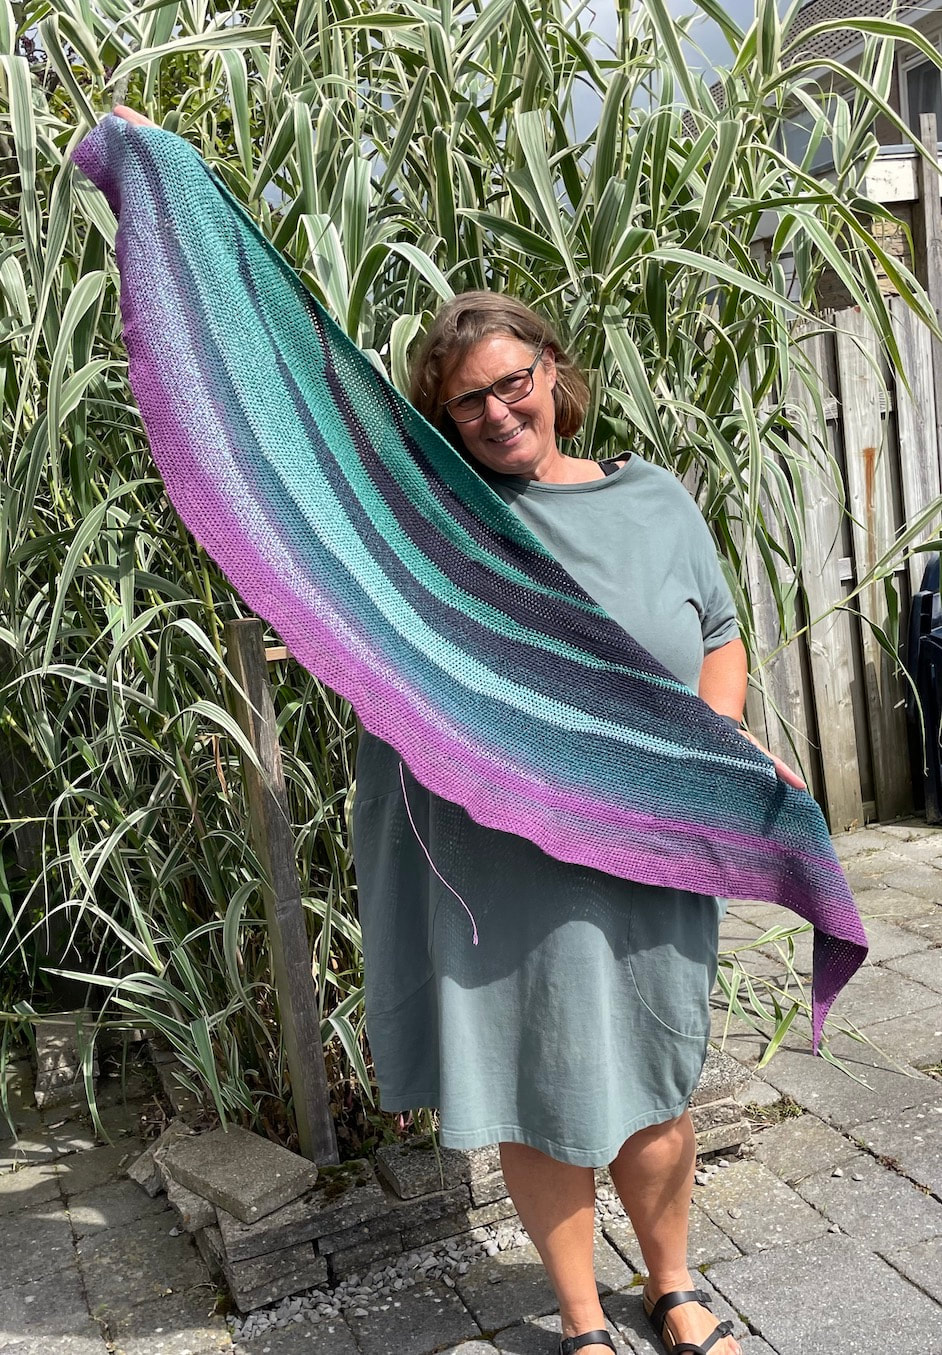 I think you now understand how it works Points of attention are: You start each section on the other side. With each section 1 stitch marker is added and you work 2 more rows. Continue until section 8 when you crochet this shawl with 1 Whirl. It does not matter much for the shape of the shawl whether you can crochet the entire section, so feel free to continue until you run out of yarn. Attach your threads. Wash your shawl and block it. -------------------------------------------------- Ik denk dat je het principe nu wel door hebt. Puntjes van aandacht zijn: Elke baan begin je aan de andere kant. Bij elke baan komt er 1 steken markeerder bij en haak je 2 rijen meer. Ga zo door tot baan 8 wanneer je deze sjaal met 1 Whirl haakt. Het maakt voor de vorm van de sjaal niet veel uit of je de gehele baan af kunt haken, dus haak gerust door tot je garen op is. Hecht je draadjes weg. Was je sjaal en span hem op. If you crochet the scarf with 2 Whirls, and just like me with 2 of the same color, you will come to the point that the 2 balls will overlap in color. I had this after the 9th section To keep a good eye on the difference in the sections, we are now going to wrap ball A again, so that the inside comes out. This can be done by hand, but if you have a wool winder this is completely easy. Place a cup or similar in the opening of the ball to prevent it from collapsing, and put it on gently. As soon as you notice a lot of thread coming in at once, stop and untangle immediately. Give this some time and love so that you can continue crocheting without knots. Now continue as normal, A remains A and B remains B I came up with 2 Whirls halfway through section 13, the sections will of course use more and more yarn, hence the difference between a shawl with 1 or 2 Whirls is not even that big. When you're done, trim the ends. Wash the shawl and block it. Hope you enjoy it! -------------------------------------- Haak je de sjaal met 2 Whirls, en net als ik met 2 dezelfde dan kom je op het punt dat de 2 bollen qua kleur gaan overlappen. Ik had dit na de 9e baan Om het verschil in de banen goed te blijven zien gaan we nu bol A opnieuw omwikkelen, zodat de binnenkant buiten komt. Dit kan met de hand, maar als je een bollenmaker hebt is dit helemaal makkelijk. Plaats een bekertje in de opening van de bol tegen het instorten, en doe het rustig aan. Zodra je merkt dat er veel draad tegelijk meekomt, meteen stoppen en ontwarren. Geef dit even wat tijd en liefde zodat je straks weer lekker verder kunt haken zonder knopen. Haak nu weer gewoon verder, A blijft A en B blijft B Ik kwam met 2 Whirls tot halverwege baan 13, de banen gaan natuurlijk steeds meer garen verbruiken, vandaar het verschil tussen een sjaal met 1 of 2 Whirls nog niet eens zo heel groot is. Wanneer je klaar bent werk de eindjes weg. Was de sjaal en span hem op. Heel veel haak en draag plezier! 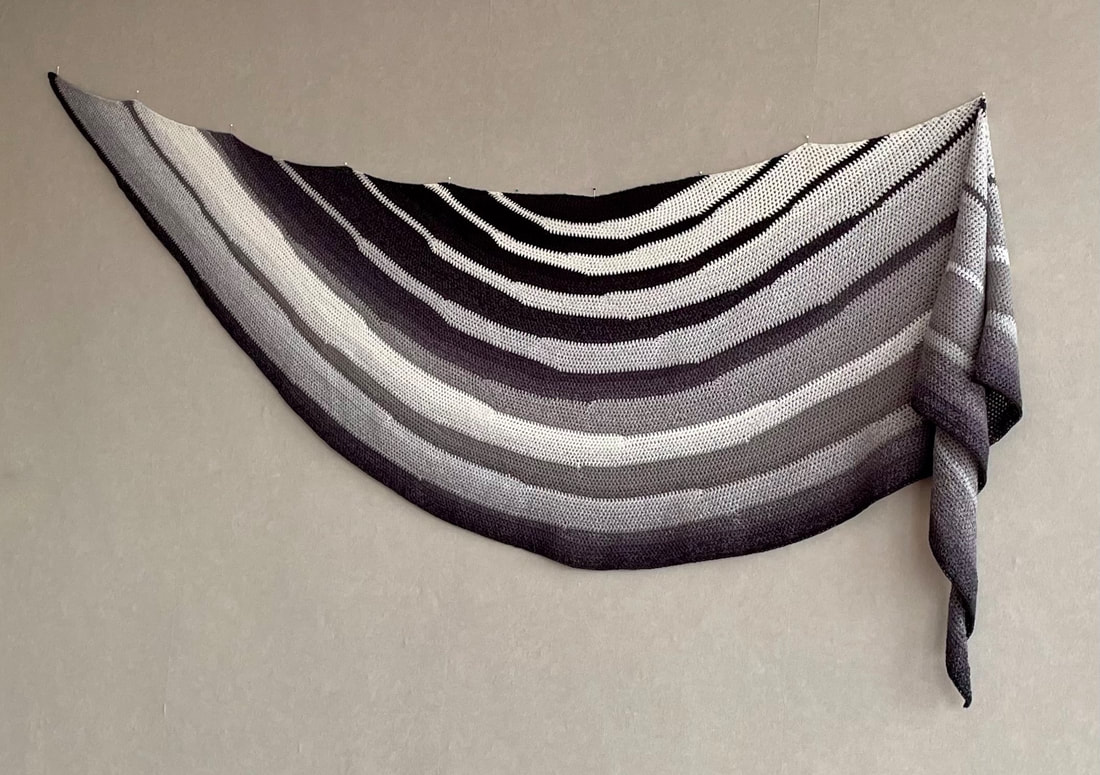
7 Comments
|

Ravelry

Wanneer je via onderstaande link je garen besteld gaat er een klein percentage naar mij zonder dat het jou een cent extra kost. Op deze manier kan ik mijn patronen gratis blijven aanbieden.
Dank je! 
|