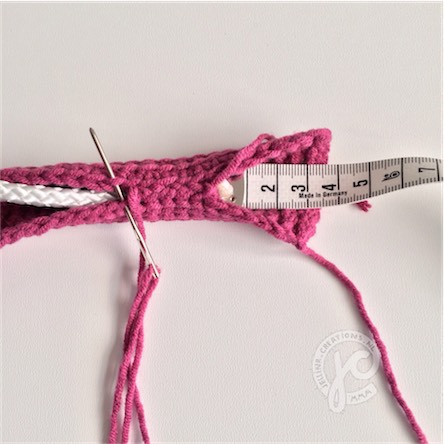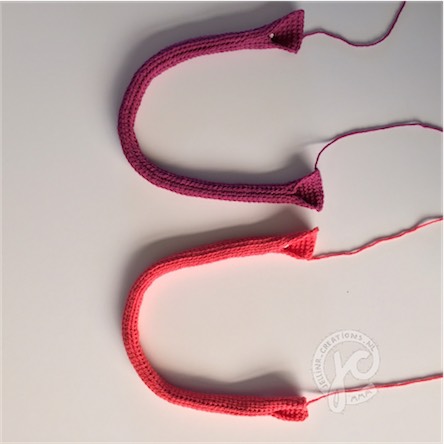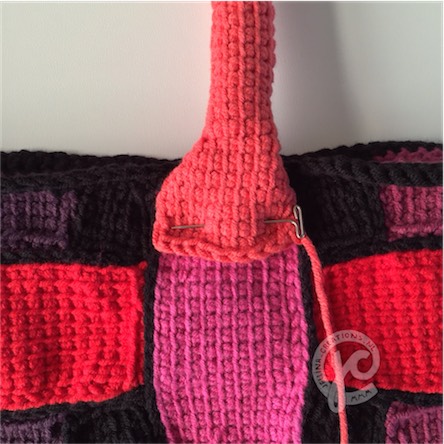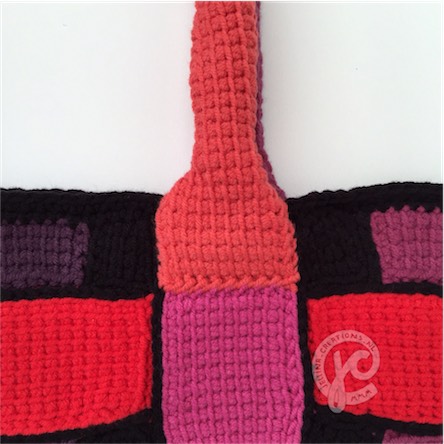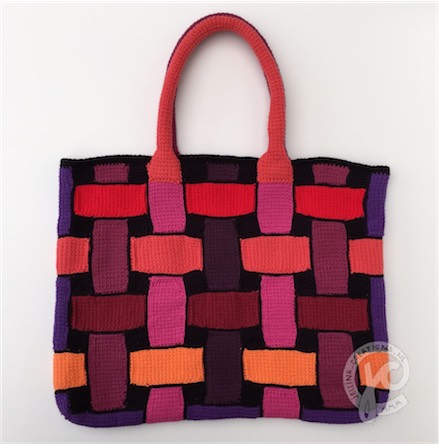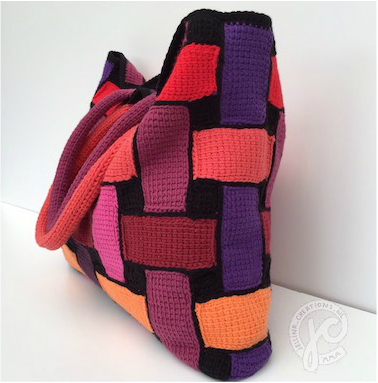
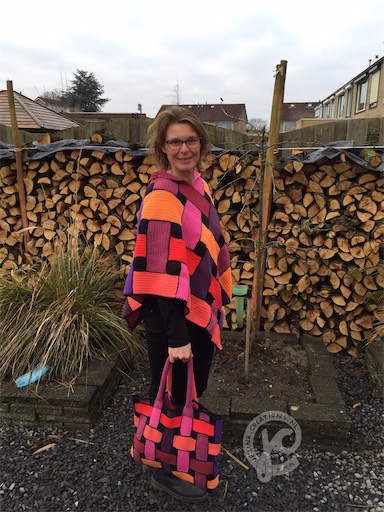
 Van de restjes van mijn poncho maakte ik een bijpassende tas. Maar weer in een heel andere haaktechniek waardoor het niet zo eentonig wordt. Doordat deze tas tunisch is gehaakt hoeft hij niet gevoerd te worden. Dit mag wel natuurlijk, maar hij is dicht genoeg van zichzelf. Ik naai niet graag dus heb het nu (nog) niet gedaan. ------------------------------------------- I made a matching bag with the leftovers from my poncho. But in a different way so it isn't monotonous. Because this bag is crochet Tunisian it doesn't need a linning. You can do this, but it's tight enough from itself. I don't like stitching so I didn't do it (yet). 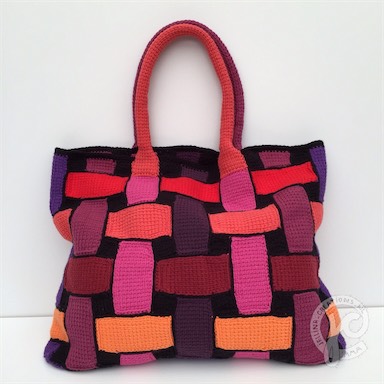 aan de slag/let's get started Benodigdheden/needs Softfun van Scheepjes licht rose/light pink 2495 midden rose/pink 2534 donker rose/dark pink 2493 paars/purple 2515 lichtrood/light red 2410 donkerrood/dark red 2492 licht oranje/light orange 2427 donker oranje/dark orange 2449 zwart/black 2408 (twee bollen/two balls) ***Scheepjesgaren is verkrijgbaar bij Caro's Atelier of 1 van de Scheepjes Retailers*** haaknaald 4 om te haken en 3 voor de afwerking. ---------------------------- i used hook 4 for crochet and hook 3 for the finish 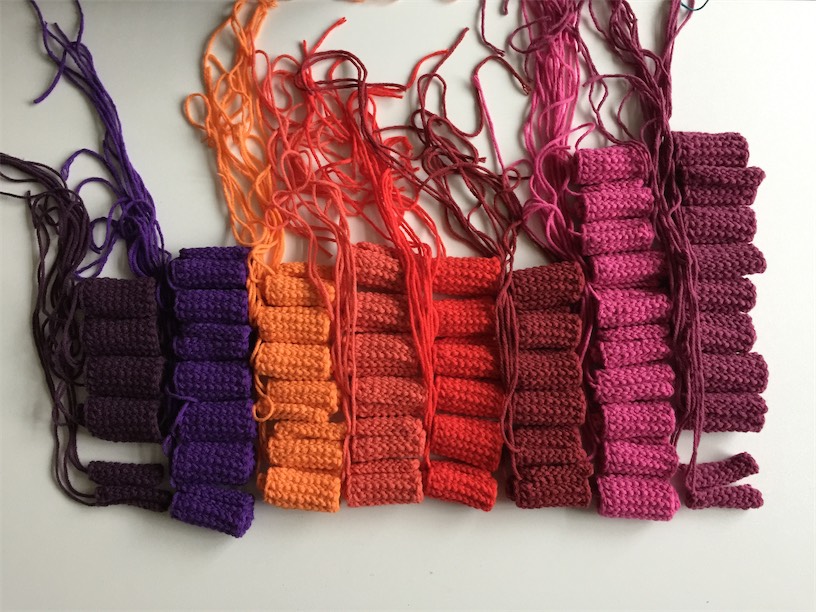 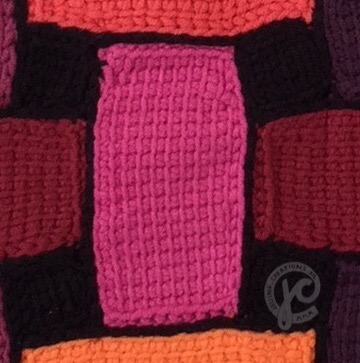 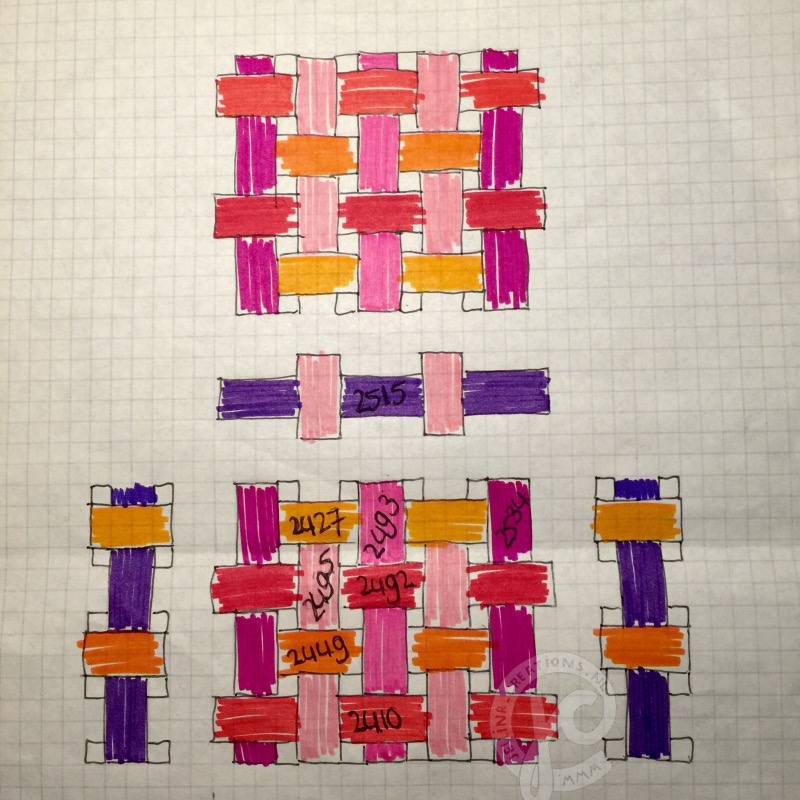 Je haakt: 10 rechthoeken licht rose (2495) 8 rechthoeken + 4 kleine lapjes midden rose (2534) 4 rechthoeken + 2 kleine lapjes donker rose (2493) 7 rechthoeken + 2 kleine lapjes paars (2515) 6 rechthoeken licht rood (2410) 6 rechthoeken donker rood (2492) 6 rechthoeken licht oranje (2427) 6 rechthoeken donker oranje (2449) 60 zwarte (2408) vierkantjes ----------------------------------------------- Crochet: 10 rectangle light pink (2495) 8 rectangle + 4 litle patches pink (2534) 4 rectangle + 2 litle patches dark pink (2493) 7 rectangle + 2 litle patches purple (2515) 6 rectangle light red (2410) 6 recangle dark red (2492) 6 rectangle light orange (2427) 6 rectangle dark orange (2449) 60 squares black (2408) ----------------------------------------------- ***Laat aan de gekleurde lapjes een begin- en einddraad van ongeveer 30 centimeter zitten voor het aan elkaar naaien. Laat aan de zwarte vierkantjes een draad aan het begin en eind van ongeveer 80 centimeter. Dit is soms vervelend maar dit draad gebruik je later meteen voor de zwarte afwerknaad en scheelt dan veel aan en afhecht werk.*** ----------------------------------------------- ***Keep a 12 inch tail on the coloured patches at the begin and the end to stitch them on eachother. Keep a tail at the begin and the end on the black squares from 32 inches This could be annoying, but you will use this tail later immediately for the black lines, and you will save much work if you do this.*** De tas begint met heel veel lapjes tunisch haakwerk. Is deze techniek nieuw voor je dan vind je hier op de handwerk site van Mirte een hele goede en duidelijke uitleg. De lapjes die je nodig hebt zijn 10 steken breed en je haakt tot je 18 verticale streepjes hebt. De lapjes zijn dan ongeveer 9 x 4 centimeter groot. Je hebt ook nog een aantal kleine lapjes nodig, deze zijn ook 10 steken breed en 4 verticale streepjes hoog. En zwarte vierkantjes van 5 steken breed en 4 verticale streepjes hoog. ------------------------------------------------------- The bag begins with many patches Tunisian crochet. Is this way new for you, you can find a good explanation hereon Mirte's site. The patches you'll need are 10 stitches wide and 4 vertical lines high. And black squares from 5 stitches wide and 4 vertical lines high. 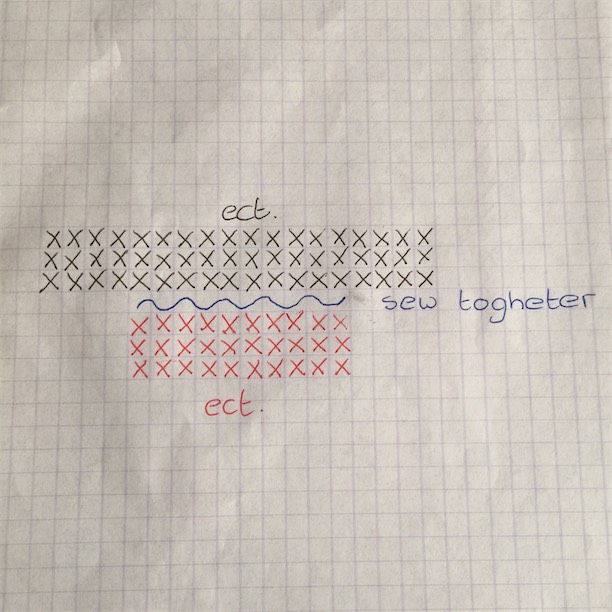 Deze zet je volgens bovenstaand schema in elkaar. ----------------------------------------- You assemble this like the scheme above. Nu moeten alle zwarte vierkantjes erin. Veel werk maar geloof me het is het uiteindelijk waard! Hoe je ze erin naait maakt niet zoveel uit maar zorg dat de verticale streepjes allemaal dezelfde kant op gaan. Wanneer alle zwarte vierkantjes erin zitten de draden niet afknippen want deze gebruiken we om de rechthoeken te accentueren. Zoals ik ook deed bij de celtic poncho -------------------------------------------- Now all black squares need to get in. That's much work, but believe me it will be worth it! How you sew them in doesn't really matter, but make sure the vertical lines all go to the same direction. When all black squares are in it, don't cut the tails, because these are needed to accent the rectangles. Just like I did with the celtic poncho Met haaknaald 3 Je werkt aan de goede kant van je tas. Je houd het (zwarte) draad aan de achterkant. Je steekt je haaknaald door je haakwerk naar achter en pak het draad mee naar voren. Nu steek je je naald een klein stukje verder door je haakwerk, pak het draad en haal door het lusje. De eerste steek is gemaakt. Nu haak je op deze manier alle naden. Welk draad je pakt moet je naar eigen inzicht doen, ik heb hier niet een logica in kunnen vinden. Je hebt in ieder geval draad genoeg voor alle naden. De draden in het midden kun je nu afhechten, maar de draden verder naar de zijkanten heb je straks nog nodig voor de laatste naden. ------------------------------------- With hook 3 Work on the good side of your bag. Hold the (black) wire at the back. Put your hook through your crocheted back and pick up the thread it forward. Now you stick your needle a little further through your crocheted suit the thread and pull through the loop. The first stitch is made. Now you crochet this way all seams. Which wire grabs you should do at their own discretion, I can not find logic in this. You have at least enough thread for all seams. The wires in the middle you can tie off now, but the wires on to the sides did you later need for the last seams. 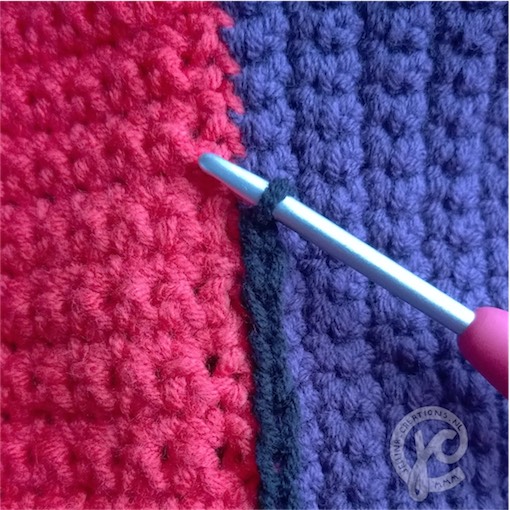 Je krijgt dan zoiets als onderstaande foto. -------------------------------------- You'll get something like the picture below. 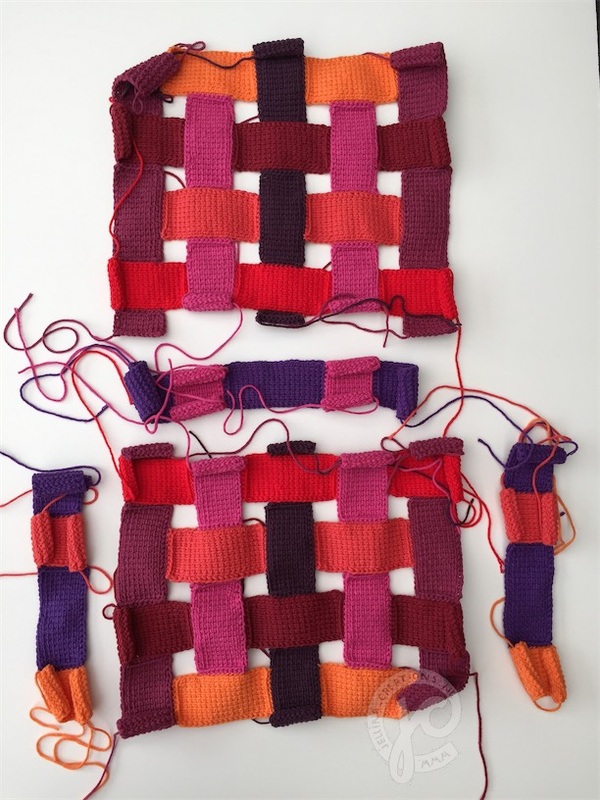 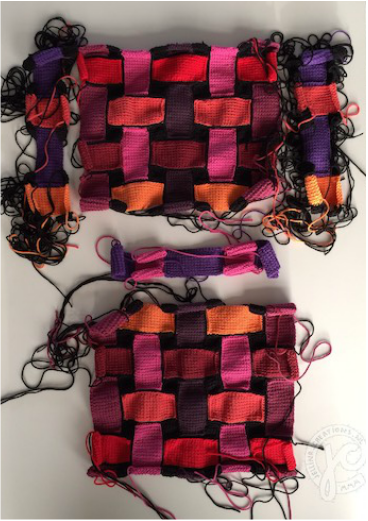 Je hebt nu zoiets als bovenstaande foto. En deze delen naai je aan elkaar tot je zoiets als onderstaande foto krijgt. Op deze foto ontbreken de 2 kleine paarse lapjes maar deze staan wel in het getekende schema. (dus deze er ook gewoon aan naaien) ------------------------------------------ You now have something like the picture above. And sew these pieces together to get something like the following picture. This photo miss the two small purple patches but it does stand in the drawn diagram. (so these patches can also sew) 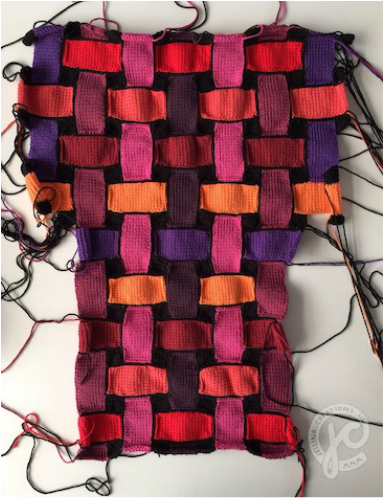 Nu kan de tas in elkaar, de paarse strook vormt de onder en zijkant. ------------------------------------- Now we sew the bag in shape, the purple strip forming the bottom and side. 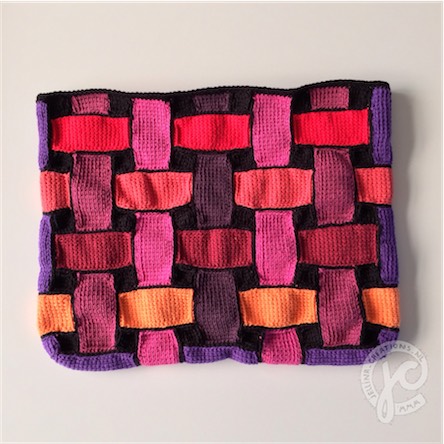 Kijk hier zie je de twee kleine paarse lapjes die ik in eerste instantie vergeten was. Maar ze zijn wel nodig om het tot een tas te maken. ------------------------------------------ Look here, you see the two small purple patches that I had forgotten in the first place. But they are required to make it into a bag. 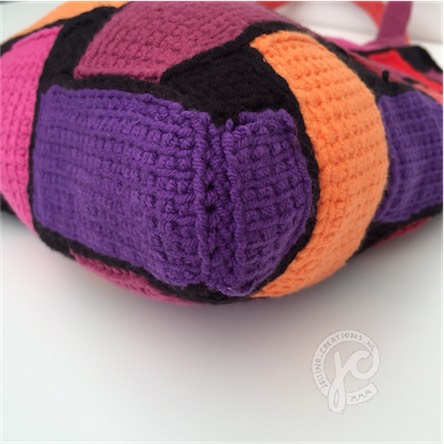 Je kunt nu alle naden afwerken en alle draadjes afhechten. Ik weet wat voor fijn gevoel het is voor elk draadje dat je weer weg kan knippen! Want zo af en toe zie je de bomen door het bos niet meer met al die draden..... ----------------------------------------- Now you can finish all the seams and tie off all the wires. I know what it's fine feeling for each thread that can be cut off again! Because occasionally you see the wood for the trees no longer with all those wires.... Als alle draadjes zijn afgehecht pak je voor de laatste keer je zwart erbij en ga je nog 2 maal rond in vasten voor de finishing touch. Zo is ook de bovenkant mooi en netjes afgewerkt. -------------------------------------- When you're done with tie off, take the black and go 2 times around in single crochet for the finishing touch. So the top is beautiful and nicely finished. 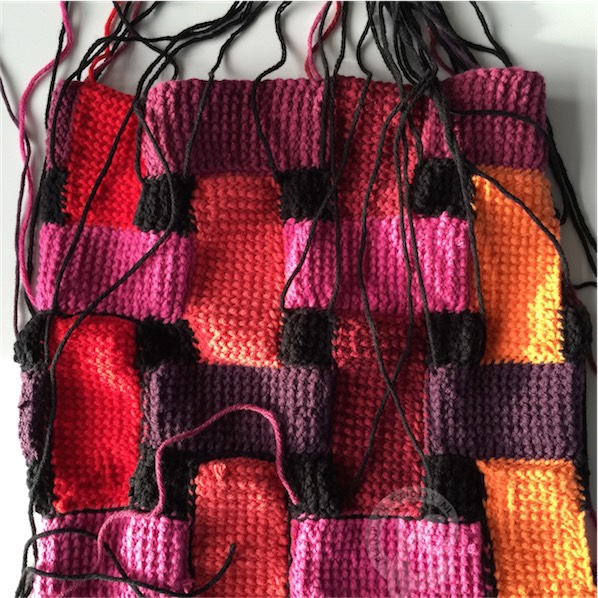
|

Ravelry

Wanneer je via onderstaande link je garen besteld gaat er een klein percentage naar mij zonder dat het jou een cent extra kost. Op deze manier kan ik mijn patronen gratis blijven aanbieden.
Dank je! 
|