Zoals beloofd het patroon, de beschrijving van de lente sjaal.
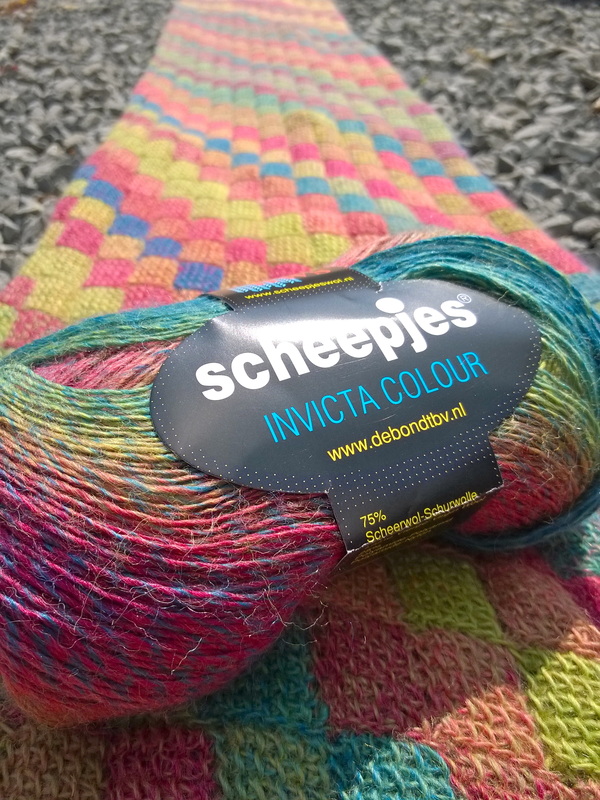
As promised the pattern of the spring wrap. Benodigdheden: 3 bollen invicta color van scheepjeswol (ik gebruikte nummer 968) haaknaald 3.5 haaknaald 5 ***Scheepjesgaren is verkrijgbaar bij Caro's Atelier of 1 van de Scheepjes Retailers*** Requirements: 3 balls of invicta color from Scheepjeswol (I used number 968 ) hook 3.5 hook 5 Het patroon is entrelac tunisch haakwerk, het is makkelijk als je deze techniek al wat beheerst al wordt het in het filmpje duidelijk uitgelegd. The pattern is entrelac tunisch crochet. It is easy if you already familiar with this technique but the movie is very explaining. Als advies staat (brei)naald 3 op het etiket maar voor deze techniek is het raadzaam een grotere naald te gebruiken. Vandaar we gaan haken met haaknaald 5 Hierdoor krijgen we een lekker soepel vallende sjaal. Wanneer je erg strak haakt is het misschien zelfs slim om een nog iets dikkere naald te gebruiken. Om makkelijk in de steken te kunnen steken, maar ook voor een lekker soepel vallende sjaal is het echt belangrijk dat los gehaakt wordt. The advice is ( knitting ) needle 3, but with this technique it is handy to use a larger needle We are going to use hook 5 This gives us a nice flowing scarf. If you are very tight hooker it might even be smart to use a slightly thicker needle It is really important that you crochet loosely . De filmpjes zijn in het Engels maar zijn zo goed gefilmd en duidelijk uitgelegd dat het denk ik door iedereen wel te volgen is. The movies are in English but are so well filmed and clearly explained that I think you can simply follow them. Je begint met 12 x 11 + 1 = 133 lossen en dan volg je het filmpje tot het eind. You start with 12 x 11 + 1 = 133 stitches and then follow the movie to the end. Er is 1 ding dat ik anders deed dan Kim Guzman Ik steek mijn naald niet in het v-tje, maar alleen in het achterste lusje. Ik vind dat op deze manier de vierkantjes mooier uitkomen. There is one thing that I did differently than Kim Guzman I do not put my needle in the V above , but only in the back loop. I think that the squares looks neater this way. 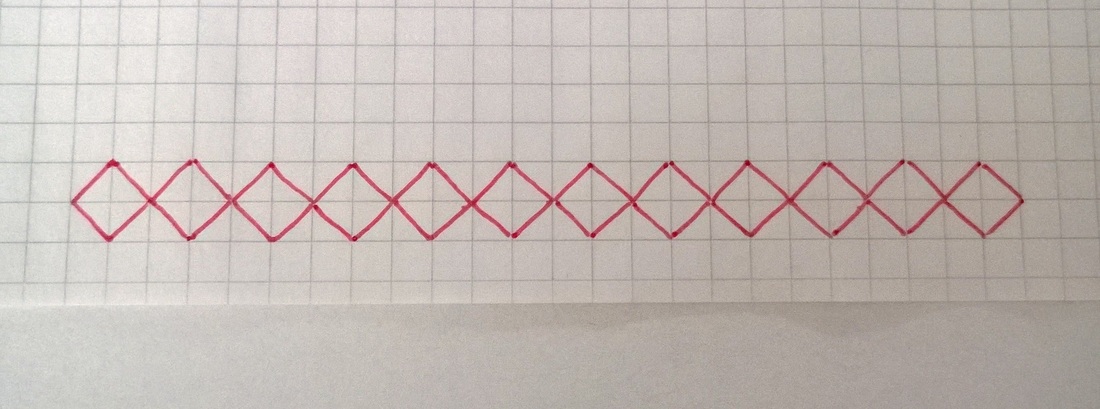
Rij 1 is nu klaar, dit is meteen de moeilijkste rij omdat het nog even inkomen is en nog niet zo makkelijk vast houd.
Hierna wordt het alleen maar leuker! Op naar rij 2, zie filmpje 2 Oja sorry het eerste blokje is ook nog even opletten, maar daarna... (en dit eerste blokje is maar eenmalig) The first row is ready, it's also the hardest row because it is still as income and not as easy to hold securely. After this it just fun! On to row 2, see movie 2 Oh sorry at the first block it is also to pay attention, but then ... 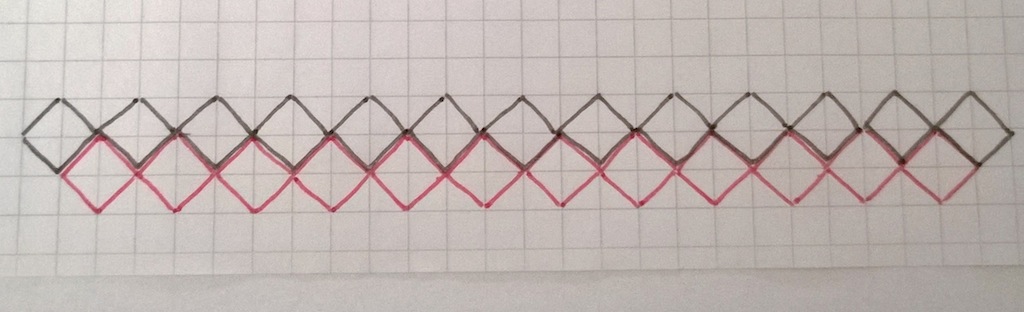
Het tweede blokje staat erop.
Ik denk dat je de slag nu wel te pakken hebt. Gaat best lekker he? Op naar de derde rij, zie het derde filmpje. The second block is ready I think you have the routine now. Going well, huh? On to the third row, see the third film. 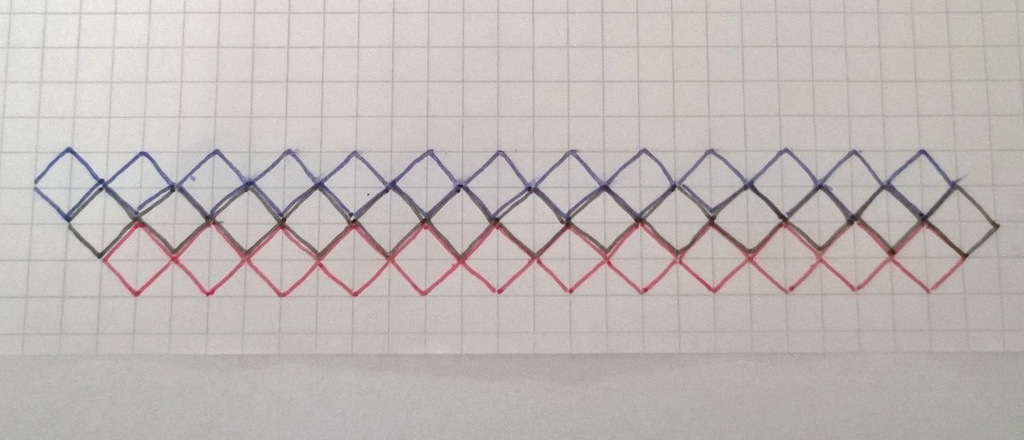
Maar wacht, de rij is nog niet klaar!
Want wij gaan geen kleed maken maar een sjaal die diagonaal loopt. Dus wij doen er nog 1 blokje achteraan, net als het laatste blokje uit filmpje 2. But wait, the row is not finished yet! Because we are not going to make blanket but a scarf that runs diagonally. So we do have one block on top, just like the last block of film 2. Dan de vierde rij. Deze is hetzelfde als rij 3 En eigenlijk is dat het. Je werkt zo door tot rij 62 of tot hoever jij de sjaal mooi vindt. Then, the fourth row. This is the same as row 3 And actually that's it. You work on until row 62, or how long you like scarf. 
De laatste rij is iets anders.
Hier haak je het laatste blokje niet. Zodat je net als in het begin twee blokjes krijgt. The last row is a little different. In this row you dont crochet the last block. It looks the same as the beginning. 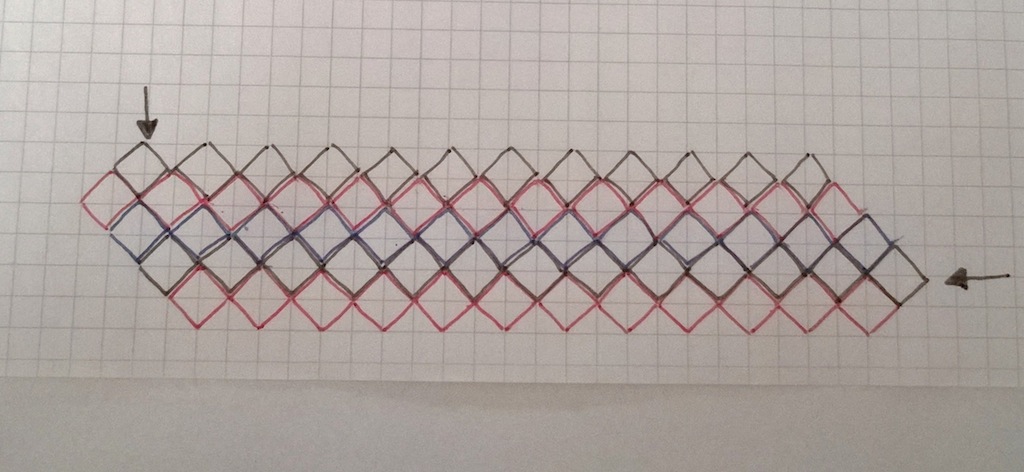
Je hebt nu een sjaal van 190 x 35 centimeter
(van puntje ene kant naar korte kant andere kant) You now have a scarf with a length of 75 inch en the wide of 13 inch 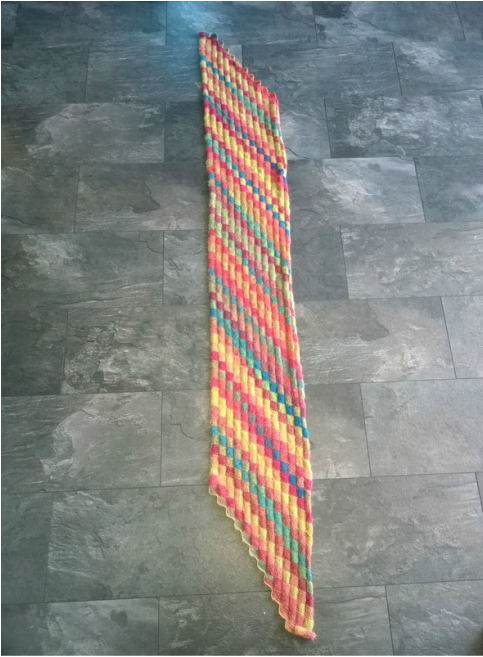
Voor de afwerking gaan we nu nog rond met vasten.
Dat wil zeggen de twee lange kanten en de korte kant waar we met de lossen begonnen. De laatste rij hoeft niet want dit is al netjes. Het afhechten doen we met haaknaald 3,5 To finish, we now go around with single crochet. Only the two long sides and the short side where we started. The last row we do not because this is neat. The tie-off we do with hook 3,5 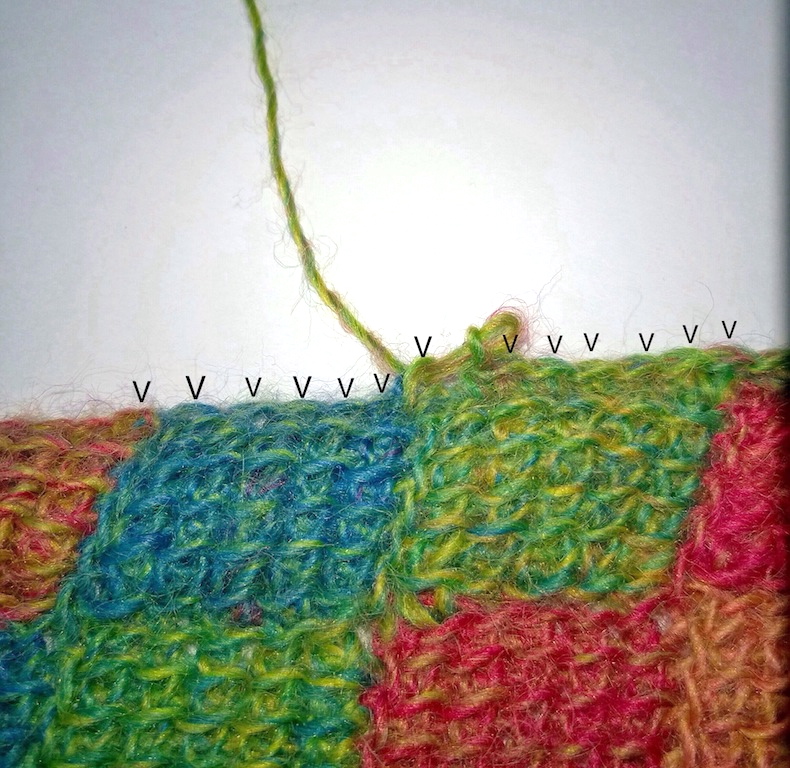
De lange kanten spreken een beetje voor zich.
Je hebt 5 openingen en de 6de steek doe je tussen de twee blokjes in. Dus per blokje 6 vasten. In de afwerking ga ik trouwens wel gewoon door beide lusjes,oftewel het v-tje. The long sides are simple You have 5 holes and the 6th stitch you do between the two blocks. So each block 6 stitches. In this last row I crochet trough both loops (the v) 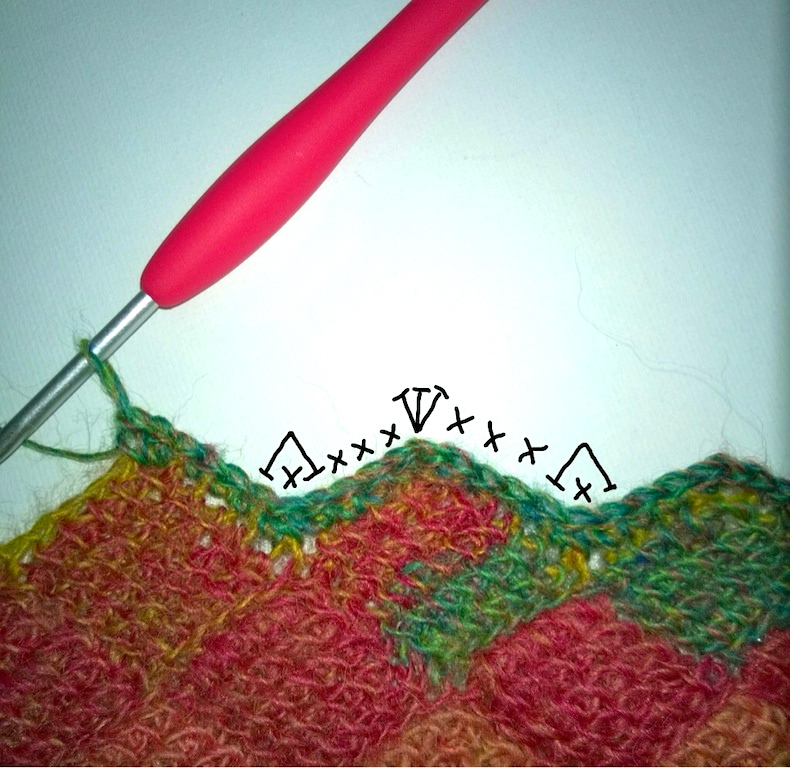
De onderkant haak je zoals bovenstaande foto.
In de bovenste vasten haak je 3 vasten dan 3 vasten in elk volgende vasten en dan haak je twee vasten samen waarbij je de vasten in het dal overslaat. (sorry de stokjes tekens zijn een beetje verwarrend, maar wist het anders niet te tekenen) On the top you do 3 sc in one stitch, then 3 sc and in the valley you do two sc togheter but you miss the middle one. (sorry the symbols are a bit confusing, but I do not know how i must draw it) Nu komt er nog een laatste belangrijke stap namelijk Blokken! Hierdoor wordt je haakwerk zoveel mooier. Now there is one more important step namely blocking. This will make you much more beautiful crocheted.
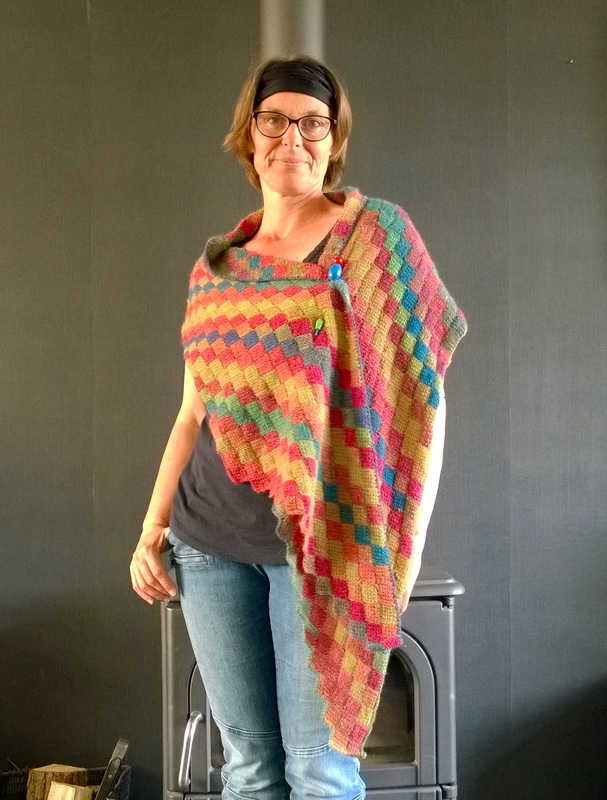
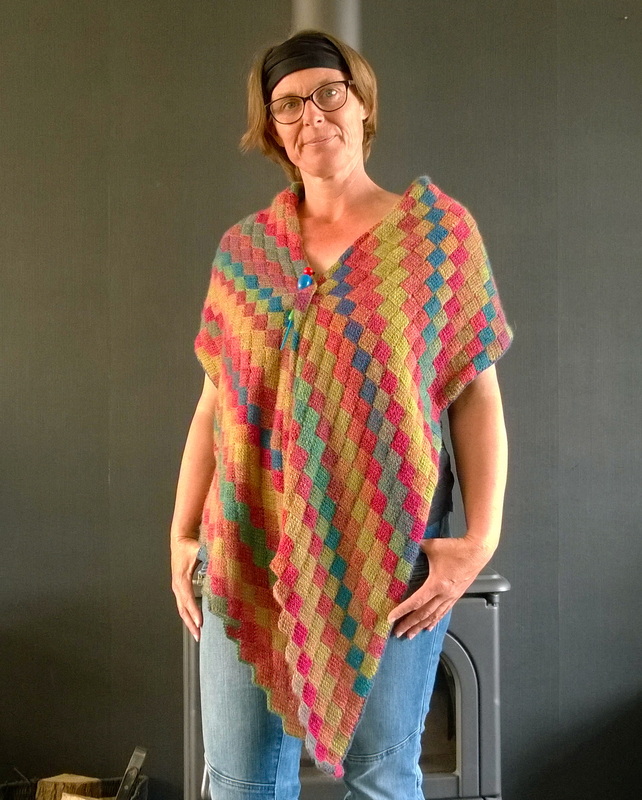
En dan komt het grote genieten van al je werk,
hoe je ook van plan bent hem te gaan dragen. (klikken is groter) And then comes the big enjoying all your work. How are you wear it? (click to make the picture bigger) Veel plezier met het maken! Have fun! edit 23-9-2014 Hier de link naar het patroon vertaald in het Duits door Barbara van Sockhype
37 Comments
|

Ravelry

Wanneer je via onderstaande link je garen besteld gaat er een klein percentage naar mij zonder dat het jou een cent extra kost. Op deze manier kan ik mijn patronen gratis blijven aanbieden.
Dank je! 
|