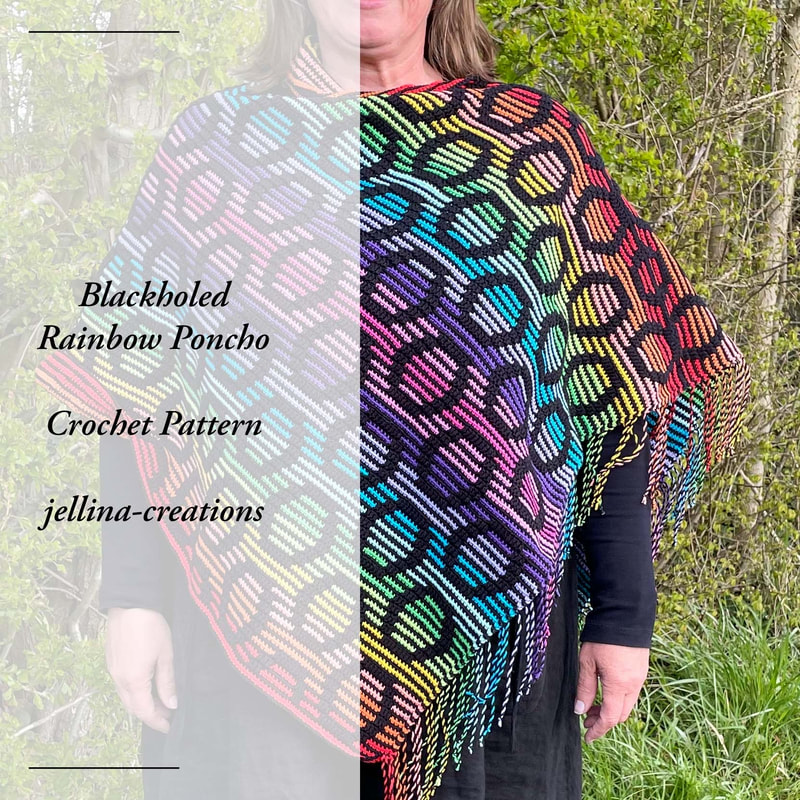
 Materials: Color A: 8x Scheepjes Softfun 2408, 50gr/140m, 60% cotton, 40% acrylic Color B: 2x Scheepjes Softfun Colour Pack: Rainbow Crochethook 4.0 ------------------------------------------------ Benodigdheden: Kleur A: 8x Scheepjes Softfun kleurnr: 2408, 50gr/140m, 60% katoen, 40% acryl Kleur B: 2x Scheepjes Softfun Colour pack: Rainbow Haaknaald 4.0 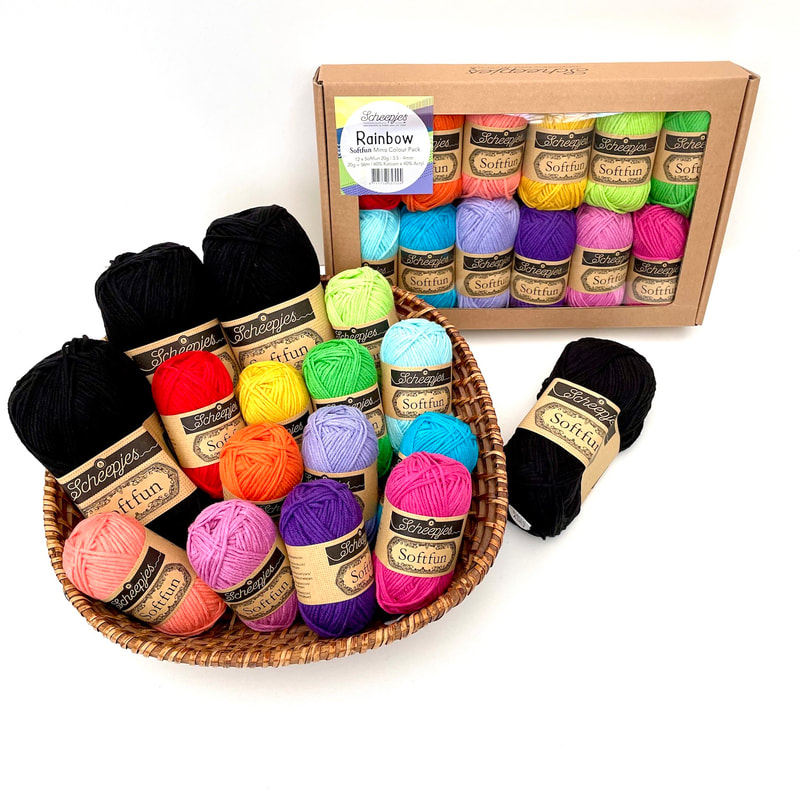 Pattern Notes You only work from the right side, you cut your thread after every row. We will make fringes from the ends later. For this, keep 20 centimeters of wire available at the beginning and at the end. From round 2 you work all single crochets in the back loop, except for the first and last stitch, which are normal single crochets. Work the lowered dc in the front loop of the stitch 2 rounds below. Or to make it easier, work the black dc in the front loop of the black row below. When working the ldc's skip the same amount of sts, they fall behind the dc's. Check this regularly in the beginning by always bending the 'flap' of treble crochets to see the dc from the previous round. Later you will get more skill in this and that is no longer necessary. Crochet 3 rounds with each color. --------------------------------------------- Opmerkingen Je werkt alleen aan de goede kant, je knipt na elke toer je draad af. Van de uiteindes maken we later fringes. Je moet hiervoor aan het begin en aan het eind een kleine 20 centimeter draad vrijhouden. Vanaf toer 2 haak je alle vasten in de achterste lus, behalve de eerste en de laatste, dit zijn normale vasten. Het verlaagde stokje in de voorste lus (vstvl) haak je in de voorste lus van de steek 2 toeren eronder. Of om het makkelijker te maken, de zwarte stokjes haak je in de voorste lus van de zwarte toer eronder. Wanneer je de verlaagde stokjes haakt, sla je dezelfde hoeveelheid steken over, deze vallen achter de stokjes. Controleer dit in het begin regelmatig door steeds het ‘flapje’ van stokjes naar voor te buigen om de vasten van de vorige toer goed te kunnen zien. Later krijg je hier meer handigheid in en is dat niet meer nodig. Met elke kleur haak je 3 toeren. Color sequence/Kleurvolgorde 2410 Candy Apple 2651 Pumkin 2636 Soft Coral 2634 Bumblebee 2516 Apple 2605 Emerald 2603 Cool Blue 2511 Dark Turquoise 2519 Voilet 2515 Deep Violet 2480 Pink 2495 Hot Pink And then back in reverse order, skipping 2495 Hot Pink Pink ------------------------------------------- En dan weer terug in de omgekeerde volgorde, sla hierbij 2495 Hot Pink over 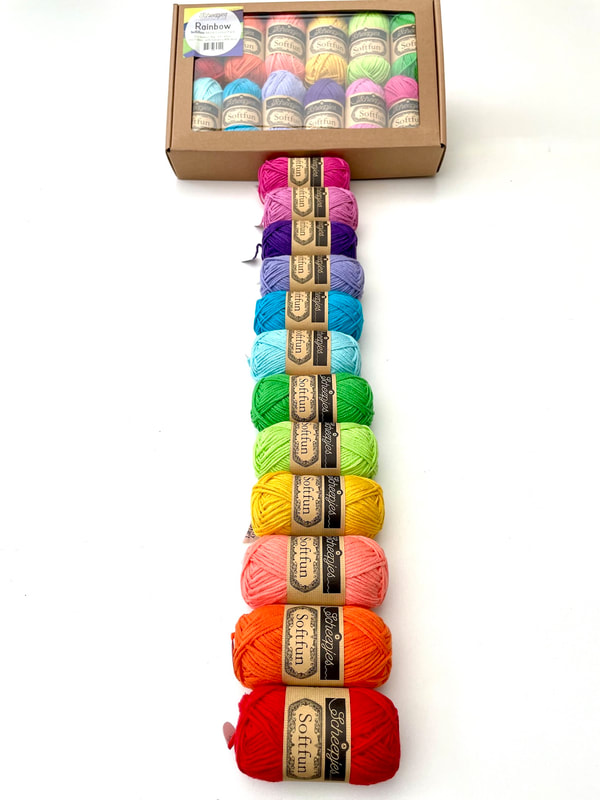 Stitches/Steken ch/l chainstitch/lossen sc/v single crochet/vasten blsc/val single crochet in back loop/vaste in achterste lus ldc/vstvl lowered double crochet/verlaagd stokje voorste lus Pattern With color A ch315 Row 1 with B 315sc Row 2 with A 315sc Row 3 with B 315sc Row 4 with A 1sc, 8blsc, *9ldc, 6blsc, 3ldc, 9blsc, 3ldc, 6blsc*, repeat between ** again 7x, 9ldc, 8blsc, 1sc. Row 5 with B: 1sc, 313 blsc, 1sc. Row 6 with A: 1sc, 6blsc, *3ldc, 7blsc, 3ldc, 5blsc, 3ldc, 7blsc, 3ldc, 5blsc*, repeat between ** again 7x, 3ldc, 7blsc, 3ldc, 6blsc, 1sc. Row 7 with B: 1sc, 313 blsc, 1sc. Row 8 with A: 1sc, 5blsc, *3ldc, 9blsc, 3ldc, 6blsc, 9ldc, 6blsc*, repeat between ** again 7x, 3ldc, 9blsc, 3ldc, 5blsc, 1sc. Row 9 With B: 1sc, 313blsc, 1sc. Row 10 With A: 1sc, 4blsc, *3ldc, 11blsc, 3ldc, 19blsc*, repeat between ** again 7x, 3ldc, 11blsc, 3ldc, 4blsc, 1sc. Row 11 With B: 1sc, 313blsc, 1sc. Row 12 as row 10 Row 13 with B: 1sc 313blsc, 1sc. Row 14 as row 8 Row 15 With B: 1sc, 313blsc, 1sc. Row 16 as row 6 Row 17 With B: 1sc, 313blsc, 1sc. Row 18 as row 4 Row 19 With B: 1sc, 313blsc, 1vsc Row 20 With A: 1sc, 22blsc, *3ldc, 11blsc, 3ldc, 19blsc* herhaal tussen ** nog 7x, 3blsc, 1sc. Row 21 With B: 1sc, 313blsc, 1sc. Row 22 as row 20 Row 23 With B: 1sc, 313blsc, 1sc. Row 24 - 123 Repeat row 4 - 23 again 5x. Row 124 - 138 Repeat row 4 - 18. ---------------------------------------------- Werkwijze Met kleur A 315 lossen. Toer 1 met kleur B: 315 v. Toer 2 met kleur A: 315 v. Toer 3 met kleur B: 315 v. Toer 4 met kleur A: 1v, 8 val, *9 vstvl, 6 val, 3 vstvl, 9 val, 3 vstvl, 6 val*, herhaal tussen ** nog 7x, 9vstvl, 8val, 1v. Toer 5 met kleur B: 1v, 313 val, 1v. Toer 6 met kleur A: 1v, 6 val, *3 vstvl, 7 val, 3 vstvl, 5 val, 3vstvl, 7 val, 3 vstvl, 5 val*, herhaal tussen ** nog 7x, 3 vstvl, 7 val, 3 vstvl, 6 val, 1v. Toer 7 met kleur B: 1v, 313 val, 1v. Toer 8 met kleur A: 1v, 5 val, *3vstvl, 9 val, 3 vstvl, 6 val, 9 vstvl, 6 val*, herhaal tussen ** nog 7x, 3vstvl, 9 val, 3 vstvl, 5 val, 1v. Toer 9 met kleur B: 1v, 313 val, 1v. Toer 10 met kleur A: 1v, 4 val, *3 vstvl, 11 val, 3 vstvl, 19 val*, herhaal tussen ** nog 7x, 3 vstvl, 11 val, 3 vstvl, 4 val, 1v. Toer 11 met kleur B: 1v, 313 val, 1v. Toer 12 idem als toer 10 Toer 13 met kleur B: 1v, 313 val, 1v. Toer 14 idem als toer 8 Toer 15 met kleur B: 1v, 313 val, 1v. Toer 16 idem als toer 6 Toer 17 met kleur B: 1v, 313 val, 1v. Toer 18 idem als toer 4 Toer 19 met kleur B: 1v, 313 val, 1v. Toer 20 met kleur A: 1v, 22 val, *3 vstvl, 11 val, 3 vstvl, 19 val* herhaal tussen ** nog 7x, 3 val, 1v. Toer 21 met kleur B: 1v, 313 val, 1v. Toer 22 idem als toer 20 Toer 23 met kleur B: 1v, 313 val, 1v. Toer 24 - 123 Herhaal toer 4 - 23 nog 5x. Toer 124 - 138 Herhaal toer 4 - 18. Je bent nu klaar met haken. 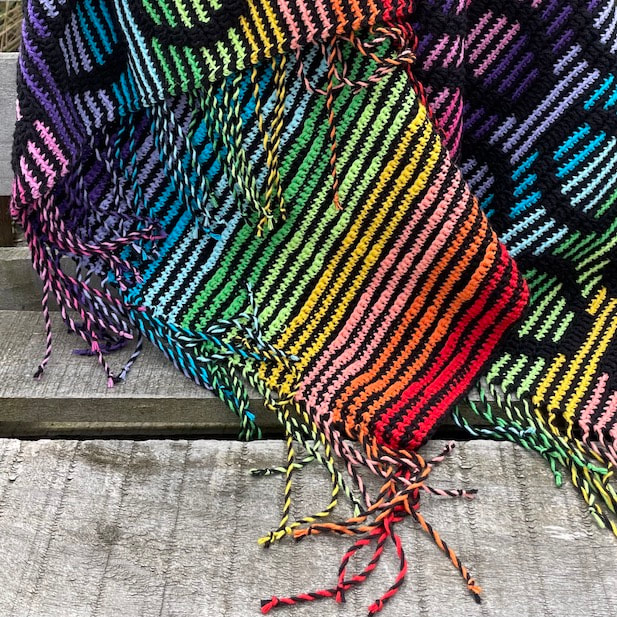 Fringes We are now going to make the fringes. First tie 2 threads together, make a knot with a black thread and a colored thread. I made a 'twisted fringe'. You can search for this on youtube and you will find various videos where it is explained. Here I briefly explain how you do that. First cut all wires to 1 length You make the 'fringe' from 2 threads that you have knotted together. Wet your index fingers and thumb and first twist one thread 4x in the direction of the twining. Do this for the other thread as well (while holding the first thread firmly). Now grab both by the ends and twist them together in opposite directions, Make a small knot in the ends to fix the fringe. ---------------------------------------- Franjes/Fringes We gaan nu de franjes maken. Knoop eerst steeds 2 draadjes aan elkaar, maak een dubbele knoop met steeds een zwart met een gekleurd draad. Ik maakte van de draden een ’twisted fringe’ Je kunt hierop zoeken op youtube en dan vind je diversen filmpjes waarbij het wordt uitgelegd. Ik leg hier kort uit hoe je dat doet. Knip eerst alle draden op 1 lengte Je maakt de ‘fringe’ van steeds 2 draden die je aan elkaar hebt geknoopt. Maak je wijsvingers duim vochtig en draai eerst de ene draad 4x met de richting van de twining mee. Doe dit ook voor het andere draad (terwijl je het eerste draad stevig vasthoud). Pak nu beide bij de uiteinde vast en draai in tegengestelde richting, Maak een klein knoopje in de uiteinden om de ‘fringe’ te fixeren. 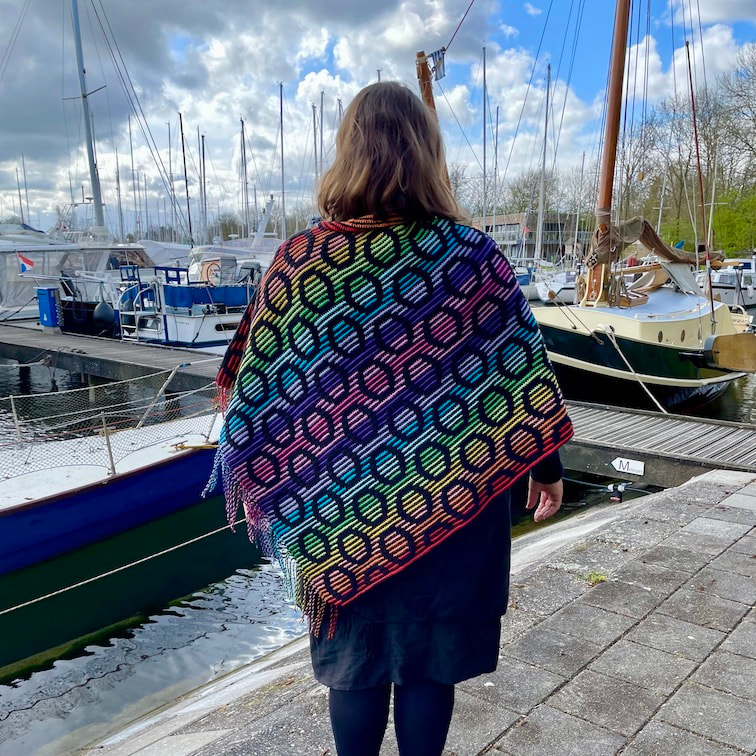 Assembling poncho Fold the crocheted piece in half, the red strips towards each other. And sew 1 side together from the bottom (where the fringes are). Sew to about 45 centimeters so that you have about 30 centimeters left as an opening for your head. Due to the shape of the poncho, you can choose to wear it with the point forward, then it is asymmetrical, or with the fringes at the front. --------------------------------------------- Poncho in elkaar zetten Vouw de gehaakte lap in de 2-en En naai vanaf de onderkant (waar de franjes zitten) 1 kant aan elkaar. Naai tot ongeveer 45 centimeter zodat je nog ongeveer 30 centimeter overhoud als opening voor je hoofd. Door de vorm van de poncho kun je er voor kiezen om hem met de punt naar voren te dragen, hij is dan a-symetrisch, of met de franjes van voren. 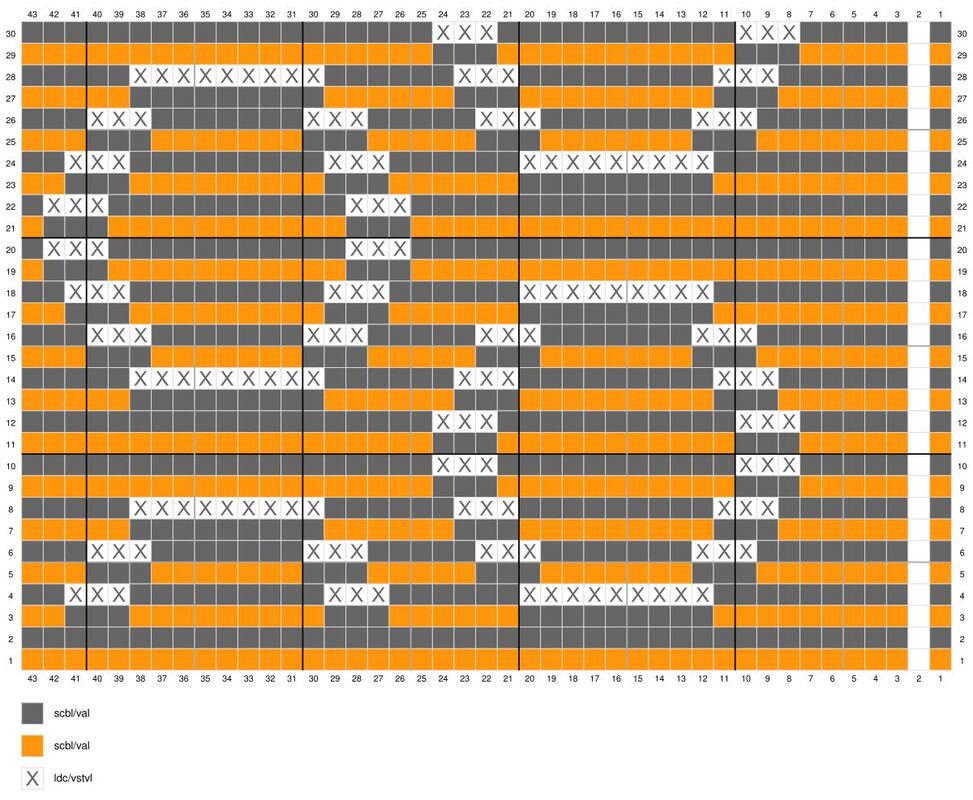 The scheme
The right column indicates which color you need for that row. The white squares with cross indicate that a lowered double crochet is worked here, the stitches below are covered by the ldc and thus automatically become color A. In this way, a circle pattern is created. I hope you will have a lot of fun making this poncho and wearing it afterwards. -------------------------------------------------------- Uitleg schema De rechter kolom geeft aan in welke kleur de toer gehaakt word. De witte vierkantjes met kruisje geven aan dat hier een verlaagd stokje wordt gehaakt, de steken hieronder worden bedekt door het stokje en worden dus automatisch ook kleur A. Op deze manier ontstaat er een cirkel patroon in je haakwerk. Ik hoop dat je veel plezier zult hebben tijdens het maken van deze poncho maar ook daarna tijdens het dragen.
0 Comments
Leave a Reply. |

Ravelry

Wanneer je via onderstaande link je garen besteld gaat er een klein percentage naar mij zonder dat het jou een cent extra kost. Op deze manier kan ik mijn patronen gratis blijven aanbieden.
Dank je! 
|