jellina-creations
  • blog
  • free crochet patterns
  • shop
    • Errata
  • privacy and more
  • About me
  • contact
  • blog
  • free crochet patterns
  • shop
    • Errata
  • privacy and more
  • About me
  • contact
Foto
 
-Enjoy every moment-

​​jellina-creations


​designer of crochet patterns
​blogger
.
Foto

​Welcome at jellina-creations 
Feel free to browse around on my blog, check if there is a pattern you like.
Or maybe you see a unique handmade bag in my shop that you want to buy.
If you have a question or just want to say something, please contact me! ​
Foto
Welkom bij jellina-creations
Wat leuk dat je hier een kijkje komt nemen.
Snuffel gerust eens rond op mijn blog, kijk even of er een leuk patroon voor je bij zit.
Of misschien zie je wel een uniek  handgemaakte tas in mijn shop die je graag wilt hebben. 
Heb je een vraag of wil je wat kwijt, neem dan contact met me op! ​

Illusion crochet pattern 'Jumping Dots'

12/3/2020

5 Reacties

 
Foto

Illusion crochet

Na het succes van babydeken Robin, vond ik het weer tijd voor een nieuw ontwerp in de illusie tapestry techniek.
Omdat ik denk dat simpele vormen het beste werken  koos ik voor een bollen patroon.
Ik wilde dit keer een sjaal gaan maken omdat ik denk dat dit ook heel goed werkt.
Een sjaal is contant in beweging waardoor de illusie goed opvalt.

-------------------------------

After the success of baby blanket Robin, I thought it was time for a new design in the illusion tapestry technique.
Because I think simple shapes work best, I chose a pattern with dots.
I wanted to make a scarf this time because I think it works really well too.
A scarf is constantly in moves, which makes the illusion stand out.

Foto
Ik koos dit keer voor de combinatie van Scheepjes Whirl en Whirlette.
En wel voor de kleuren  759 Jumping Jelly en  851 Liquorice.
Dus bovenop de illusie techniek zit in deze sjaal ook een mooi kleurverloop.
Ik denk dat dit een sjaal is waar je nooit op uitgekeken raakt.
Al is het maar door de kleur!

Maar houd je niet van uitgesproken kleuren dan zijn er natuurlijk nog legio andere combinaties mogelijk!
Dit garen komt in zoveel kleuren dat er voor iedereen wel een combinatie mogelijk is.

------------------------------

This time I chose the combination of Scheepjes Whirl and Whirlette.
For the colors 759 Jumping Jelly and 851 Liquorice.
So on top of the illusion technique, this scarf also has a nice color gradient.
I think this is a scarf that you never get tired of.
If only because of the color!

But if you do not like pronounced colors, there are of course many other combinations possible!
This yarn comes in so many colors that there is a combination for everyone.

Pattern


Ravelry klik hier​
Voor het Nederlandse patroon klik hier

Garenpakket hier verkrijgbaar
​

​-----------------------------------------------
Buy on Ravelry click here
​English pattern click here
​
​For  yarn click here
Foto
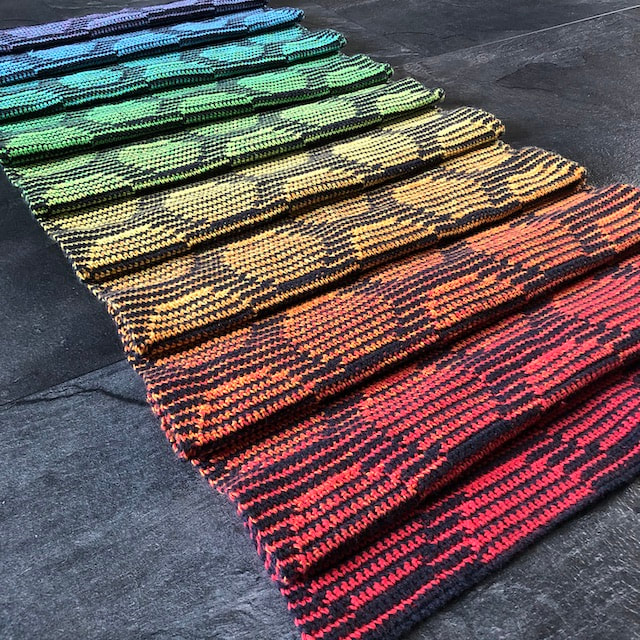
Het patroon bevat een uitleg over deze illusie techniek,
een uitgeschreven werkbeschrijving, een kleurenschema om de kleurwissels visueel te maken 
en een schema waarin je precies kunt bijhouden waar je bent.
Voor deze techniek is dat ideaal, je hoeft zo nooit meer te tellen in welke rij je bent.

-----------------------------

The pattern contains an explanation of my illusion technique,
a written description, a color scheme to visualize the color changes
and a schedule where you can keep track of exactly where you are.
This is ideal for this technique, so you never have to count in which row you are again.
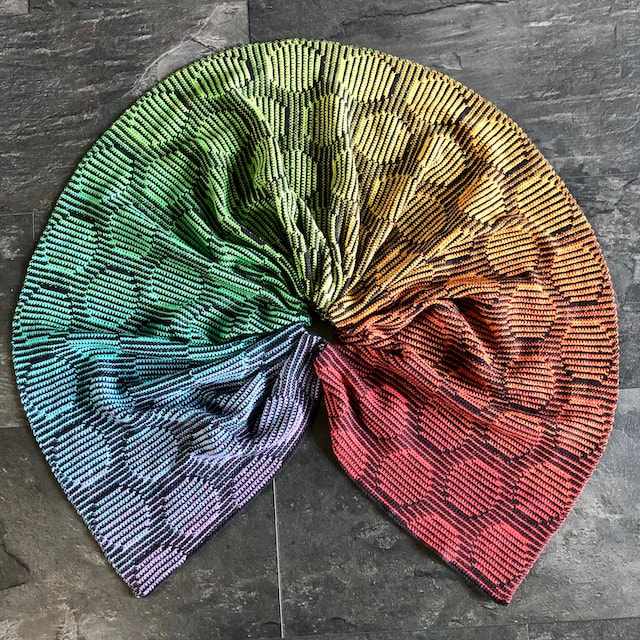
Foto

Both sides are beautiful

Voor wie deze techniek nog niet kent, voor en achterkant zijn beide even mooi.
Het enige verschil tussen beide kanten is dat elke kant zijn eigen dominante kleur heeft.
Op onderstaande foto kun je goed zien dat aan de ene kant de sjaal zwart is met gekleurde bollen en de aan de andere kant is de sjaal gekleurd met zwarte bollen.

-----------------------------

For those who do not yet know this technique, both front and back are equally beautiful.
The only difference between both sides is that each side has its own dominant color.
In the photo below you can clearly see that on one side the scarf is black with dots in color and on the other side the scarf is in color with black dots.

Foto
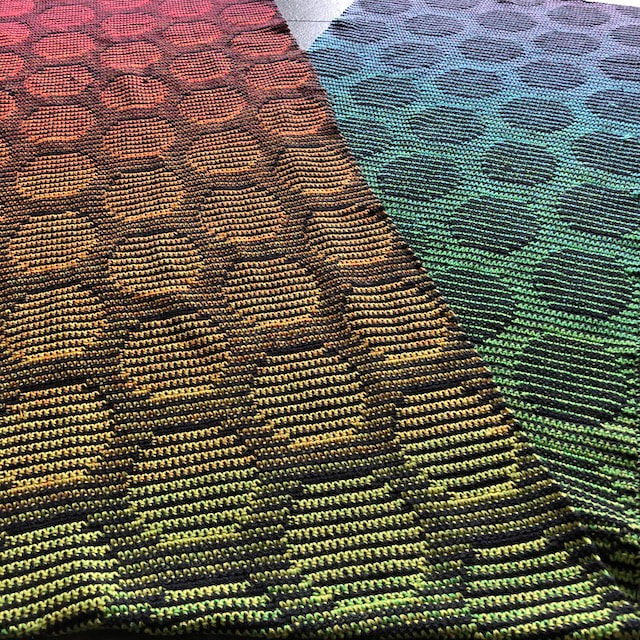
Ik wens jullie heel veel plezier met het maken van deze sjaal!
Wanneer je je werk op social media deelt vergeet me dan niet te taggen zodat ik jullie mooie werk kan bewonderen.
En gebruik de # jumpingdots, #jellinacreations en #illusioncrochet
Op deze manier kan ik jullie werk makkelijk terug vinden en promoten we op deze manier deze mooie techniek.

Ik ben erg benieuwd of jullie voor deze opvallende combinatie gaan of dat je je eigen combinatie kiest.
Laat het me vooral weten!

---------------------------

I hope you enjoy making this scarf!
When you share your work on social media don't forget to tag me so I can admire your beautiful work.
And use the # jumpingdots, #jellinacreations and #illusioncrochet
In this way, I can easily find your work and we promote this beautiful technique.

I am very curious if you go for this striking combination or if you choose your own combination.
Please let me know!

5 Reacties

Patroon minimalism Cowl

9/3/2020

3 Reacties

 
Foto
Zoals jullie vorige weken hebben kunnen lezen heb ik deze heerlijke zachte cowl gehaakt van
Scheepjes Whirl Fine-Art voor manlief en mezelf.
​Vandaag deel ik het patroon met jullie.

​Ik koos voor mijn col voor de kleur 660 Surrealism en ik koos ervoor  om ook nog een draadje Scheepjes Rhythm Alpaca mee te haken, dit deed ik om dat ik de lichtste kleur van de Whirl iets donkerder wou hebben.
(lichte kleuren in mijn gezicht maken mij flets, en dat wil ik natuurlijk niet)
Van de Alpaca koos ik kleur 659 Lindy
En voor mijn man koos ik voor het stoere Minimalism kleur 650
Ik vind deze misschien nog wel mooier als die van mezelf, want ik ben dol op grijszwart tinten.
--------------------------------------

As you may have read last week, I crocheted this lovely soft Cowl with Scheepjes Whirl Fine-Art
for my hubby and myself.
Today I share the pattern with you.

I chose the color 660 Surrealism for my cowl and I chose to combine it with a thread of Scheepjes Rhythm Alpaca as well, because I wanted the lightest color of the Whirl to be slightly darker.
(light colors close to my face make me pale, and of course I don't want that)
From the Alpaca I chose color 659 Lindy
And for my husband I chose the tough Minimalism color 650
I even might find this colour more beautiful than my own, because I love gray-black shades.
But he won't let me wear it because he loves his too much!

Foto
Benodigdheden
1x Scheepjes Whirl-Fine Art (50% Superfine Merino, 25% Micro fibre, 25% Acrylic, 215-225gr/460m)
kleur 650 Minimalisme (grijs/zwart) of 660 Surrealism (blauw)
Optioneel voor de vrouwen cowl:
2x Scheepjes Alpaca Rhythm (80% alpaca, 20% extra one wool, 25gr/200m)
kleur 659 Lindy

Haak naald 4.5 and 5.

4x steekmarkeerder

------------------------------------------------


Needs
1x Scheepjes Whirl-Fine Art (50% Superfine Merino, 25% Micro fiber, 25% Acrylic, 215-225gr / 460m)
color 650 Minimalism (gray / black) or 660 Surrealism (blue)
Optional for the women cowl:
2x Scheepjes Alpaca Rhythm (80% alpaca, 20% extra one wool, 25gr / 200m)
color 659 Lindy

Crochet needle 4.5 and 5.

4x stitch marker

---------------------------------------------------

Gebruikte steken
half stokje
dubbel stokje
vasten
halve vaste
​lossen

2 halve stokjes samengehaakt

---------------------------------------------------

Stitches (US terms)
ch chain
hdc half double crochet
​tr trebble crochet
sc single crochet
ss slipstitch
​2hdctog 2 half double crochet together 


------------------------------------------------------

​Afmetingen 

Deze cowl wordt platgemeten  46 centimeter hoog, 40 centimeter op het breedste stuk en 24 centimeter op het smalste stuk.

------------------------------------------------------

Measurements 
This cowl is measured 46 centimeters high, 40 centimeters on the widest part and 24 centimeters on the narrowest part.


Foto
Opmerkingen
​

-Deze cowl wordt in het rond gehaakt.
-Elke ronde sluit je met een halve vaste, elke toer met halve stokjes begin je met een losse en elke toer met dubbele stokjes begin je met 3 lossen.
-Vanaf toer 5 word er geminderd.
-Vanaf toer 33 haak je verder zonder te minderen.
-Minderen: 2 halve stokjes samen haken om 1 half stokje te minderen doe je als volgt: Garen om naald, naald in volgend steek, haal lus op, doe dit nog 1x, garen om naald, haal door alle lussen.
-Plaats bepalen waar je minder doe je als volgt:
Leg de cowl plat voor je en plaats een markeer aan de linker en rechter kant. Bepaal het midden tussen deze 2 markeerders en plaats op deze 2 plaatsen ook een markeerder. Op de 4 plaatsen die je gemarkeerd hebt minder je.
De volgende toer dat je moet minderen verplaats je de markeerders naar een steek tussen de 2 markeerders, zodat je minderingen steeds mooi over de cowl verdeeld worden.

--------------------------------------------


Pattern Notes

-This cowl is made in rounds.
- Every round is closed with a ss, each row with hdc you start with a ch one and every row with dc you start with ch3.
-Decrease from row 5.
-From round 33 you continue crochet without decreasing.
- Decreasing: Crochet 2 hdc together to reduce 1 hdc as follows: Yarn on needle, needle in next stitch, pick up loop, do this once more, thread around needle, pull through all loops.
-Where to decrease:
Lay the cowl flat in front of you and place a marker on the left and right side. Determine the center between these 2 markers and place a marker at these 2 places. You decrease in the 4 places that you have marked.
The next round that you have to decrease, move the markers to a stitch between the 2 markers, so that your decreases are always nicely distributed over the cowl.
Instructies
Zet 140 lossen op met haak naald 5 en sluit met hv op eerste losse

Met haaknaald 4.5

1 Haak een vaste in elke losse tot einde. Sluit met halve op eerste vaste
2 Begin met 3 lossen, dan dubbelstokje in elke steek tot einde. Sluit met halve vaste vaste op derde losse.
3. 1 losse en in dezelfde steek een half stokje in de achterste lus, wanneer je naar de achterkant van je werk kijkt zie je achter het ‘normale’ v-tje nog een derde horizontaal lusje lopen en een lusje tussen de dubbele stokjes van de vorige toer en hierin haak je. (zie foto 1a en 1b) Half stokje in elke steek tot eind, sluit met een halve vaste op het eerste halve stokje.
4. 3 lossen en in dezelfde steek een dubbel stokje in de achterste lus, het halve stokje van de vorige toer heeft 3 horizontale lusjes, neem de achterste. (zie foto 2a en 2b) Dubbel stokje in elke steek tot eind, sluit met een halve vaste op het eerste dubbele stokje.
5. Deze toer is hetzelfde als toer 3 maar nu gaan we 4 halve stokjes minderen.
6. Als 4
7 t/m 32.  Herhaal toer 5 en 6
33. Herhaal toer 3 en 4 tot je garen op is.

Hecht je draad af en werk de eindjes weg.

Leg je cowl liggend te drogen nadat je hem in een wol wasmiddel hebt geweekt/wassen.
​De cowl hoeft niet geblokt te worden.

--------------------------------------------------


Instructions
Ch 140  with hook 5 and close with first sl st

With crochet hook 4.5

1. sc  in each ch. Close with ss in first sc.
2 Start with ch3, then tr in each stitch till end. Closes with ss on third ch.
3. ch1 and in the same stitch hdc in the back loop, when you look at the back of your work you see a third horizontal loop behind the "normal" v and one loop between de tr stitches of the previous row and that is the loop you work in. (see photo 1a and 1b) Hdc in each stitch till end, close with a ss on the first hdc.
4. Ch3 and crochet in the same stitch a tr in the back loop, the hdc of the previous row has 3 horizontal loops, take the back loop. (see photo 2a and 2b) Tr in each stitch to end, close with ss on the first tr.
5. This round is the same as round 3 but now we will decrease 4 hdc.
6. Same as row 4
7 - 32. Repeat round 5 and 6
33. Repeat rows 3 and 4 until your yarn is finished.

Tie off your thread and work away the ends.

Lay your cowl flat to dry after soaking it in a wool wash.
The cowl does not have to be blocked.
Foto
Ben je enthousiast geworden en wil je ook zo'n lekkere cowl voor jezelf haken?
​Hieronder vind je een link naar naar Caro's Atelier waar je het garen kunt kopen wat je nodig hebt.
Dit is een affiliatie link wat inhoudt dat ik een klein percentage van jou aankoop krijg.
Dit helpt mij als kleine ondernemer terwijl het jou niks extra's kost.

Wanneer je een cowl hebt gemaakt deel deze vooral op social media en op Ravelry.
Tag mij of gebruik de #jellinacreations of #minimalismcowl

Dan wens ik je nog een fijne dag en heel veel plezier met het haken van deze cowl!

--------------------------------

Have you become enthusiastic and do you also want to crochet such a nice cowl for yourself?
Below you will find a link to Caro's Atelier where you can buy the yarn you need.
This is an affiliate link which means that I get a small percentage of your purchase.
This helps me as a small business while it costs you nothing extra.

When you have created a cowl, share it mainly on social media and on Ravelry.
Tag me or use the #jellinacreations or #minimalismcowl

Have a nice day and have fun crocheting this cowl!


​​​Scheepjes Whirl Fine-Art kun je hier bestellen.*

3 Reacties

De minimalism Col voor hem en haar

1/3/2020

0 Reacties

 
Foto

Een mooi stel

En dan heb ik het over onze nieuwe collen!
Ze zijn beide klaar en worden al vaak gedragen want ze zijn heerlijk warm en zacht.
In eerste instantie begon ik er 1 voor mezelf, maar man-lief keek af en toe jaloers mijn kant op en dus besloot ik ook voor hem zo'n heerlijke en functionele cowl te maken.
En daar heb ik geen spijt van want zeg nou zelf, het staat hem super!

De col zelf draagt ook heerlijk door de vorm, hij loopt iets conisch wat inhoud dat hij goed aansluit in de nek, maar mooi over je jas valt.
Met deze vorm heb je dus ook absoluut geen last van tocht in je nek.
Foto

Welke kies jij?

Ik haakte deze fijne collen met Scheepjes Whirl Fine-Art.
Hiervan zijn 12 kleuren dus er is altijd wel een kleur waar jij helemaal verliefd op wordt.
En eenmaal zo'n bol in je handen.... ben je verkocht want het is zo zacht en zo fijn om mee te werken.


​​Scheepjes Whirl Fine-Art kun je hier bestellen.*

Foto

Minimalisme Col voor de vrouw

​Ik koos voor mijn col voor de kleur 660 Surrealism en ik koos ervoor  om ook nog een draadje Scheepjes Rhythm Alpaca mee te haken, dit deed ik om dat ik de lichtste kleur van de Whirl iets donkerder wou hebben.
(lichte kleuren in mijn gezicht maken mij flets, en dat wil ik natuurlijk niet)
Van de Alpaca koos ik kleur 659 Lindy


Foto

Minimalism Col voor de man

En voor mijn man koos ik voor het stoere Minimalism kleur 650
Ik vind deze misschien nog wel mooier als die van mezelf, want ik ben dol op grijszwart tinten.
Maar dat is hij ook dus ik denk niet dat ik de mogelijkheid krijg hem in te pikken ;) 

Foto

Volgende week het gratis patroon!

Nu de collen zelf klaar zijn ga ik snel aan de slag om ook het patroon hiervan snel klaar te krijgen.
Komen jullie volgende week weer terug om te kijken of dat gelukt is?

​--------------------------

** Deze blogpost bevat een affiliatie link, wat inhoudt dat ik een klein percentage van het aankoop bedrag krijg zonder dat het jou iets extra's kost.
Dankjewel!
0 Reacties

Scheepjes CAL Rozeta

4/12/2019

16 Reacties

 
Foto

My Rozeta is hanging!

 I started my Rozeta adventure just like many of you on 2 October making a test piece.
Or actually a bit earlier, of course, a to be exact 3 September when Scheepjes and Tatiana from LillaBjörn's Crochet announced what the next Scheepjes Cal will be.
It was love at first sight and I was sure I wanted to join this CAL, and I immediately had the idea in my head to try Whirl and Whirlette.
After a chat with Tatiana, I thought 3 Whirls and 5 Whirletes would certainly have enough, so they were purchased. And from then on, every week I sat in suspense, waiting to see what part we were allowed to crochet again. 
And of course, the videos from Esther from It's all in A Nutshell were a big help! 


----------------------------------

Ik begon mijn Rozeta avontuur net als vele van jullie op 2 oktober met het maken van een proeflapje.
Of eigenlijk al iets eerder natuurlijk om precies te zijn 3 september toen Scheepjes en Tatiana van LillaBjörn's Crochet aankondigde wat de volgende Scheepjes Cal zal gaan worden.
Het was liefde op het eerste gezicht en ik wist zeker dat ik deze CAL mee wou haken, en ik had ook al meteen het idee in mijn hoofd om het met Whirl en Whirlette te gaan proberen.
Na een overleg met Tatiana dacht ik aan 3 Whirls en 5  Whirletes zeker genoeg te hebben, dus deze werden aangeschaft en ook ik zat net als een groot deel van hakend Nederland elke week weer in spanning af te wachten welk deel we nu weer mochten haken en of het zou lukken met hulp van de video's van Esther van It's all in A Nutshell!

A Wonderfull Process

And how I enjoyed this every week!
I already knew that I like tapestry hooks for a while, but that I would like overlay hooks came as a surprise. (a technique that I will certainly use more often)
Even I have crocheted a large part of the mandala twice, first, it became a bowl, later he started to wave.
Then I frogged and started again with fresh courage.

But every week my Rozeta grew bigger and bigger.
And I wanted him to hang it above the television as an eye-catcher on our black wall.
So I doubted a lot, what shall I do?
Continue the CAL or shall I stop at this point.


--------------------------------------------------
​
En wat heb ik hier elke week van genoten! 
Dat ik tapestry haken leuk vind dat wist ik al een poosje, maar dat ik overlay haken zo leuk zou vinden kwam als een verassing. (een techniek die ik zeker vaker ga gebruiken)
Ook ik heb de mandala voor een groot deel 2x gehaakt, eerst werd het een kommetje, later ging hij golven.
Dan haakte ik terug en begon weer vol frisse moed opnieuw.

Maar elke week groeide mijn Rozeta groter en groter.
En ik wilde hem graag boven de televisie hangen als eye catcher op onze zwarte muur.
Dus ik twijfelde enorm, wat is wijsheid.
Foto

Wallhanging

After week 7 was over, I really thought it was super nice, would it add something if I would finish it completely?
I would probably use it as a blanket and not hang it as I had intended.
Moreover, it is much easier to tighten as a circle, making it more beautiful.
So I made the decision and decided that week 7 was the last week for me.


------------------------------

Na week 7 vond ik hem echt al supermooi, zou het wat toevoegen als ik hem toch helemaal zou afhaken?

Waarschijnlijk zou ik hem dan als deken gebruiken en niet ophangen zoals eerst de bedoeling was.
Bovendien is hij als cirkel veel makkelijker op te spannen, waardoor hij mooier tot z'n recht komt.

Dus de knoop doorgehakt en besloot ik dat week 7 voor mij de laatste week was.

How I prepaired the Rozeta

I frog the last row and instead I crochet a row of tr without increases.
For the last 2 rounds, I crochet a row of tr in the front loop of the last row and a row of tr in the rear loop of the last row.
Now it was time to block my Rozeta to see how much my ring should be in diameter.
I decided to order a (metal) ring of 95 centimeters in diameter (I did that here)
At first, I wanted to crochet him in the ring with dc's, but because there was quite a lot of tension on it, it wasn't that easy.
So, in the end, I chose to sew the two tr rows together, with the metal ring in between of course.
The result is beautiful on our wall, I am so very happy with it!

A detailed tutorial on how to make the rozeta a wall hanger can be found here

-------------------------------

Ik haalde de laatste toer weer uit en hiervoor in de plaats heb ik een toer stokjes gehaakt zonder meerderingen.
Als laatste 2 toeren haakte ik een rij stokjes in het voorste lusje van de laatste toer en  een rij stokjes in het achterste lusje van de laatste toer.
Nu was het tijd om mijn Rozeta op te spannen om te kijken hoeveel mijn ring in doorsnede moest worden.
Ik besloot een (metalen) ring van 95 centimeter in doorsnede te bestellen (dat deed ik hier)
In eerste instantie wou ik hem in de ring haken met vasten maar omdat er best veel spanning op stond ging dit niet zo makkelijk.
Dus uiteindelijk gekozen om de twee stokjes rijen aan elkaar te naaien, met hiertussen uiteraard de metalen ring.
Het resultaat is een prachtig mooi strak gespannen Rozeta aan onze muur, ik ben er zo ontzettend blij mee!

Een uitgebreide tutorial over hoe ik van de Rozeta een muur mandala maakte vindt je hier

Foto

Details

In  Ravelry I kept all the details, which yarn I used and of course how much. Which crochet hooks, and when I had to change my thread tension.
So for this kind of details, take a look at my Ravelry page.


---------------------------------

Hier op Ravelry hield ik alle details bij, welk garen ik gebruikte en natuurlijk hoeveel. Welke haaknaalden, en wanneer ik mijn draadspanning moest veranderen.
​Dus neem voor dit soort details vooral een kijkje op mijn Ravelry pagina.


For the required yarn you can go to one of the Scheepjes sales points, which you can find here.
If you want to order online (for Europe), order here.
This way I get a little commission without it costing you a cent extra.
This allows me to continue to offer free patterns.


​Voor de benodigde garen kun je terecht bij 1 van de scheepjes verkoop punten, deze vind je hier.
Wanneer je online wilt bestellen, bestel dan hier.
Op deze manier krijg ik een klein beetje provisie zonder dat het jou een cent extra kost.
​Dit stelt mij in staat om ook gratis patronen te blijven aanbieden.

16 Reacties

Free Pattern Scarf 'Diamante'

11/10/2019

0 Reacties

 
Foto

Materials

Materials
Scheepjes Whirl (60% cotton, 40% acrylic, 215-225gr/1000m) 1x 771 Jumping Jaffa Pop
3.5 crochet hook
tapestry needle (for weaving in the ends)

Gauge Tension
20sts and 10.5 rows to measure 10 x 10cm over dc using a 3.5mm hook 

Abbreviations (US TERMS)
ch chain
dc double crochet

Measurements
200 x 38cm
216 gram


-----------------------------------------------


Benodigdheden

Scheepjes Whirl (60% katoen,40% acryl, 215-225 gr/1000m) Kleurnr 771 Jumping Jaffa Pop
Haaknaald 3.5
Maasnaald

Stekenverhouding
20 steken en 10.5 toeren in stokjes met een haaknaald van 3.5 meten 10 x 10 cm

Gebruikte steken
l losse
​st stokje


Afmetingen
200 x 38 cm
216 gram
Foto

Pattern notes


This scarf is crocheted in the fillet technique which means that you can make patterns in your work with only dcs (US terms) and chains.
In this case it is diamonds.

With file crochet it is easiest if you can read from a diagram, this is often easier to understand than from the written pattern. Because fillet crochet consists of dcs and chains that constantly alternate, this can become very unclear.

The red frame in my schedule indicates the repetition, this is especially useful for people who want to make the scarf bigger or smaller.

For a neat side, it is best if you start every row with chainless standing crochet.
Esther van It’s All in A Nutshell has made a clear video of this. You can view it here.
If you don't get the hang of it now, just chain 2 or 3, but these do not count as a stitch.

When you crochet a chain in filet crochet, you automatically skip 1 stitch, so this is not mentioned in the pattern.


-------------------------------------------

Deze sjaal wordt gehaakt in de filet techniek wat wil zeggen dat je door middel van stokjes en lossen patronen in je haakwerk kunt aanbrengen.
In dit geval zijn het ruiten.

Bij filehaken is het het makkelijkst als je van een schema kunt haken, dit is vaak overzichtelijker dan van de geschreven patroon. Omdat filet haken uit lossen en stokjes bestaan die elkaar constant afwisselen kan dit erg onoverzichtelijk worden.

Het rode kader in mijn schema geeft de herhaling aan, dit is vooral handig voor mensen die de sjaal groter of kleiner willen maken.

Voor een nette zijkant is het het mooist als je in plaats van 2 of 3 lossen een op zichzelf staand stokje haakt.
Esther van It’s All in A Nutshell heeft hier een duidelijke video van gemaakt. Je kunt deze hier bekijken.
Krijg je dit nu niet onder de knie haak dan gewoon 2 of 3 lossen maar deze tellen dan niet mee als steek.

Wanneer je en losse haakt in filehaakwerk sla je automatisch 1 steek over, dit wordt dus niet vermeld in het patroon.


Foto

Instructions

US TERMS
Chain 85
row 1 dc in 4th ch from hook, dc, 4x (dc, ch), *3x (dc, ch), 2dc, 4x (dc, ch)* repeat between ** again 4x, 3x (dc, ch), 3dc.
row 2 ch2, 3dc, 2x (dc, ch), dc, *ch, 2x (dc, ch), 5dc, 2x (dc, ch, dc)* repeat between ** again 4x, ch, 2x (dc, ch), 5dc.
row 3 ch2, 5dc, 2x (dc, ch), *1x (dc, ch), 10dc, 2x (dc, ch)* repeat between ** again 4x, 1x (dc, ch), 7dc.
row 4 ch2, 8dc, *ch1, 15dc* repeat between ** again 4x, ch, 9dc.
row 5 ch2, 9dc, *7dc, ch1, 8dc* repeat between ** again 4x
row 6 ch3, dc, ch, 5dc, *5dc, 3x (dc, ch), 5dc* repeat between ** again 4x, 6dc, ch, 3dc.
row 7 ch2, dc, 2x (dc, ch), 4dc, *2dc, 5x (dc, ch), 3dc* repeat between ** again 4x, 3dc, 3x (ch, dc)
row 8 ch3, 3x (dc, ch), dc, *dc, 7x (dc, ch), dc* repeat between ** again 4x, dc, 3x (dc, ch), 3dc.
row 9 as row 7
row 10 as row 6
row 11 as row 5
row 12 as row 4
row 13 as row 3
row 14 as 2 row 
row 15-182 Repeat row 1-14 again 12x.
row 183-190 Repeat row  1-8 

Cut yarn and weave in all ends.
Block the scarf.


------------------------------------------

Begin met 85 lossen


rij 1 st in 4e l van naald, st, 4x (st, l), *3x (st, l), 2st, 4x (st, l)* herhaal tussen ** nog 4x, 3x (st, l), 3st.
rij 2 2l, 3st, 2x (st, l), st, *l, 2x (st, l), 5st, 2x (st, l, st)* herhaal tussen ** nog 4x, l, 2x (st, l), 5st.
rij 3 2l, 5st, 2x (st, l), *1x (st, l), 10st, 2x (st, l)* herhaal tussen ** nog 4x, 1x (st, l), 7st.
rij4 2l, 8st, *1l, 15st* herhaal tussen ** nog 4x, l, 9st.
rij 5 2l, 9st, *7st, 1l, 8st* herhaal tussen ** nog 4x
rij 6 3l, st, l, 5st, *5st, 3x (st, l), 5st* herhaal tussen ** nog 4x, 6st, l, 3st.
rij 7 2l, st, 2x (st, l), 4st, *2st, 5x (st, l), 3st* herhaal tussen ** nog 4x, 3st, 3x (l, st)
rij 8 3l, 3x (st, l), st, *st, 7x (st, l), st* herhaal tussen ** nog 4x, st, 3x (st, l), 3st.
rij 9 als 7
rij 10 als 6
rij 11 als 5
rij 12 als 4
rij 13 als 3
rij 14 als 2
rij 15-182 Herhaal rij 1-14 nog 12x.
rij 183-190 Herhaal rij 1-8

Werk je draadjes weg.
Block je sjaal.
Foto

For the required yarn you can go to one of the Scheepjes sales points, which you can find here.
If you want to order online (for Europe), order here.
This way I get a little commission without it costing you a cent extra.
This allows me to continue to offer free patterns.

The pattern this Scarf is also available as a print friendly, advertisement free pdf
pdf Scarf 'Diamante'

------------------------------------------------
​
Voor de benodigde garen kun je terecht bij 1 van de scheepjes verkoop punten, deze vind je 
hier.
Wanneer je online wilt bestellen, bestel dan hier.
Op deze manier krijg ik een klein beetje provisie zonder dat het jou een cent extra kost.
​Dit stelt mij in staat om ook gratis patronen te blijven aanbieden.
-----------------------------------------------


​Het patroon van deze sjaal is ook beschikbaar als print vriendelijke pdf zonder reclame.
PDF Sjaal 'Diamante'
0 Reacties
<<Vorige

    Foto
    jellina-creations staat voor originaliteit, kleurgebruik en grafische vormen.

    RSS-feed


    follow me on

    Foto
    Foto
    Foto
    Foto
    Foto

    ​Wanneer je via onderstaande link je garen besteld gaat er een klein percentage naar mij zonder dat het jou een cent extra kost. Op deze manier kan ik mijn patronen gratis blijven aanbieden. Dank je!
    Foto

    Foto

    Mijn favoriete wolwinkeltje
    Foto

    Categorieën

    Alles
    Diversen
    Filet Haken
    Finished Objects
    Gehaakte Dekens
    Gehaakte Kleding
    Gehaakte Kussens
    Gehaakte Mutsen
    Gehaakte Sjaals
    Gehaakte Tassen
    Gehaakt Wandkleed
    Gratis Haak Patroon
    How To ...
    Illusie Haken
    Kleine Haak Patroontjes
    Koop Patroon
    Polymeerklei
    Publicatie
    Rest Verwerking
    Scheepjes Serie
    Scheepjes Whirl
    Tunisch Haken
    Werk Beschrijving


    Archieven

    Maart 2021
    Februari 2021
    December 2020
    Oktober 2020
    September 2020
    Juli 2020
    Mei 2020
    April 2020
    Maart 2020
    Februari 2020
    Januari 2020
    December 2019
    November 2019
    Oktober 2019
    September 2019
    Augustus 2019
    Juni 2019
    Mei 2019
    April 2019
    Maart 2019
    Januari 2019
    December 2018
    November 2018
    Oktober 2018
    September 2018
    Augustus 2018
    Juli 2018
    Juni 2018
    Mei 2018
    April 2018
    Maart 2018
    Februari 2018
    Januari 2018
    December 2017
    November 2017
    Oktober 2017
    September 2017
    Augustus 2017
    Juli 2017
    Juni 2017
    Mei 2017
    Maart 2017
    Februari 2017
    Januari 2017
    December 2016
    November 2016
    Oktober 2016
    Augustus 2016
    Juli 2016
    Juni 2016
    Mei 2016
    April 2016
    Maart 2016
    Februari 2016
    Januari 2016
    December 2015
    November 2015
    Oktober 2015
    September 2015
    Juni 2015
    Mei 2015
    April 2015
    Maart 2015
    Februari 2015
    Januari 2015
    December 2014
    November 2014
    September 2014
    Augustus 2014
    Juli 2014
    Juni 2014
    Mei 2014
    April 2014
    Januari 2014
    December 2013
    Juni 2013
    Mei 2013
    April 2013
    Maart 2013
    Januari 2013
    Augustus 2012
    Juli 2012
    Mei 2012
    April 2012
    Maart 2012
    Februari 2012
    Januari 2012
    November 2011
    Augustus 2011
    Juli 2011
    April 2010

Copyright jellina-creations.nl © 2019