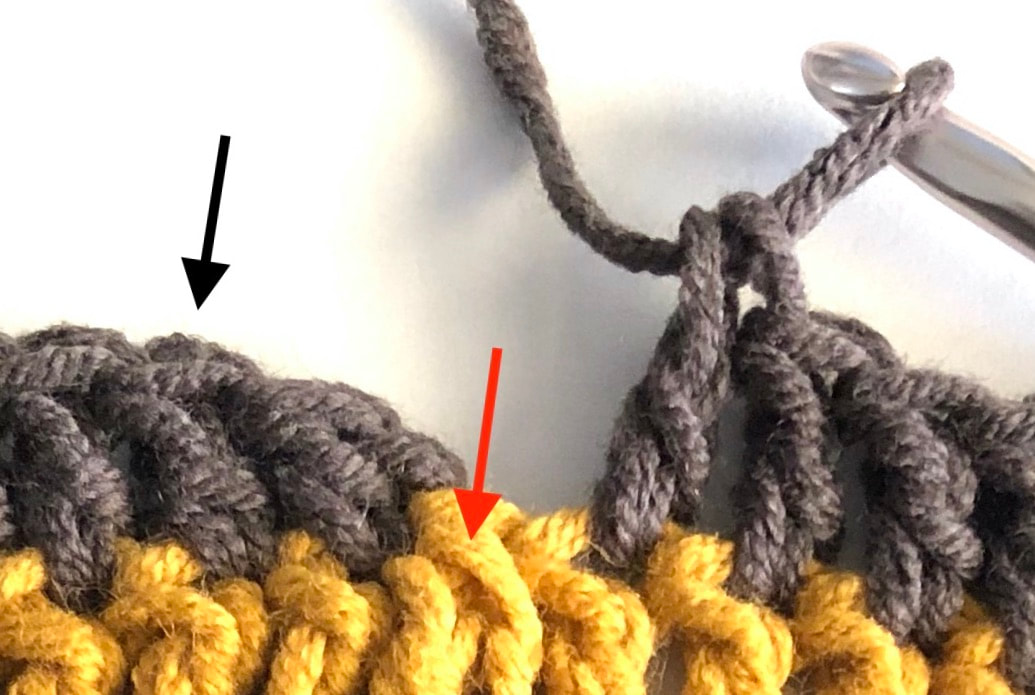
 Materials Scheepjes Softfun, 50g/140m, 60% cotton, 40% acrylic 9 x yellow, 2621 10 x grey 2532 Crochet hook 4.0 mm Measurements The finished blanket is 160 x 107 cm and the weight is 904 gr Gauge/Tension 1 element/rectangle measure before blocking 29 x 18 centimeter But if your elements / rectangles are slightly larger or smaller, this does not matter much for the effect, only your dimensions deviate slightly from the original. Abbreviations ch chain dc double crochet ss slipstitch sc single crochet tr trebbie crochet ------------------------------------------------------ Benodigdheden: Scheepjes Softfun, 50g/140m, 60% katoen, 40% acryl 9 x okergeel kleurnummer 2621 10 x grijs kleurnummer 2532 Haaknaald 4.0 mm Afmetingen 1 element/rechthoek meet ongeblockt 29 x 18 centimeter De gehele deken meet 160 x 107 cm en weegt 904 gr Stekenverhouding 1 element meet ongeblockt 29 x 18 centimeter. Bij deze grootte wordt de deken zoals het voorbeeld. Maar zijn je elementen/rechthoeken iets groter of kleiner maakt dit niet heel veel uit voor het effect, alleen je afmetingen wijken iets af van het origineel. Gebruikte steken l losse st stokje hv halve vaste v vaste Patern notes This blanket consists of 23 whole and 4 half units, which will be sewn together later on. The units consist of 2 colors. You immediately crochet the loose threads along, so you don’t have to tie them off at the end. Every time that you switch colors, you take the thread up to the next row. In this way, you will see a thread on the back side. The dc stitches mentioned in the description, e.g. (3), will function as the corners of the unit. These dc stitches will all be crocheted in the same stitch. Be sure to keep counting :) If you feel like your rectangle will curl in the corners, you could swap the middle dc of the corner for a tr. This will really depend on your way of crocheting, so it will be different for everyone! It will not make a difference for the design. --------------------------------------------------------------- Opmerkingen Deze deken is opgebouwd uit 23 hele plus 4 halve losse elementen welke later aan elkaar genaaid worden. De elementen bestaan uit 2 kleuren, de losse draadjes haak je meteen mee en hoef je dus niet meer af te hechten. Je neemt, bij wisseling van kleur, je draad steeds mee omhoog naar de volgende toer, hierdoor zie je aan de achterkant een draadje lopen. De stokjes die in de beschrijving tussen haakjes vermeld staan, bijv (3), vormen de hoeken van het element. Deze stokjes worden alle in dezelfde steek gehaakt. Controleer je werk steeds, blijf tellen, anders loop je kans dat je rechthoek scheef trekt. Wanneer je het idee hebt dat je rechthoek gaat krullen in de hoeken dan kun je in de hoeken het middelste stokje vervangen voor een dubbelstokje. Dit hangt erg af van je hand van haken en dat kun je dus voor jezelf bepalen, het maakt voor het ontwerp geen verschil. PatternInstructions one element (23 total) With color A: 21 ch (don’t crochet too tight, because you’re going to work in both ways) Row 1 Dc in 3rd ch from hook, 18dc (crochet the furthest loop from the chains) In the final ch, 6 more dc. Crochet the following part across your starting thread, so that the starting thread is maneuvered away nicely. 18dc, you can cut off the end of your starting thread. Crochet 7dc in the 19th ch (see the arrow in photo 1a). Finalize with ss on the second dc (see photo 1b). --------------------------------------- Werkwijze hele element (maak er 23) Met kleur A 21 lossen (haak los want je gaat aan beide kanten werken) Toer 1 St in 3e l van haaknaald, 18st (haak hierbij de achterste lus van de opzet-lossen) In laatste losse nog 6st Haak het volgende gedeelte over je begindraad heen, zodat deze direct netjes is weggewerkt. 18st, laatste stukje van je begindraad kun je afknippen. Haak in de 19e losse 7 stokjes (zie pijl foto 1a), sluit met hv op 2e st (zie foto 1b) 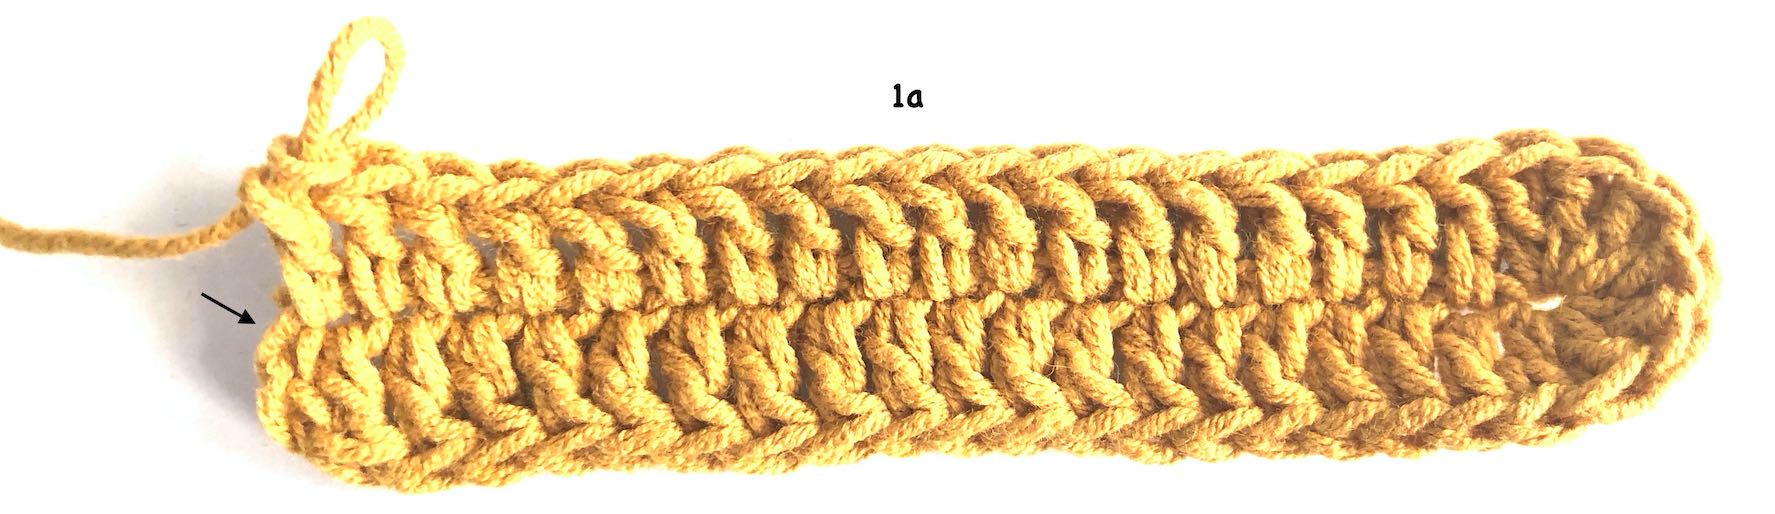 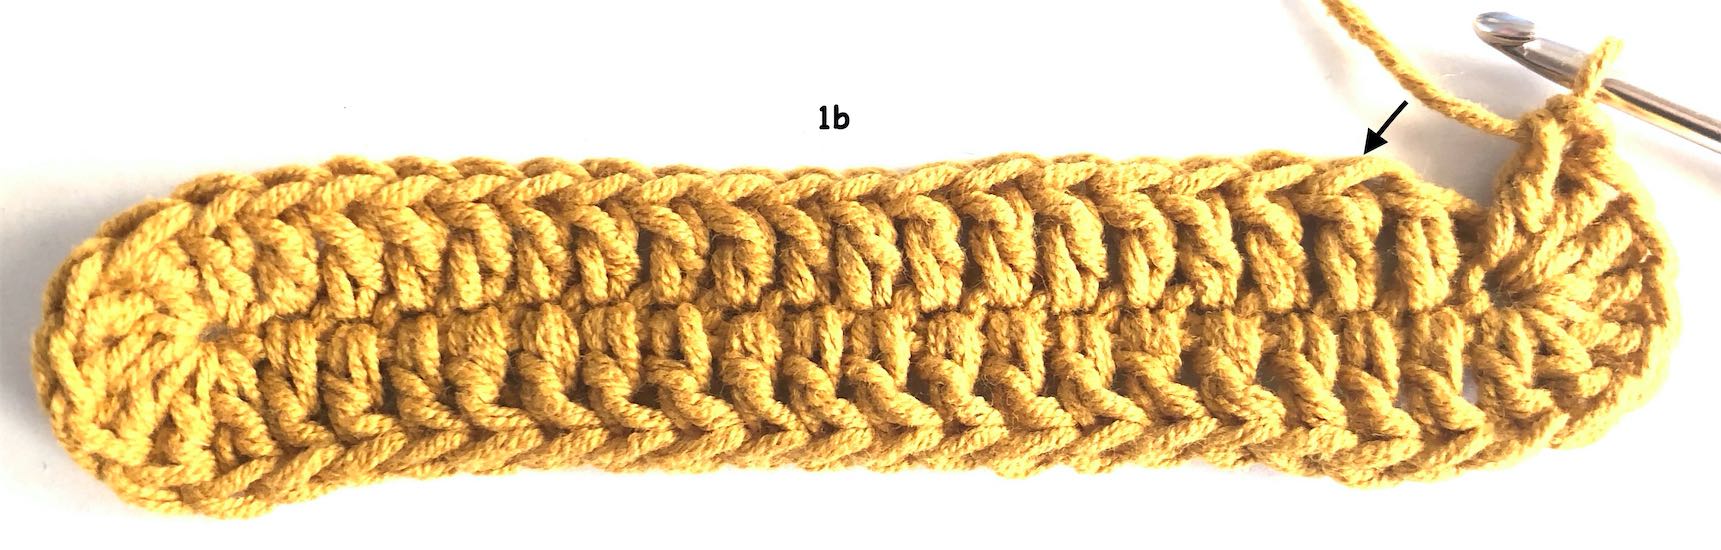 Row 2 Attach color B with an ss and ch1 (pull thread A to tighten) Crochet the following part across your starting thread. 1dc in the same gap as color A ss 18dc, you can cut off the end of your starting thread. (5dc), 3dc, (5dc), 20dc, (5dc), 3dc, (5dc), 1dc and end with ss on the 1st dc (see photo 2) -------------------------------------------------------- Toer 2 Hecht kleur B aan met een hv en haak 1l (trek draad A strak aan) Haak het volgende gedeelte over je begindraad heen. 1st in dezelfde opening als de kleur A hv 18 st, laatste stukje van je begindraad kun je afknippen. (5st), 3st, (5st), 20st, (5st), 3st, (5st), 1st, sluit met hv op 1e st (zie foto 2)  Row 3 Grab color A with ss and ch1 (pull thread B to tighten) 1dc in underlying dc (see photo 3a) 20dc, (3dc), 7dc, (3dc), 24dc, (3dc), 7dc, (3dc), 3dc, close with ss on second dc (see photo 3b) -------------------------------------------------------- Toer 3 Pak met hv kleur A op en haak 1l (trek draad B strak aan) 1st in onderliggend stokje (zie foto 3a) 20st, (3st), 7st, (3st), 24st, (3st), 7st, (3st), 3st, , sluit met hv op 2e st (zie foto 3b)  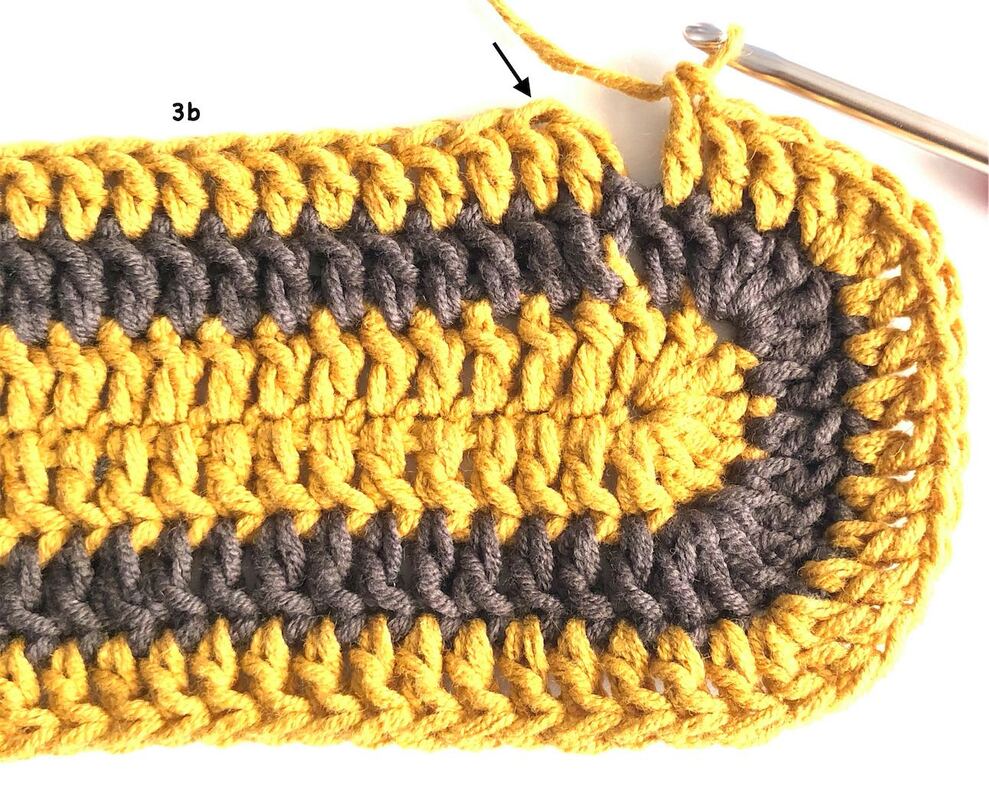 Row 4 Grab color B with ss and ch1 (pull thread A to tighten) 1dc in underlying dc (see photo 3a) 20dc, (5dc), 9dc, (5dc), 26dc, (5dc), 9dc, (5dc), 4dc and 1 more dc that you insert a little deeper than usual. You also take the first loop from the underlying sc (see photo below red arrow). So you grab 3 loops instead of the usual 2. Close with ss on the second dc (see photo below black arrow) ----------------------------------------------------------- Toer 4 Pak met hv kleur B op en haak 1v (trek draad A strak aan) 1st in onderliggend stokje (zie foto 3a) 20st, (5st), 9st (5st), 26st, (5st), 9st, (5st), 4st, en nog 1 stokje wat je iets dieper dan normaal insteekt, je neemt ook het voorste lusje van de onderliggende vaste mee (zie onderstaande foto rode pijl), je pakt dus 3 lusjes op ipv de gebruikelijke 2, sluit met hv op 2e st (zie onderstaande foto zwarte pijl) Row 5 Grab color A with ss and ch1 (pull thread B to tighten) 1dc in underlying dc (see photo 3a) 21dc, (3dc), 13dc, (3dc), 30dc, (3dc), 13dc, (3dc), 7dc, and 1 more dc that you insert a little deeper than usual. You also take the first loop from the underlying sc (see photo above red arrow). So you grab 3 loops instead of the usual 2. Close with ss on the second dc (see photo above black arrow). Row 6 Grab color B with ss and ch1 (pull thread A to tighten) 1dc in underlying dc (see photo 3a) 21dc, (5dc), 15dc, (5dc), 32dc, (5dc), 15dc, (5dc), 9dc and 1 more dc that you insert a little deeper than usual. You also take the first loop from the underlying sc (see photo 4’s red arrow). So you grab 3 loops instead of the usual 2. Close with ss on the second dc (see photo 4’s black arrow). Row 7 Grab color A with ss and ch1 (pull thread B to tighten) 1dc in underlying dc (see photo 3a) 22dc, (3dc), 19dc, (3dc), 36dc, (3dc), 19dc, (3dc), 12dc and 1 more dc that you insert a little deeper than usual. You also take the first loop from the underlying sc (see photo 4’s red arrow). So you grab 3 loops instead of the usual 2. Close with ss on the second dc (see photo 4’s black arrow). Row 8 Grab color B with ss and ch1 (pull thread A to tighten) 1dc in underlying dc (see photo 3a) 22d, (5dc), 21dc, (5dc), 38dc, (5dc), 21dc, (5dc), 14dc and 1 more dc that you insert a little deeper than usual. You also take the first loop from the underlying sc (see photo above red arrow). So you grab 3 loops instead of the usual 2. Close with ss on the second dc (see photo above black arrow). Row 9 Grab color A with ss and ch1 (pull thread B to tighten) 1sc in underlying dc (see photo 3a), crochet the first 20 stitches across color B and then cut this. 23sc, (sc, ch2, sc), 25sc, (sc, ch2, sc), 42sc (sc, ch2, sc) 25sc, (sc, ch2, sc) 17sc and 1 more sc that you insert a little deeper than usual. You also take the first loop from the underlying sc and close with ss on the first sc. Cut yarn and keep 100cm for sewing the pieces together. -------------------------------------------------- Toer 5 Pak met hv kleur A op en haak 1l (trek draad B strak aan) 1st in onderliggend stokje (zie foto 3a) 21st, (3st), 13st (3st), 30st, (3st), 13st, (3st), 7st, en nog 1 stokje wat je iets dieper dan normaal insteekt, je neemt ook het voorste lusje van onderliggende vaste mee (zie bovenstaande foto, rode pijl), je pakt dus 3 lusjes ipv de gebruikelijke 2, sluit met hv op 2e st (zie bovenstaande foto, zwarte pijl) Toer 6 Pak met hv kleur B op en haak 1l (trek draad A strak aan) 1st in onderliggend stokje (zie foto 3a) 21st, (5st), 15st (5st), 32st, (5st), 15st, (5st), 9st, en nog 1 stokje wat je iets dieper dan normaal insteekt, je neemt ook het voorste lusje van onderliggende vaste mee (zie foto 4, rode pijl), je pakt dus 3 lusjes ipv de gebruikelijke 2, sluit met hv op 2e st (zie foto 4, zwarte pijl) Toer 7 Pak met hv kleur A op en haak 1l (trek draad B strak aan) 1st in onderliggend stokje (zie foto 3a) 22st, (3st), 19st (3st), 36st, (3st), 19st, (3st), 12st, en nog 1 stokje wat je iets dieper dan normaal insteekt, je neemt ook het voorste lusje van onderliggende vaste mee (zie foto 4, rode pijl), je pakt dus 3 lusjes ipv de gebruikelijke 2, sluit met hv op 2e st (zie foto 4, zwarte pijl) Toer 8 Pak met hv kleur B op en haak 1l (trek draad A strak aan) 1st in onderliggend stokje (zie foto 3a) 22st, (5st), 21st (5st), 38st, (5st), 21st, (5st), 14st, en nog 1 stokje wat je iets dieper dan normaal insteekt, je neemt ook het voorste lusje van onderliggende vaste mee (zie foto 4, rode pijl), je pakt dus 3 lusjes ipv de gebruikelijke 2, sluit met hv op 2e st (zie foto 4, zwarte pijl) Toer 9 Pak met hv kleur A op en haak 1l (trek draad B strak aan) 1v in onderliggend stokje (zie foto 3a), haak de eerste 20 steken over kleur B en knip deze dan af. 23v, (v, 2l, v), 25v, (v, 2l, v), 42v, (v, 2l, v), 25v, (v, 2l, v), 17v, nog 1 laatste v en deze steek je ook iets dieper zodat je het voorste lusje van het onderliggende vaste meeneemt, sluit met hv op eerste v. Knip je draad af op 1 meter. Half element (4 total) 11ch with color A (crochet loosely, because you’re working from both sides). Row 1 Dc in 3rd ch from hook, 8dc 6 more dc in the final ch Crochet the following part across your starting thread. 8dc, then you can cut off the end of your starting thread. For now, you’re done with color A. Attach a stitch marker on the loop. Row 2 Attach color B on the first dc of row 1 with a chainless standing dc OR ch3. Crochet the following part across your starting thread. 8dc, (5dc), 3dc, (5dc), 9dc and you can cut off the end of your starting thread. For now, you’re done with color B. Attach a stitch marker to the loop. Row 3 Time for color A again. Pull the loop a little bit so that it’s on the same height as row 2 (see photo 5a) Crochet 1ss in the first stitch to bring color A on the good height (photo 5b) and then a chainless standing dc OR 3ch. 10dc, (3dc), 7dc, (3dc), 11dc For now, you’re done with color A. Attach a stitch marker to the loop. ----------------------------------------------------------------------- Werkwijze half element (maak er 4) Met kleur A 11 lossen (haak los want je werkt aan beide kanten). Toer 1 St in 3e l van haaknaald, 8st In laatste l nog 6st Haak het volgende gedeelte over je begindraad heen. 8st, laatste stukje van je begindraad kun je afknippen. Je bent even klaar met kleur A, zet een steken markeerder op de lus Toer 2 Hecht kleur B aan op het eerste stokje van toer 1 met een opzichzelfstaand stokje, of 3 lossen. Haak het volgende gedeelte over je begindraad heen. 8st, (5st), 3st, (5st), 9st, laatste stukje van je begindraad kun je afknippen. Je bent even klaar met kleur B, zet een steken markeerder op de lus Toer 3 Pak kleur A weer op, trek de lus iets op zodat hij op dezelfde hoogte zit als toer 2 (foto 5a) Haak in de eerste steek een hv om kleur A op hoogte te brengen (foto 5b) en dan een opzichzelfstaand stokje of 3 lossen. 10st, (3st), 7st, (3st), 11st Je bent even klaar met kleur A, zet een steken markeerder op de lus.   Row 4 Time for color B again. Pull the loop a little bit so that it’s on the same height as row 3. Crochet 1ss in the first stitch to bring color B on the good height and then a chainless standing dc OR 3ch. 11dc, (5dc), 9dc, (5dc), 12dc For now, you’re done with color B. Attach a stitch marker to the loop. Row 5 Time for color A again. Pull the loop a little bit so that it’s on the same height as row 4. Crochet 1ss in the first stitch to bring color A on the good height and then a chainless standing dc OR 3ch. 13dc, (3dc), 13dc, (3dc), 14dc For now, you’re done with color A. Attach a stitch marker to the loop. Row 6 Time for color B again. Pull the loop a little bit so that it’s on the same height as row 5. Crochet 1ss in the first stitch to bring color B on the good height and then a chainless standing dc OR 3ch. 14dc, (5dc), 15dc, (5dc), 15dc For now, you’re done with color B. Attach a stitch marker to the loop. Row 7 Time for color A again. Pull the loop a little bit so that it’s on the same height as row 6. Crochet 1ss in the first stitch to bring color A on the good height and then a chainless standing dc OR 3ch. 16dc, (3dc), 19dc, (3dc), 17dc For now, you’re done with color A. Attach a stitch marker to the loop. Row 8 Time for color B again. Pull the loop a little bit so that it’s on the same height as row 7. Crochet 1ss in the first stitch to bring color B on the good height and then a chainless standing dc OR 3ch. 17dc, (5dc), 21dc, (5dc), 18dc Now you’re done with color B for real. Cut off the thread at about 10-15cm. Row 9 Time for color A again. Crochet 1sc in underlying dc (crochet the first 20 stitches across color B and cut this off) 20sc, (sc, ch2, sc), 25sc (sc, ch2, sc) 19sc (sc, ch2, sc) 24sc divided over the side, (sc, ch2, sc) finalize with ss on the first sc. Cut off your thread at about 1 meter. ------------------------------------------------------- Toer 4 Pak kleur B weer op, trek de lus iets op zodat hij op dezelfde hoogte zit als toer 3 Haak in de eerste steek een hv om kleur B op hoogte te brengen en dan een opzichzelfstaand stokje of 3 lossen. 11st, (5st), 9st, (5st), 12st Je bent even klaar met kleur B, zet een steken markeerder op de lus. Toer 5 Pak kleur A weer op, trek de lus iets op zodat hij op dezelfde hoogte zit als toer 4 Haak in de eerste steek een hv om kleur A op hoogte te brengen en dan een opzichzelfstaand stokje of 3 lossen. 13st, (3st), 13st, (3st), 14st Je bent even klaar met kleur A, zet een steken markeerder op de lus. Toer 6 Pak kleur B weer op, trek de lus iets op zodat hij op dezelfde hoogte zit als toer 5 Haak in de eerste steek een hv om kleur B op hoogte te brengen en dan een opzichzelfstaand stokje of 3 lossen. 14st, (5st), 15st, (5st), 15st Je bent even klaar met kleur B, zet een steken markeerder op de lus. Toer 7 Pak kleur A weer op, trek de lus iets op zodat hij op dezelfde hoogte zit als toer 6 Haak in de eerste steek een hv om kleur A op hoogte te brengen en dan een opzichzelfstaand stokje of 3 lossen. 16st, (3st), 19st, (3st), 17st Je bent even klaar met kleur A, zet een steken markeerder op de lus. Toer 8 Pak kleur B weer op, trek de lus iets op zodat hij op dezelfde hoogte zit als toer 7 Haak in de eerste steek een hv om kleur B op hoogte te brengen en dan een opzichzelfstaand stokje of 3 lossen. 17st, (5st), 21st, (5st), 18st Je bent nu klaar met kleur B, knip je draad af op 10/15 centimeter. Toer 9 Pak met hv kleur A op en haak 1v in onderliggend stokje, (haak de eerste 20 steken over kleur B en knip deze dan af) 20v, (v, 2l, v), 25v, (v, 2l, v), 19v, (v, 2l, v), 24v verdeeld over de zijkant, (v, 2l, v), sluit met hv op eerste v. Knip je draad af op ongeveer 1 meter. 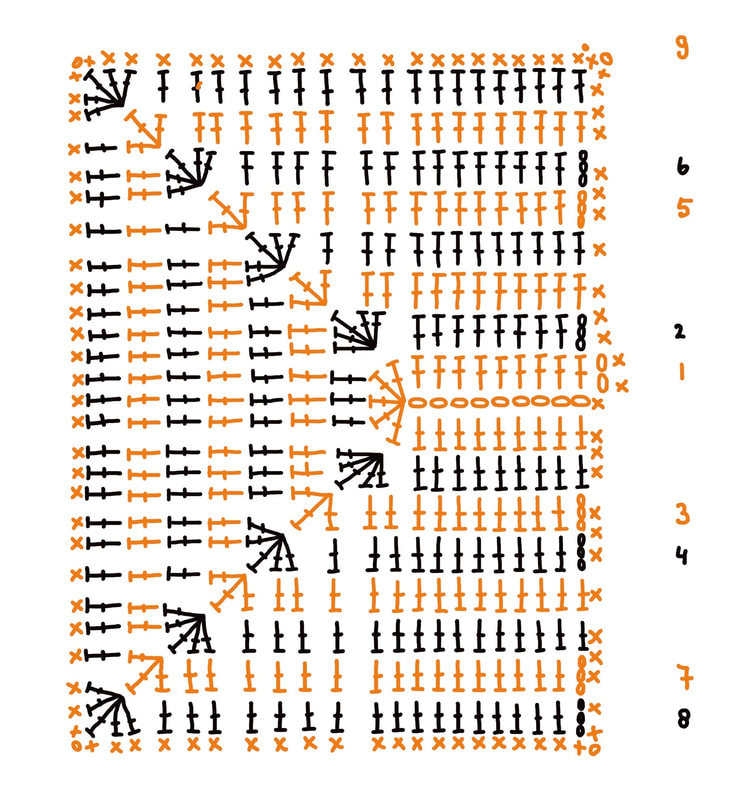 Sew them togetherPlace the parts with the good sides on eachother and stitch them together with the whip stitch (shown on photo) ---------------------------------------------------- Plaats de delen met de goede kanten op elkaar en naai ze met de overhandse steek (zie foto) aan elkaar. 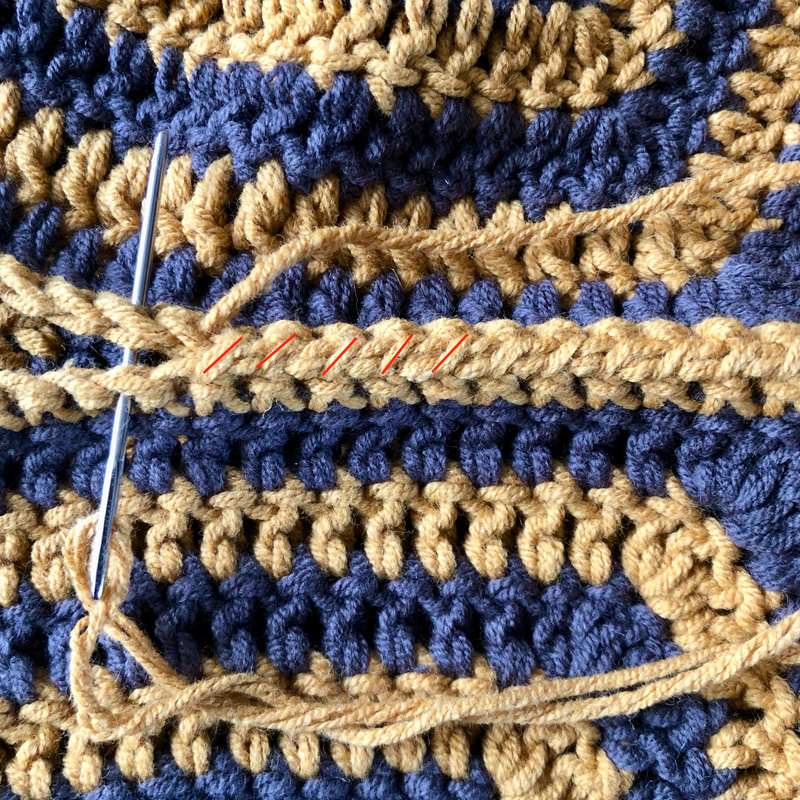 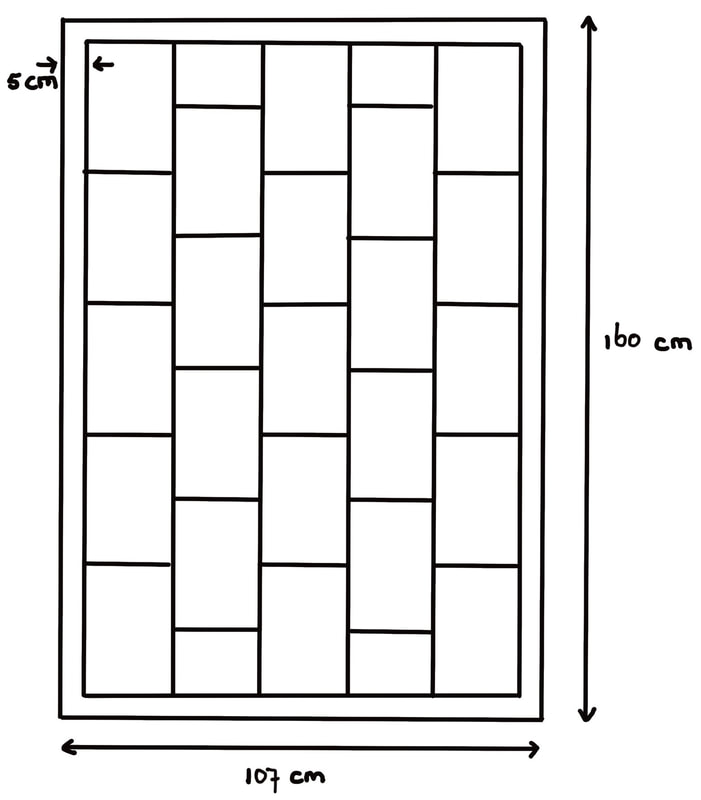 Place a stitch marker in the middle stitch of the long sides. The easiest way to do this is to fold the rectangle once and insert the stitch marker. This will facilitate the process of stitching the units together, because you will keep moving the units. In this way you will connect them up until halfway with the opposite rectangle. In above picture you can see how the blanket should be stitched together. --------------------------------------- Plaats een steken markeerder in de middelste steek van de lange kanten. Dit doe je het makkelijkst door de rechthoek dubbel te vouwen en hier een markeerden in te steken. Dit vereenvoudigt het aan elkaar naaien van de elementen omdat je de elementen steeds laat verspringen en ze dus tot de helft met de tegenoverliggende rechthoek verbindt. Hierboven zie je schematisch afgebeeld hoe de deken aan elkaar wordt genaaid. BorderRow 1 You should face the wrong side. Attach color A wherever you want. Crochet sc in every sc. In the corners, sc- ch1- sc-, close with ss in the first sc of this row and cut yarn. Row 2 With the good side facing you, attach color B wherever you want. Crochet sc in every sc. In the corners, sc- ch- sc, close with ss in the first sc from this row. Row 3 Turn. ch3 OR chainless standing dc, then crochet an dc in every sc. Crochet 3dc in every corner. Close with an ss on the 3rd ch (or the chainless standing dc). Row 4 Turn. Crochet sc in every dc. In corners: sc- ch- sc and close with ss in the first sc of this row. Row 5 Turn. ch3 OR chainless standing dc, then crochet an dc in every sc. Crochet 3dc in every corner. Close with an ss on the 3rd ch (or the chainless standing dc) Row 6 Turn. Crochet sc in every dc. In corners: sc- ch- sc and close with ss in the first sc of this row. Row 7 Turn your piece. ch3 OR chainless standing dc, then crochet an dc in every sc. Crochet 3dc in every corner. Close with an ss on the 3rd ch (or the chainless standing dc) Row 8 Turn. Crochet sc in every dc. In corners: sc- ch- sc and close with ss in the first sc of this row. Now tie off all threads and block your blanket. -------------------------------------------- Toer 1 Met de verkeerde kant voor. Hecht kleur A aan willekeurig waar. Haak in elke vaste een vaste, in de hoeken haak je een vaste- losse- vaste, sluit deze toer met een halve vaste in de eerste vaste van deze toer en knip dit draad af. Toer 2 Met goede kant voor hecht je kleur B aan willekeurig waar. Haak in elke vaste een vaste, in de hoeken haak je een vaste - losse - vaste, sluit deze toer met een halve vaste in de eerste vaste van deze toer. Toer 3 Keer je werk. Haak 3 lossen (of een opzichzelfstaand stokje), haak vervolgens in elke vaste een stokje. In de hoeken haak je 3 stokjes. Sluit deze toer met een halve vaste op de derde losse ( of het opzichzelf staand stokje) Toer 4 Keer je werk. Haak in elke stokje een vaste, in de hoeken haak je een vaste - losse - vaste, sluit deze toer met een halve vaste in de eerste vaste van deze toer. Toer 5 Keer je werk. Haak 3 lossen (of een opzichzelfstaand stokje), haak vervolgens in elke vaste een stokje. In de hoeken haak je 3 stokjes. Sluit deze toer met een halve vaste op de derde losse ( of het opzichzelf staand stokje) Toer 6 Keer je werk. Haak in elke stokje een vaste, in de hoeken haak je een vaste - losse - vaste, sluit deze toer met een halve vaste in de eerste vaste van deze toer. Toer 7 Keer je werk. Haak 3 lossen (of een opzichzelfstaand stokje), haak vervolgens in elke vaste een stokje. In de hoeken haak je 3 stokjes. Sluit deze toer met een halve vaste op de derde losse ( of het opzichzelf staand stokje) Toer 8 Keer je werk. Haak in elke stokje een vaste, in de hoeken haak je een vaste - losse - vaste, sluit deze toer met een halve vaste in de eerste vaste van deze toer. Hecht alle draadjes af en block je deken. 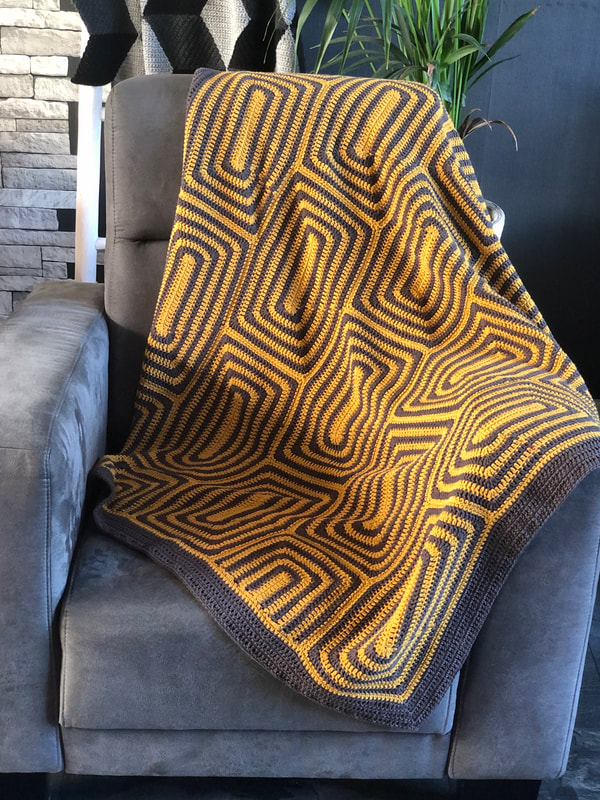
0 Comments
Leave a Reply. |

Ravelry

Wanneer je via onderstaande link je garen besteld gaat er een klein percentage naar mij zonder dat het jou een cent extra kost. Op deze manier kan ik mijn patronen gratis blijven aanbieden.
Dank je! 
|