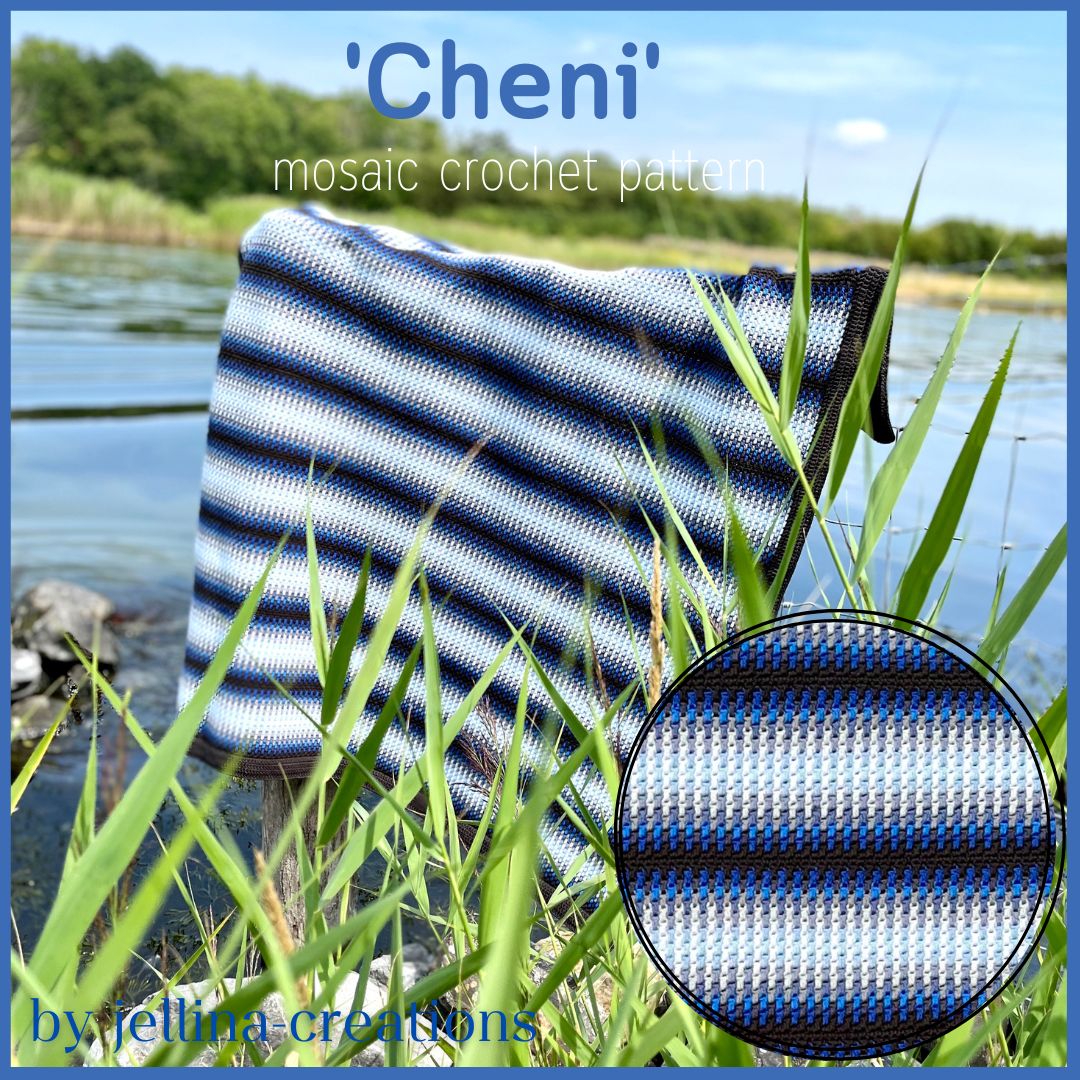
 Scheepjes Softfun (60% cotton, 40% acrylic, 50g/140m) 7x A 2628 Charcoal 2x B 2626 Cobalt 2x C 2601 Graphite 2x D 2629 Azure 2x E 2510 Dove 2x F 2489 Denim 2x G 2530 Cloud 2x H 2602 Slate Blue 2x I 2627 Mist 2x J 2432 Light Blue 2x K 2412 Snow 1x L 2613 Sky Crochethook: 3.5mm for the blanket and 3.0mm for the border. Measurements: 126x109cm weight without border 1086g weight with border 1270g Gauge/Tension: 19.5 sts and 21 rows to measure 10 x10cm using a 3.5mm hook. -------------------------------------- Zoals beloofd het patroon van de bootdeken 'Cheni' Gehaakt met Scheepjes Softfun (60% katoen, 40% acryl, 50g/140m) Benodigdheden: 7x Kleur A 2628 Charcoal 2x Kleur B 2626 Cobalt 2x Kleur C 2601 Graphite 2x Kleur D 2629 Azure 2x Kleur E 2510 Dove 2x Kleur F 2489 Denim 2x Kleur G 2530 Cloud 2x Kleur H 2602 Slate Blue 2x Kleur I 2627 Mist 2x Kleur J 2432 Light Blue 2x Kleur K 2412 Snow 1x Kleur L 2613 Sky Haaknaald: 3.5mm voor deken en 3.0mm voor rand Afmetingen: 126x109 Gewicht zonder rand: 1086 gram Gewicht met rand: 1270 gram Steken verhouding: 21 rijen en 19.5 steken maken 10 x10 cm Pattern NotesThis blanket is crocheted in the overlay mosaic technique. That means that you cast on your thread every row and cut your thread after each row. The first and last stitch are always normal single crochet. The single crochet stitches are always crocheted in the back loop. (except for this blanket row 26 and 27) and the double crochet stitches in the front loop of the stitch 2 rows below. This technique means a wonderfully relaxed crochet work but with lots of ends that need to be tucked away. This is fortunately solved by a double border where all the ends are hidden. This can be done in different ways. For this blanket we use a simplified way. But this one requires a slightly different way of crocheting from the beginning. 1 Row 1 crochet in the 'bump' i.e. in the loop at the back of the two loops. 2 Start with a with a slipknot on your hook. 3 Bind off with a chain. Because of the last 2 steps you don't have to knot your threads afterwards because they are already fixed! There is a you tube video available in which I tried to cover the most obscure points. I hope this provides clarity. ---------------------------------------- Deze deken wordt gehaakt in de overlay mozaiek techniek. Dat wil zeggen dat je elke rij je draad aanhecht en na elke rij je draad afknipt. De eerste en laatste steek zijn altijd normale vasten. Verder worden de vasten altijd in de achterste lus gehaakt (bij deze deken rij 26 en 27 uitgezonderd) en de stokjes in de voorste lus van de steek 2 rijen lager. Deze techniek betekend een heerlijk relaxed haakwerkje maar met veel eindjes die weggewerkt moeten worden. Dit wordt gelukkig opgelost door een dubbele rand waar alle eindjes in worden verstopt. Dit kan op verschillende manieren. Voor deze deken gebruiken we een vereenvoudigde manier. Maar deze vergt wel vanaf het begin een iets andere manier van haken. 1 Rij 1 haak je in de ‘bump’ dwz in het lusje aan de achterkant van de twee lusjes. 2 Hecht aan met een opzetlus. 3 Hecht af met een losse. Door de laatste 2 punten hoef je na afloop je draadjes niet meer aan elkaar te knopen want ze zijn al gefixeerd! Er is een you tube video beschikbaar waarin ik de onduidelijkste punten hebt geprobeerd te behandelen. Ik hoop dat dit duidelijkheid biedt. PatternInstructions (US terms) With color A, chain 200 Row 1 Note: work this row in the 'bump' or in the back of the 2 loops Single crochet in 2nd chain, 198 single crochet, secure with a chain 1, cut yarn. Row 2 Join with a slip knot and crochet a single crochet in the first stitch, 197 single crochet in the back loop, 1 single crochet in the last stitch, secure with a chain 1, cut thread. Row 3 Join with a slip knot and crochet a single crochet in the first stitch *double crochet in front loop of stitch 2 rows below, single crochet in back loop* repeat until there are 2 stitches left, 1 double crochet in front loop of stitch 2 rows below, and 1 single crochet in the last stitch, secure with a chain, cut thread. Row 4 with color B Join with a slip knot and crochet a single crochet in the first stitch, *single crochet in back loop, double crochet in front loop of stitch 2 rows below* repeat until there are 2 stitches left, 1 single crochet in back loop, and 1 single crochet in the last stitch, secure with a chain, cut thread. Row 5 with color C Join with a slip knot and crochet a single crochet in the first stitch *double crochet in front loop of stitch 2 rows below, single crochet in back loop* repeat until there are 2 stitches left, 1 double crochet in front loop of stitch 2 rows below, and 1 single crochet in the last stitch, secure with a chain, cut thread. Row 6 with color D Join with a slip knot and crochet a single crochet in the first stitch, *single crochet in back loop, double crochet in front loop of stitch 2 rows below* repeat until there are 2 stitches left, 1 single crochet in back loop, and 1 single crochet in the last stitch, secure with a chain, cut thread. Row 7 with color E Join with a slip knot and crochet a single crochet in the first stitch *double crochet in front loop of stitch 2 rows below, single crochet in back loop* repeat until there are 2 stitches left, 1 double crochet in front loop of stitch 2 rows below, and 1 single crochet in the last stitch, secure with a chain, cut thread. Row 8 with color F Join with a slip knot and crochet a single crochet in the first stitch, *single crochet in back loop, double crochet in front loop of stitch 2 rows below* repeat until there are 2 stitches left, 1 single crochet in back loop, and 1 single crochet in the last stitch, secure with a chain, cut thread. Row 9 with color G Join with a slip knot and crochet a single crochet in the first stitch *double crochet in front loop of stitch 2 rows below, single crochet in back loop* repeat until there are 2 stitches left, 1 double crochet in front loop of stitch 2 rows below, and 1 single crochet in the last stitch, secure with a chain, cut thread. Row 10 with color H Join with a slip knot and crochet a single crochet in the first stitch, *single crochet in back loop, double crochet in front loop of stitch 2 rows below* repeat until there are 2 stitches left, 1 single crochet in back loop, and 1 single crochet in the last stitch, secure with a chain, cut thread. Row 11 with color I Join with a slip knot and crochet a single crochet in the first stitch *double crochet in front loop of stitch 2 rows below, single crochet in back loop* repeat until there are 2 stitches left, 1 double crochet in front loop of stitch 2 rows below, and 1 single crochet in the last stitch, secure with a chain, cut thread. Row 12 with color J Join with a slip knot and crochet a single crochet in the first stitch, *single crochet in back loop, double crochet in front loop of stitch 2 rows below* repeat until there are 2 stitches left, 1 single crochet in back loop, and 1 single crochet in the last stitch, secure with a chain, cut thread. Row 13 with color K Join with a slip knot and crochet a single crochet in the first stitch *double crochet in front loop of stitch 2 rows below, single crochet in back loop* repeat until there are 2 stitches left, 1 double crochet in front loop of stitch 2 rows below, and 1 single crochet in the last stitch, secure with a chain, cut thread. Row 14 with color L Join with a slip knot and crochet a single crochet in the first stitch, *single crochet in back loop, double crochet in front loop of stitch 2 rows below* repeat until there are 2 stitches left, 1 single crochet in back loop, and 1 single crochet in the last stitch, secure with a chain, cut thread. Row 15 with color K Join with a slip knot and crochet a single crochet in the first stitch *double crochet in front loop of stitch 2 rows below, single crochet in back loop* repeat until there are 2 stitches left, 1 double crochet in front loop of stitch 2 rows below, and 1 single crochet in the last stitch, secure with a chain, cut thread. Row 16 with color J Join with a slip knot and crochet a single crochet in the first stitch, *single crochet in back loop, double crochet in front loop of stitch 2 rows below* repeat until there are 2 stitches left, 1 single crochet in back loop, and 1 single crochet in the last stitch, secure with a chain, cut thread. Row 17 with color I Join with a slip knot and crochet a single crochet in the first stitch *double crochet in front loop of stitch 2 rows below, single crochet in back loop* repeat until there are 2 stitches left, 1 double crochet in front loop of stitch 2 rows below, and 1 single crochet in the last stitch, secure with a chain, cut thread. Row 18 with color H Join with a slip knot and crochet a single crochet in the first stitch, *single crochet in back loop, double crochet in front loop of stitch 2 rows below* repeat until there are 2 stitches left, 1 single crochet in back loop, and 1 single crochet in the last stitch, secure with a chain, cut thread. Row 19 with color G Join with a slip knot and crochet a single crochet in the first stitch *double crochet in front loop of stitch 2 rows below, single crochet in back loop* repeat until there are 2 stitches left, 1 double crochet in front loop of stitch 2 rows below, and 1 single crochet in the last stitch, secure with a chain, cut thread. Row 20 with color F Join with a slip knot and crochet a single crochet in the first stitch, *single crochet in back loop, double crochet in front loop of stitch 2 rows below* repeat until there are 2 stitches left, 1 single crochet in back loop, and 1 single crochet in the last stitch, secure with a chain, cut thread. Row 21 with color E Join with a slip knot and crochet a single crochet in the first stitch, *single crochet in back loop, double crochet in front loop of stitch 2 rows below* repeat until there are 2 stitches left, 1 single crochet in back loop, and 1 single crochet in the last stitch, secure with a chain, cut thread. Row 22 with color D Join with a slip knot and crochet a single crochet in the first stitch *double crochet in front loop of stitch 2 rows below, single crochet in back loop* repeat until there are 2 stitches left, 1 double crochet in front loop of stitch 2 rows below, and 1 single crochet in the last stitch, secure with a chain, cut thread. Row 23 with color C Join with a slip knot and crochet a single crochet in the first stitch, *single crochet in back loop, double crochet in front loop of stitch 2 rows below* repeat until there are 2 stitches left, 1 single crochet in back loop, and 1 single crochet in the last stitch, secure with a chain, cut thread. Row 24 with color B Join with a slip knot and crochet a single crochet in the first stitch *double crochet in front loop of stitch 2 rows below, single crochet in back loop* repeat until there are 2 stitches left, 1 double crochet in front loop of stitch 2 rows below, and 1 single crochet in the last stitch, secure with a chain, cut thread. Row 25 with color A Join with a slip knot and crochet a single crochet in the first stitch, *single crochet in back loop, double crochet in front loop of stitch 2 rows below* repeat until there are 2 stitches left, 1 single crochet in back loop, and 1 single crochet in the last stitch, secure with a chain, cut thread. Center piece Row 26 with color A Join with a slipknot and crochet a single crochet in each stitch until end, secure with a chain, cut thread. Row 27 with color A Join with a slipknot and crochet a single crochet in the first stitch, *single crochet in back loop, single crochet through both loops* repeat until there are 2 stitches left, 1 single crochet in back loop, and 1 single crochet in the last stitch, secure with a chain, cut thread. Repeat rows 3 to 27 9 more times Except for the last repeat, do not crochet row 27. -------------------------------------------------- Met kleur A, haak 200 lossen Rij 1 Let op! haak deze rij in de ‘bump’ oftewel in de achterkant van de 2 lusjes, vaste in de 2e losse, 198 vasten, knip draad af Rij 2 Hecht aan met een opzetlus en haak een vaste in de eerste steek, 197 vasten in de achterste lus, 1 vaste in de laatste steek, hecht af met een losse, knip draad af. Rij 3 Hecht aan met een opzetlus en haal een vaste in de eerste steek, *stokje in voorste lus van de steek 2 rijen terug, vaste in achterste lus* herhaal dit tot er nog 2 steken over zijn, 1 stokje in de voorste lus van de steek 2 rijen terug, en 1 vaste in de laatste steek, hecht af met een losse, knip draad af. Rij 4 met kleur B Hecht aan met een opzetlus en haak een vaste in de eerste steek, *vaste in achterste lus, stokje in voorste lus van de steek 2 rijen terug* herhaal dit tot er nog 2 steken over zijn, 1 vaste in achterste lus, en 1 vaste in de laatste steek, hecht af met een losse, knip draad af. Rij 5 met kleur C Hecht aan met een opzetlus en haak een vaste in de eerste steek, *stokje in voorste lus van de steek 2 rijen terug, vaste in achterste lus* herhaal dit tot er nog 2 steken over zijn, 1 stokje in de voorste lus van de steek 2 rijen terug, en 1 vaste in de laatste steek, hecht af met een losse, knip draad af. Rij 6 met kleur D Hecht aan met een opzetlus en haak een vaste in de eerste steek, *vaste in achterste lus, stokje in voorste lus van de steek 2 rijen terug* herhaal dit tot er nog 2 steken over zijn, 1 vaste in achterste lus, en 1 vaste in de laatste steek, hecht af met een losse, knip draad af. Rij 7 met kleur E Hecht aan met een opzetlus en haak een vaste in de eerste steek, *stokje in voorste lus van de steek 2 rijen terug, vaste in achterste lus* herhaal dit tot er nog 2 steken over zijn, 1 stokje in de voorste lus van de steek 2 rijen terug, en 1 vaste in de laatste steek, hecht af met een losse, knip draad af. Rij 8 met kleur F Hecht aan met een opzetlus en haak een vaste in de eerste steek, *vaste in achterste lus, stokje in voorste lus van de steek 2 rijen terug* herhaal dit tot er nog 2 steken over zijn, 1 vaste in achterste lus, en 1 vaste in de laatste steek, hecht af met een losse, knip draad af. Rij 9 met kleur G Hecht aan met een opzetlus en haak een vaste in de eerste steek, *stokje in voorste lus van de steek 2 rijen terug, vaste in achterste lus* herhaal dit tot er nog 2 steken over zijn, 1 stokje in de voorste lus van de steek 2 rijen terug, en 1 vaste in de laatste steek, hecht af met een losse, knip draad af. Rij 10 met kleur H Hecht aan met een opzetlus en haak een vaste in de eerste steek, *vaste in achterste lus, stokje in voorste lus van de steek 2 rijen terug* herhaal dit tot er nog 2 steken over zijn, 1 vaste in achterste lus, en 1 vaste in de laatste steek, hecht af met een losse, knip draad af. Rij 11 met kleur I Hecht aan met een opzetlus en haak een vaste in de eerste steek, *stokje in voorste lus van de steek 2 rijen terug, vaste in achterste lus* herhaal dit tot er nog 2 steken over zijn, 1 stokje in de voorste lus van de steek 2 rijen terug, en 1 vaste in de laatste steek, hecht af met een losse, knip draad af. Rij 12 met kleur J Hecht aan met een opzetlus en haak een vaste in de eerste steek, *vaste in achterste lus, stokje in voorste lus van de steek 2 rijen terug* herhaal dit tot er nog 2 steken over zijn, 1 vaste in achterste lus, en 1 vaste in de laatste steek, hecht af met een losse, knip draad af. Rij 13 met kleur K Hecht aan met een opzetlus en haak een vaste in de eerste steek, *stokje in voorste lus van de steek 2 rijen terug, vaste in achterste lus* herhaal dit tot er nog 2 steken over zijn, 1 stokje in de voorste lus van de steek 2 rijen terug, en 1 vaste in de laatste steek, hecht af met een losse, knip draad af. Rij 14 met kleur L Hecht aan met een opzetlus en haak een vaste in de eerste steek, *vaste in achterste lus, stokje in voorste lus van de steek 2 rijen terug* herhaal dit tot er nog 2 steken over zijn, 1 vaste in achterste lus, en 1 vaste in de laatste steek, hecht af met een losse, knip draad af. Rij 15 met kleur K Hecht aan met een opzetlus en haak een vaste in de eerste steek, *stokje in voorste lus van de steek 2 rijen terug, vaste in achterste lus* herhaal dit tot er nog 2 steken over zijn, 1 stokje in de voorste lus van de steek 2 rijen terug, en 1 vaste in de laatste steek, hecht af met een losse, knip draad af. Rij 16 met kleur J Hecht aan met een opzetlus en haak een vaste in de eerste steek, *vaste in achterste lus, stokje in voorste lus van de steek 2 rijen terug* herhaal dit tot er nog 2 steken over zijn, 1 vaste in achterste lus, en 1 vaste in de laatste steek, hecht af met een losse, knip draad af. Rij 17 met kleur I Hecht aan met een opzetlus en haak een vaste in de eerste steek, *stokje in voorste lus van de steek 2 rijen terug, vaste in achterste lus* herhaal dit tot er nog 2 steken over zijn, 1 stokje in de voorste lus van de steek 2 rijen terug, en 1 vaste in de laatste steek, hecht af met een losse, knip draad af. Rij 18 met kleur H Hecht aan met een opzetlus en haak een vaste in de eerste steek, *vaste in achterste lus, stokje in voorste lus van de steek 2 rijen terug* herhaal dit tot er nog 2 steken over zijn, 1 vaste in achterste lus, en 1 vaste in de laatste steek, hecht af met een losse, knip draad af. Rij 19 met kleur G Hecht aan met een opzetlus en haak een vaste in de eerste steek, *stokje in voorste lus van de steek 2 rijen terug, vaste in achterste lus* herhaal dit tot er nog 2 steken over zijn, 1 stokje in de voorste lus van de steek 2 rijen terug, en 1 vaste in de laatste steek, hecht af met een losse, knip draad af. Rij 20 met kleur F Hecht aan met een opzetlus en haak een vaste in de eerste steek, *vaste in achterste lus, stokje in voorste lus van de steek 2 rijen terug* herhaal dit tot er nog 2 steken over zijn, 1 vaste in achterste lus, en 1 vaste in de laatste steek, hecht af met een losse, knip draad af. Rij 21 met kleur E Hecht aan met een opzetlus en haak een vaste in de eerste steek, *stokje in voorste lus van de steek 2 rijen terug, vaste in achterste lus* herhaal dit tot er nog 2 steken over zijn, 1 stokje in de voorste lus van de steek 2 rijen terug, en 1 vaste in de laatste steek, hecht af met een losse, knip draad af. Rij 22 met kleur D Hecht aan met een opzetlus en haak een vaste in de eerste steek, *vaste in achterste lus, stokje in voorste lus van de steek 2 rijen terug* herhaal dit tot er nog 2 steken over zijn, 1 vaste in achterste lus, en 1 vaste in de laatste steek, hecht af met een losse, knip draad af. Rij 23 met kleur C Hecht aan met een opzetlus en haak een vaste in de eerste steek, *stokje in voorste lus van de steek 2 rijen terug, vaste in achterste lus* herhaal dit tot er nog 2 steken over zijn, 1 stokje in de voorste lus van de steek 2 rijen terug, en 1 vaste in de laatste steek, hecht af met een losse, knip draad af. Rij 24 met kleur B Hecht aan met een opzetlus en haak een vaste in de eerste steek, *vaste in achterste lus, stokje in voorste lus van de steek 2 rijen terug* herhaal dit tot er nog 2 steken over zijn, 1 vaste in achterste lus, en 1 vaste in de laatste steek, hecht af met een losse, knip draad af. Rij 25 met kleur A Hecht aan met een opzetlus en haak een vaste in de eerste steek, *stokje in voorste lus van de steek 2 rijen terug, vaste in achterste lus* herhaal dit tot er nog 2 steken over zijn, 1 stokje in de voorste lus van de steek 2 rijen terug, en 1 vaste in de laatste steek, hecht af met een losse, knip draad af. Tussen stukje Rij 26 met kleur A Hecht aan met een opzetlus en haak een vaste in de eerste steek, vaste in elke steek tot eind, hecht af met een losse, knip draad af. Rij 27 met kleur A Hecht aan met een opzetlus en haak een vaste in de eerste steek, *vaste in achterste lus, vaste door beide lusjes* herhaal dit tot er nog 2 steken over zijn, 1 vaste in achterste lus, en 1 vaste in de laatste steek, hecht af met een losse, knip draad af. Herhaal rij 3 t/m 27 nog 9 keer muv de laatste herhaling, hierbij haak je rij 27 niet. 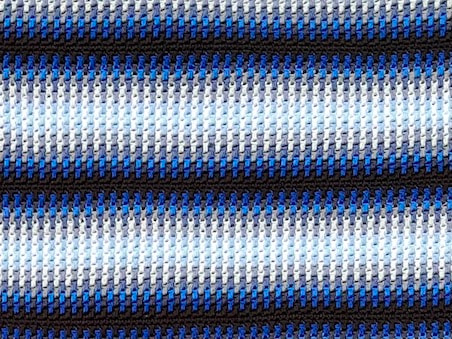 BorderWith crochet hook 3.0mm and color A Frontside is facing forward. Row 1A Attach yarn in the top right in the front loop, a few stitches out from the side. Crochet a double crochet in each stitch, in the last stitch crochet a double crochet, chain 2 and a double crochet. Turn your work a quarter turn. For the side you do not work in a stitch but you work around a row. You insert your needle into the gap between the last stick and the last solid. Do this until the end. Turn your work a quarter turn. Work in the front loop of the first single crochet, 1 double crochet, chain2 and 1 double crochet. Continue to crochet in each stitch a double crochet in the front loop. In the last stitch, again in the front loop, crochet a double crochet, chain2 and 1 double crochet. Turn your work a quarter turn. Also for this side you do not crochet in a stitch but you crochet around a row. Insert your needle into the gap between the first double crochet and the first single crochet. Repeat this until the end. Turn your work a quarter turn. In the front loop of the first single crochet, crochet 1 double crochet, chain2 and 1 double crochet. Continue crocheting in each stitch until you reach your first double crochet, close this row with a slip stitch on the first double crochet. Row 2A and 3A Crochet a double crochet in each double crochet. In the chain spaces (the corners) crochet 2 double crochet, chain2, 2 double crochet. Close the row with a slipstitch on the first double crochet. Cut yarn and tie off. Backside is facing forward. Row 1A Attach yarn in the top right in the front loop, a few stitches out from the side. Crochet a double crochet in each stitch, in the last stitch crochet a double crochet, chain 2 and a double crochet. Turn your work a quarter turn. For the side you do not work in a stitch but you work around a row. You insert your needle into the gap between the last stick and the last solid. Do this until the end. Turn your work a quarter turn. Work in the front loop of the first single crochet, 1 double crochet, chain2 and 1 double crochet. Continue to crochet in each stitch a double crochet in the front loop. In the last stitch, again in the front loop, crochet a double crochet, chain2 and 1 double crochet. Turn your work a quarter turn. Also for this side you do not crochet in a stitch but you crochet around a row. Insert your needle into the gap between the first double crochet and the first single crochet. Repeat this until the end. Turn your work a quarter turn. In the front loop of the first single crochet, crochet 1 double crochet, chain2 and 1 double crochet. Continue crocheting in each stitch until you reach your first double crochet, close this row with a slip stitch on the first double crochet. Row 2A and 3A Crochet a double crochet in each double crochet. In the chain spaces (the corners) crochet 2 double crochet, chain2, 2 double crochet. Close the row with a slipstitch on the first double crochet. Cut yarn and tie off. For the last row, we will attach the yarn to the right side. We will now close the double edge. Repeat row 2 With this difference: Crochet through 4 loops instead of 2. Finished! --------------------------------------- Met haaknaald 3.0mm en kleur A Voorkant voor. Rij 1A Hecht rechtsboven aan met een opzetlus in de voorste lus, een paar steken uit de kant. Haak in elke steek een stokje, in de laatste steek haak je een stokje, 2 lossen en een stokje. Draai je werk een kwartslag. Voor de zijkant haak je niet in een steek maar je haakt om een rij. Je maakt een omslag, steekt dus langs voor in, en om de rij heen en maak nu je stokje. Je steekt je naald in de opening tussen het laatste stokje en de laatste vaste. Dit doe je tot het eind. Draai je werk een kwartslag. Haak in de voorste lus van de eerste vaste 1 stokje, 2 losse en 1 stokje. Haak verder in elke steek een stokje in de voorste lus. In de laatste steek haak je weer in de voorste lus een stokje, 2 lossen en 1 stokje. Draai je werk een kwartslag. Ook voor deze zijkant haak je niet in een steek maar je haakt om een rij. Je maakt een omslag, steekt dus langs voor in, en om de rij heen en maak nu je stokje. Je steekt je naald in de opening tussen het eerste stokje en de eerste vaste. Dit doe je tot het eind. Draai je werk een kwartslag. Haak in de voorste lus van de eerste vaste 1 stokje, 2 losse en 1 stokje. Haak verder in elke steek tot je bij je eerste stokje komt, sluit deze rij met een halve vaste op het eerste stokje. Rij 2A en 3A Haak in elke stokje een stokje. In de lossenopeningen (de hoeken) haak je 2 stokjes, 2 lossen, 2 stokjes. Sluit de toer met een halve vaste op het eerste stokje. Knip garen af en hecht af. Achterkant voor Rij 1A Hecht rechtsboven aan met een opzetlus in de voorste lus, een paar steken uit de kant. Haak in elke steek een stokje, in de laatste steek haak je een stokje, 2 lossen en een stokje. Draai je werk een kwartslag. Ook deze zijkant haak je niet in een steek maar haakt je om een rij. Deze is nu makkelijk te vinden omdat er al eens omheen gehaakt is. Dit doe je tot het eind. Draai je werk een kwartslag. Haak in de voorste lus van de eerste vaste 1 stokje, 2 losse en 1 stokje. Haak verder in elke steek een stokje in de voorste lus. In de laatste steek haak je weer in de voorste lus een stokje, 2 lossen en 1 stokje. Draai je werk een kwartslag. Haak deze rij weer om de rijen heen ipv in een steek. Dit doe je tot het eind. Draai je werk een kwartslag. Haak in de voorste lus van de eerste vaste 1 stokje, 2 losse en 1 stokje. Haak verder in elke steek tot je bij je eerste stokje komt, sluit deze rij met een halve vaste op het eerste stokje. Rij 2A en 3A Haak in elke stokje een stokje. In de lossenopeningen (de hoeken) haak je 2 stokjes, 2 lossen, 2 stokjes. Sluit de toer met een halve vaste op het eerste stokje. Knip garen af en hecht af. Voor de laatste rij hechten we aan aan de goede kant. We gaan de dubbele rand nu sluiten. Herhaal rij 2 Met dit verschil: Haak door 4 lusjes ipv door 2. Klaar! 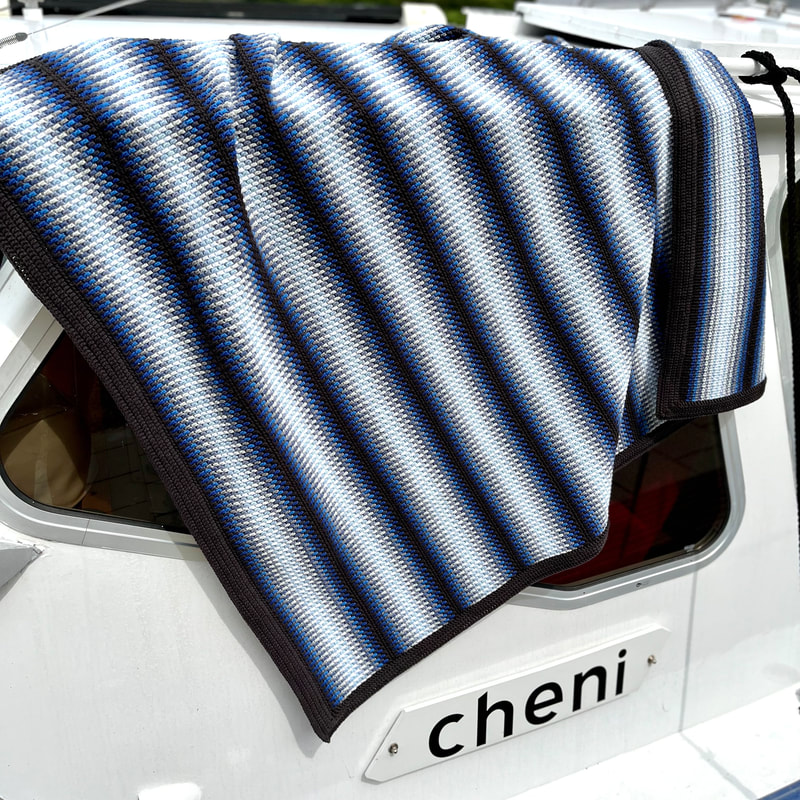
1 Comment
|

Ravelry

Wanneer je via onderstaande link je garen besteld gaat er een klein percentage naar mij zonder dat het jou een cent extra kost. Op deze manier kan ik mijn patronen gratis blijven aanbieden.
Dank je! 
|