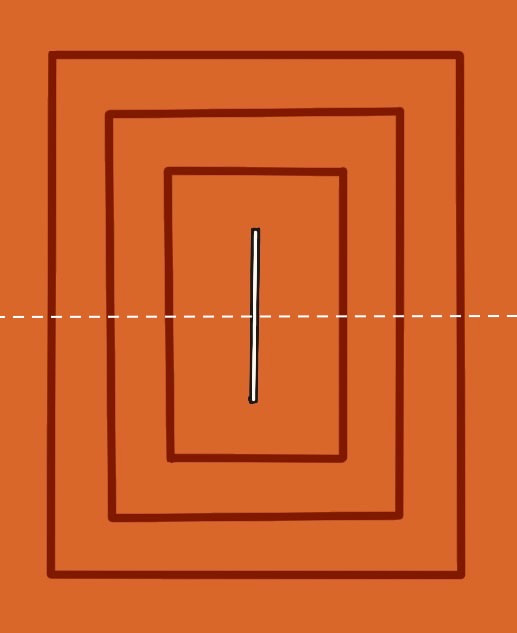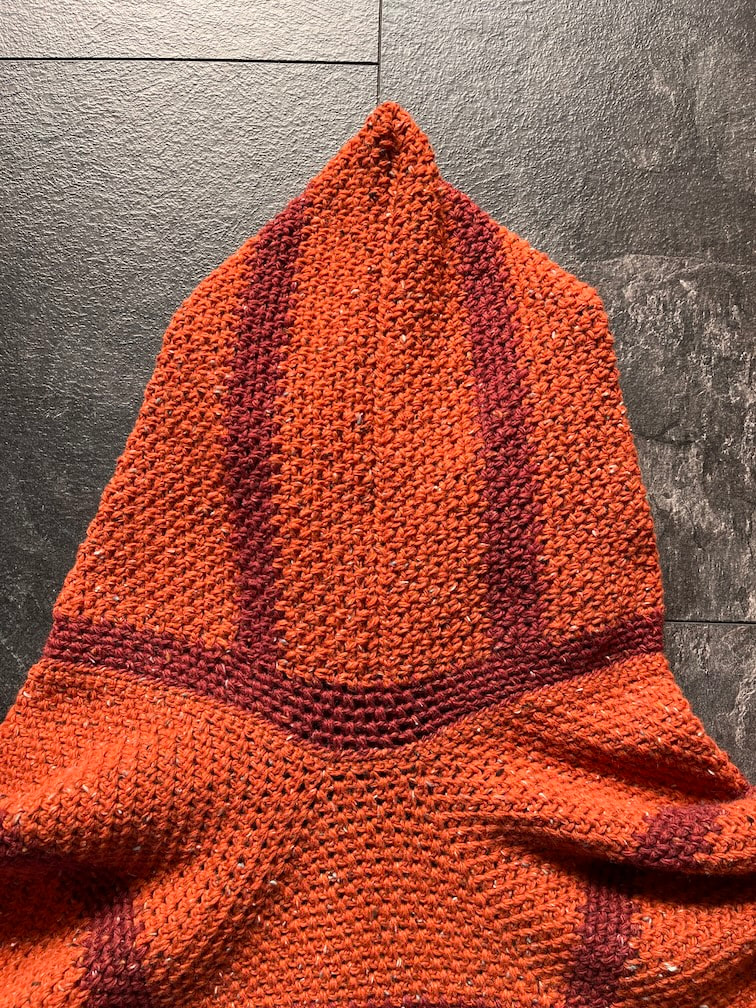
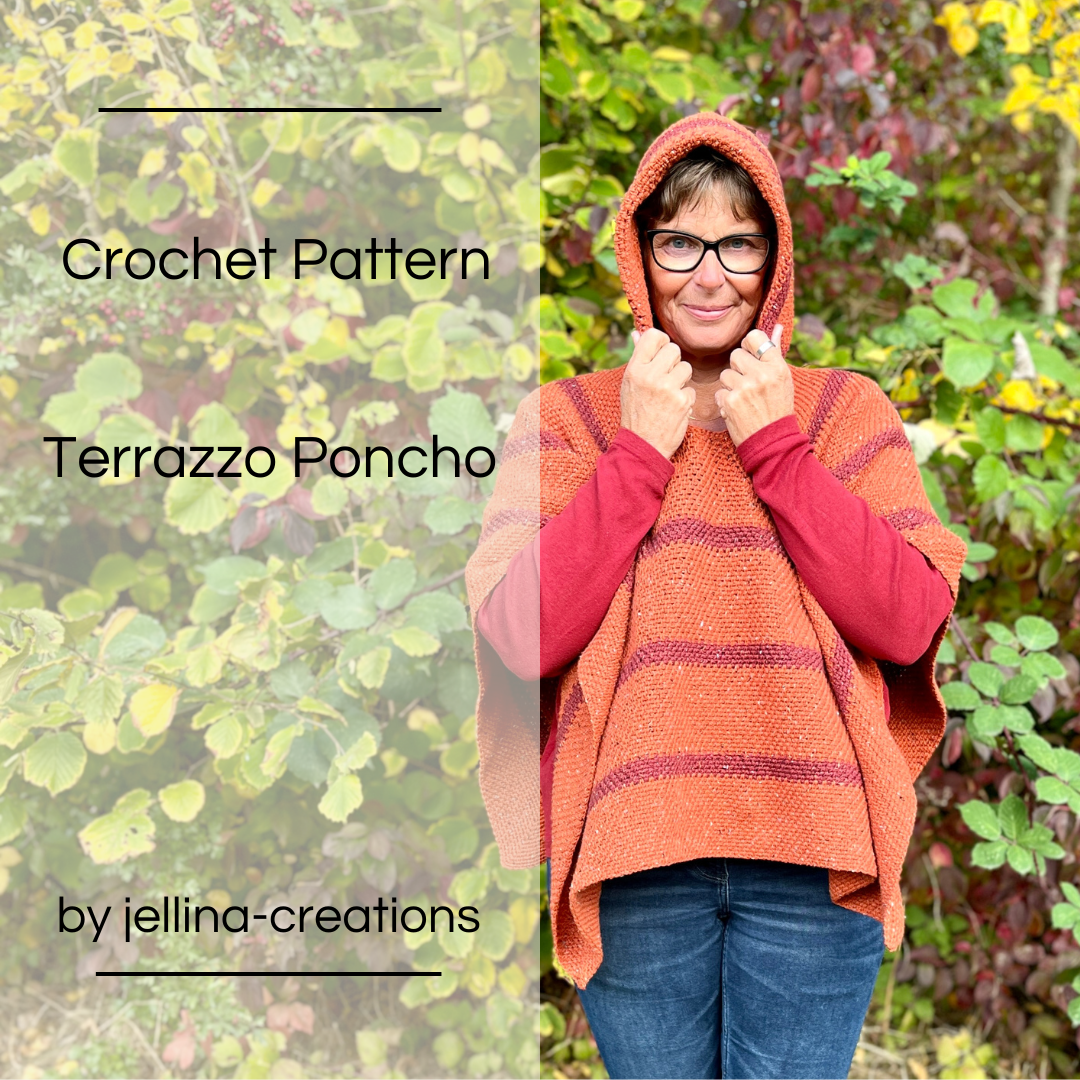
 Buy your yarn local or online at Caro's AtelierMaterials Yarn: Scheepjes Terrazzo (70% recycled Mulling Free Wool, 30% Recycled Viscose. 9x Mogano 716 3x Espresso 717 Crochet Hook: 4.5mm en 5.0mm Measurements after blocking: width 83cm and height 131cm Weight: 490 gram Gauge/Tension: 20 sts and 20 rows to measure 10 x 10cm over linnen stitch using 5.0mm crochet hook abbreviations sc single crochet ch chain ss slip stitch st stitch ---------------------------------------------- Benodigdheden Garen: Scheepjes Terrazzo (70% recycled Mulling Free Wool, 30% Recycled Viscose. 9x Mogano 716 3x Espresso 717 Haaknaald: 4.5mm en 5.0mm Afmetingen na het blocken: 131cm lang en 83cm breed Gewicht: 490 gram Steken verhouding: 20 steken en 20 toeren meten 10 x 10 cm Gebruikte steken v vaste l losse hv halve vaste st steek . Pattern notes This poncho consists of one large rectangular piece with an opening for your head. We start at the opening with a chain row and crochet from there in the round, increasing at the corners. To prevent distortion of the rectangle, we regularly change the direction of the crochet stitches. This change is done simultaneously with the color change, where color A is the right side, and color B is the wrong side. For this poncho, we use the linen stitch, a smooth but dense stitch that alternates between a single crochet and a chain, and you crochet the single crochets into the chain space of the previous row. The hood is crocheted separately and later sewn onto the poncho. --------------------------------------------- Notities Deze poncho bestaat uit 1 grote rechthoekige lap met een opening voor je hoofd. We beginnen bij de opening met een lossen rij en haken vanuit daar in het rond waarbij we meerderen bij de hoeken. Om vervorming van de rechthoek te voorkomen draaien we regelmatig de haak richting. Die wisseling doen we gelijk aan de kleurwisseling, waarbij kleur A de goede kant is en kleur B de achterkant. We gebruiken voor deze poncho de linnensteek, een soepele maar toch dichte steek waarbij een vaste en losse wordt afgewisseld en je de vasten steeds in de lossen-opening van de vorige toer haakt. De capuchon wordt apart gehaakt en later aan de poncho genaaid. PatternWith color A and a 4.5mm crochet hook, Chain 133 . Round 1 (right side) 1 single crochet in the 2nd chain from the crochet hook, 131 single crochets, close with a slip stitch to the first single crochet. From here on, continue with a 5.0mm crochet hook. Round 2 (right side) (ch1, 1sc, ch2, 1sc), Repeat 28x *ch1, skip 1 st, 1sc* for the long side, end this row with 1ch stitch. In the next corner (1sc, ch2, 1sc) Repeat 3x *ch1, 1sc* for the short side, end this row with 1ch stitch. In the next corner (1sc, ch2, 1sc) Repeat 28x *ch1, skip 1 st, 1sc* for the long side, end this row with 1 ch stitch. In the next corner (1sc, ch2, 1sc) Repeat 3x *ch1, skip 1 st, 1sc* for the short side, end this row with 1 ch stitch. Close this round with a ss in the first st. Round 3 to 18 (right side) Go to the next ch stitch with a ss In each ch-space, 1sc, skip 1 st, ch1. In each 2-chain space, which are the corners (1sc, ch2, 1sc). Finish with a ss in the first st, and cut the yarn. Round 19 with color B (wrong side) Attach color B with a sc in a random chain space. sc in each ch-space, skip 1 st, ch1. In each 2-chain space, which are the corners (1sc, ch2, 1sc). Finish with a ss in the first st. Rounds 20 to 23 (wrong side) Go with a ss to the next chain space. sc in each ch- space, skip 1 st, ch1. In each 2-chain space, which are the corners (1sc, ch2, 1sc). Finish with a ss in the first st and cut the yarn. Round 24 with color A (right side) Attach color A with a sc in a random chain space. sc in each ch-space, skip 1 st, ch1. In each 2-chain space, which are the corners (1sc, ch2, 1sc). Finish with a ss in the first st. Rounds 25 to 34 (right side) Go with a ss to the next chain space. sc in each ch-space, skip 1 st, ch1. In each 2-chain space, which are the corners (1sc, ch2, 1sc). Finish with a ss in the first st and cut the yarn. Repeat rounds 19 to 34 two more times. ------------------------------------------- Met kleur A en haaknaald 4.5mm 133 lossen Toer 1 (goede kant) 1 vaste in 2e losse van haaknaald, 131 vasten, sluit op de eerste vaste. Ga vanaf hier verder met 5.0mm haaknaald Toer 2 (goede kant) (1 losse, 1 vaste, 2 lossen, 1 vasten), Herhaal 28x *1 losse, 1 steek overslaan, 1 vaste* voor de lange kant, eindig met 1 losse. Haak in de volgende hoek (1vaste, 2 losse, 1 vaste) Herhaal 3x *1 losse, 1 vaste* voor de korte kant, eindig met 1 losse. Haak in de volgende hoek (1 vaste, 2 losse, 1 vaste) Herhaal 28x * 1 losse, 1 steek overslaan, 1 vaste* voor de lange kant, eindig met 1 losse. Haak in de volgende hoek (1vaste, 2 losse, 1 vaste) Herhaal 3x * 1 losse, 1 steek overslaan, 1 vaste* voor de korte kant, eindig met 1 losse. Sluit met een halve vaste op de eerste steek. Toer 3 t/m 18 (goede kant) Ga met een halve vaste naar de volgende lossen-opening Haak in elke lossen opening een vaste, sla 1 steek over, haak 1 losse. Haak in elke 2-lossen opening, dus op de hoeken (1 vaste, 2 lossen, 1 vaste) Sluit met een halve vaste op de eerste steek, en knip draad af. Toer 19 met kleur B (achterkant) Hecht kleur B aan in een lossen opening met een vaste. Haak vervolgens in elke lossen opening een vaste, sla 1 steek over, haak 1 losse. Haak in elke 2-lossen opening, dus op de hoeken (1 vaste, 2 lossen, 1 vaste) Sluit met een halve vaste op de eerste steek. Toer 20 t/m 23 (achterkant) Ga met een halve vaste naar de volgende lossen-opening. Haak in elke lossen opening een vaste, sla 1 steek over, haak 1 losse. Haak in elke 2-lossen opening, dus op de hoeken (1 vaste, 2 lossen, 1 vaste) Sluit met een halve vaste op de eerste steek en knip draad af. Toer 24 met kleur A (goede kant) Hecht kleur A aan in een lossen opening met een vaste. Haak vervolgens in elke lossen opening een vaste, sla 1 steek over, haak 1 losse. Haak in elke 2-lossen opening, dus op de hoeken (1 vaste, 2 lossen, 1 vaste) Sluit met een halve vaste op de eerste steek. Toer 25 t/m 34 (goede kant) Ga met een halve vaste naar de volgende lossen-opening. Haak in elke lossen opening een vaste, sla 1 steek over, haak 1 losse. Haak in elke 2-lossen opening, dus op de hoeken (1 vaste, 2 lossen, 1 vaste) Sluit met een halve vaste op de eerste steek en knip draad af. Herhaal toer 19 t/m 34 nog 2x 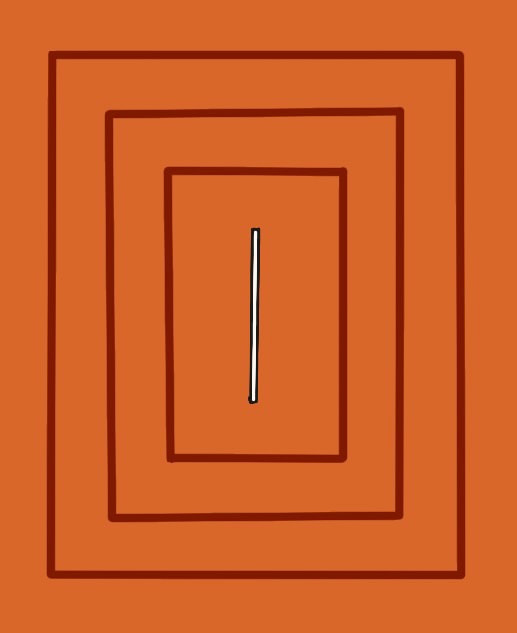 Hood Start with color A and a 4.5mm crochet hook. Chain 122. Row 1 sc in the 4th ch from the hook, *ch1, skip 1st, 1sc* Repeat between the ** to the end, turn your work. Row 2 Ch2, *1sc in the chain space from the previous round, ch1, skip 1st* Repeat between the ** to the end, 1sc in the last chain space, turn your work. Row 3 to 20 Repeat Row 2 and cut off color A. Row 21 to 25 with color B Attach color B where you cut off color A. Repeat Row 2 five times, and cut off color B. Row 26 to 45 with color A Attach color A where you cut off color B. Repeat Row 2 twenty times, and cut off color A. Row 46 to 50 with color B Attach color B where you cut off color A. Repeat Row 2 five times, and cut off color B. Row 51 to 60 with color A Attach color A where you cut off color B. Repeat Row 2 ten times and cut color A at 50 centimeters to shape the hood. ------------------------------------------------- Capuchon Start met kleur A en haak naald 4.5 Haak 122 lossen. Toer 1 1 vaste in de 4e losse van de haaknaald, *1 losse, 1 steek overslaan, 1 vaste* Herhaal tussen de ** tot het eind, keer je werk. Toer 2 2 lossen, * 1 vaste in de lossen-opening van de vorige toer, 1 losse, 1 steek overslaan* Herhaal tussen de ** tot het eind, haak in de laatste lossen-opening een vaste, keer je werk. Toer 3 t/m 20 Herhaal toer 2 en knip kleur A af. Toer 21 t/m 25 met kleur B Hecht kleur B aan, an de kant waar je kleur A heb afgeknipt. Herhaal 5x toer 2 en knip kleur B af. Toer 26 t/m 45 met kleur A Hecht kleur A aan, an de kant waar je kleur B heb afgeknipt. Herhaal 20x toer 2 en knip kleur A af. Toer 46 t/m 50 met kleur B Hecht kleur B aan, an de kant waar je kleur A heb afgeknipt. Herhaal 5x toer 2 en knip kleur B af. Toer 51 t/m 60 met kleur A Hecht kleur A aan, an de kant waar je kleur B heb afgeknipt. Herhaal 10x toer 2 en knip kleur A op 50 centimeter af zodat je hiermee de capuchon kunt vormen. shape the hood Fold the hood so that you can sew the sections where you've crocheted only 10 rows with color A together. Do this as follows (also see the image below): Hold the piece in front of you with the stripes horizontally, with the bottom (the 10 rounds) at the top and the top (the 20 rounds) at the bottom. Fold the piece vertically (see fold line) and sew the top closed (connecting A to A) using the yarn you left after Round 60. Use a whipstitch for this. --------------------------------------------------- capuchon vormen Vouw de capuchon zo dat je de gedeeltes waarbij je ‘maar’ 10 toeren hebt gehaakt met kleur A aan elkaar kunt naaien. Doe dit als volgt (zie ook afbeelding) Houd de lap voor je met de strepen horizontaal, onderkant (de 10 toeren) aan de bovenzijde en bovenkant (de 20 toeren) onder. Vouw de lap verticaal (zie vouwlijn) en naai de bovenkant dicht (verbind A met A) mbv het draad wat je hebt overgelaten na toer 60. Doe dit met de overhandse steek. 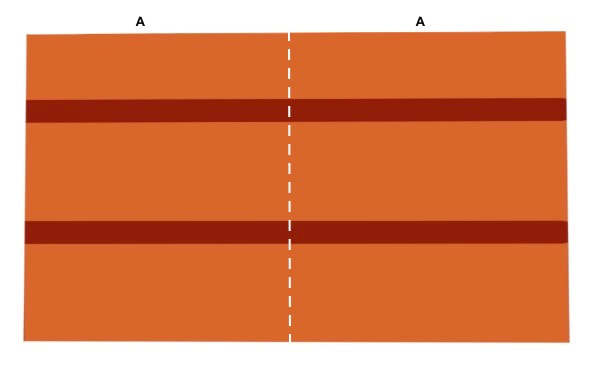 Folding line Finishing Attach color B with a single crochet in a chain space, placement doesn't matter. We will now crochet an edging of 5 rows around the hood, so *sc in each chain space, ch1, skip 1 st.* In the 2 corners: (1sc, ch2, 1sc). And close each round with a ss in the first st. For the next round, move with a ss to the next chain space. Repeat this process 5 times. Your hood now looks like the image below. --------------------------------------- Afwerking Hecht kleur B aan in een lossen opening met een vaste. plaats maakt niet uit. We gaan nu rondom de capuchon nog een stook van 5 rijen haken, dus *in elke lossen opening een vasten, 1 losse, 1 steek overslaan* In de 2 hoeken haak je (1 vaste, 2 lossen, 1 vaste) En je sluit elke toer met een halve vaste op de eerste steek. Voor de volgende volgende toer ga je met een halve vaste naar de volgende lossen opening. Dit doe je 5x in. Je capuchon ziet er nu uit zoals de afbeelding hiernaast. 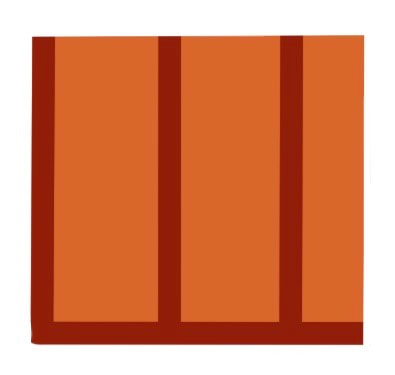 Assembling Before sewing the hood to the poncho, I recommend washing the poncho with Eucalan and blocking it. I personally did this after completing the project, and as a result, I had to come up with a way to keep the hood elevated to aid in drying. I primarily blocked the length of the poncho because I was satisfied with the width. For sewing, we will use the whipstitch and color A yarn. Start by folding the poncho in half. Place the hood in such a way that the sewn section, the seam in the middle, aligns with the back of the poncho (see photo), and the two sides end at the shoulders of the poncho. This leaves the 7 stitches on the front free. I found it helpful to initially secure the hood with stitch markers. The stitches align fairly well, allowing for a one-to-one sewing, but using markers helps you see if any improvisation is needed. This is not a problem, but if necessary, distribute it evenly over the entire length so that it's hardly noticeable. Now, you can weave in all the loose ends and enjoy your poncho! ------------------------------------------------ In elkaar zetten Voor we de capuchon aan de poncho gaan naaien adviseer ik om de poncho eerst te wassen met eucelan en te blocken. Ikzelf deed dit pas na afloop en hierdoor moest ik een constructie verzinnen om de capuchon hoog te houden om het drogen te vergemakkelijken… Ik blokte vooral de lengte van de poncho, omdat ik tevreden was over de breedte. Voor het aan elkaar naaien gebruiken we weer de overhandse steek en kleur A garen. Vouw als eerste de poncho dubbel. Plaats de capuchon zo dat de aan elkaar genaaide deel, dus de naad in het midden aan de achterkant van de poncho valt (zie foto) En de 2 zijkanten eindigen op de schouder van de poncho. De 7 steken van de voorkant blijven dus vrij. Ikzelf vond het makkelijk om de capuchon eerste met steken markeerders vast te zetten. De steken komen redelijk overeen zodat je 1 op 1 kunt naaien, maar zo kun je zien of je misschien iets moet improviseren. Dit is ook geen probleem, maar verdeel het dan mooi over de gehele lengte zodat dit nauwelijks opvalt. Nu kun je alle draadjes wegwerken en genieten van jou poncho!!
0 Opmerkingen
Laat een antwoord achter. |

Ravelry

Wanneer je via onderstaande link je garen besteld gaat er een klein percentage naar mij zonder dat het jou een cent extra kost. Op deze manier kan ik mijn patronen gratis blijven aanbieden.
Dank je! 
|